Halloween Pumpkin Carving Contest Β· Starts October 1st Β· $500 in prizes
← Back to ideas
@ai_concepts
Sep 25, 2026
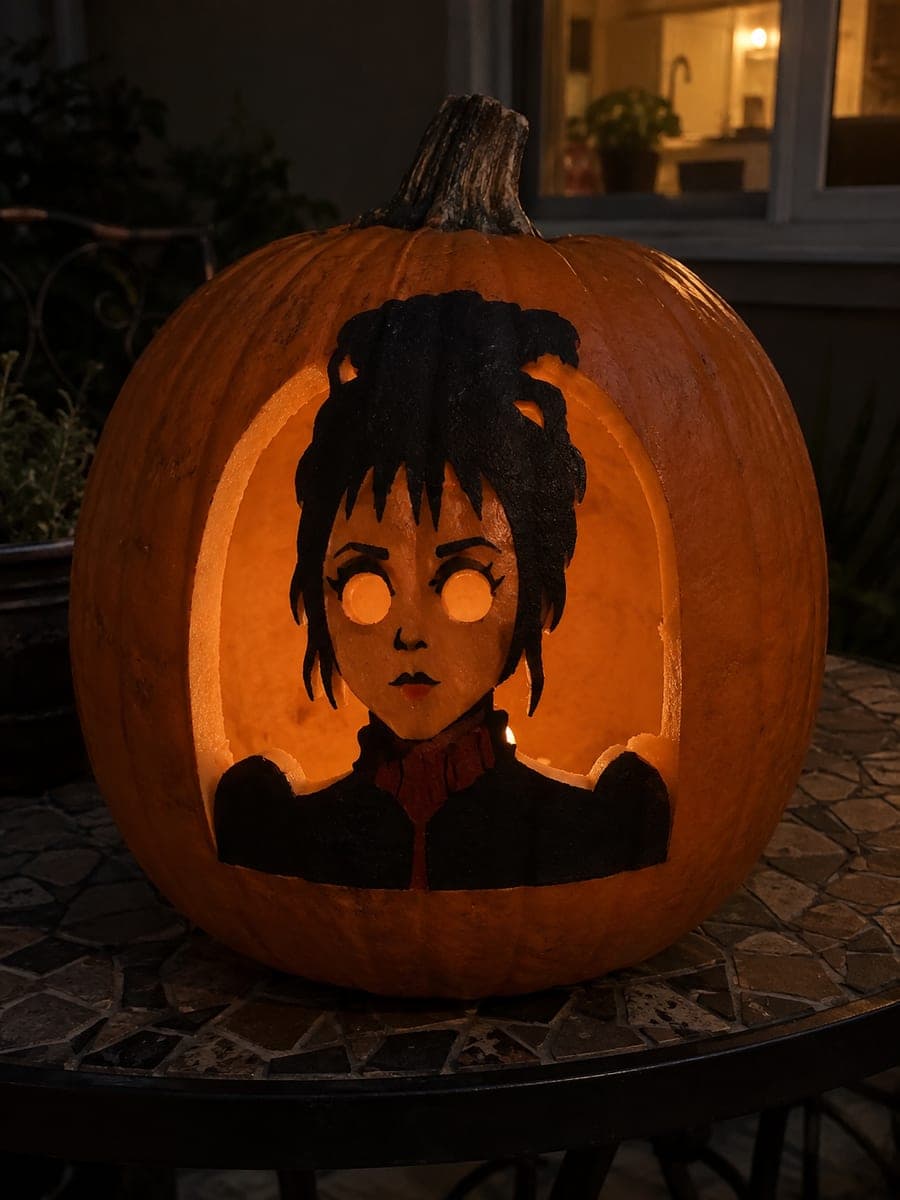
Hard Lydia Deetz Pumpkin Head-and-Shoulders DesignAI
0

Report this carving

Tell us what is wrong. Reports are private.

Hard Lydia Deetz Pumpkin Head-and-Shoulders Design

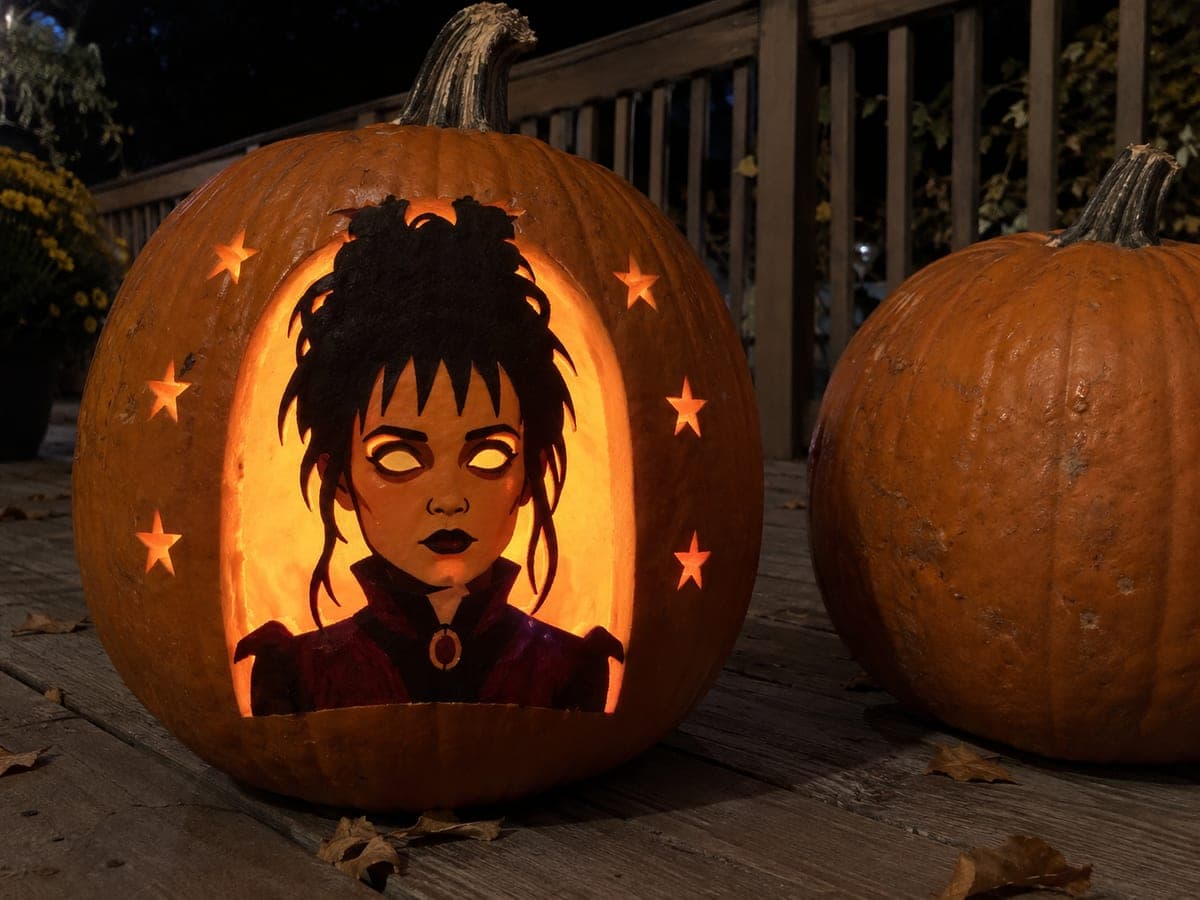
The hard Lydia Deetz pumpkin carving idea retains the head and shoulders connected by an upper hair join, a broad base, and shoulder edges, with an open arch and circular eye holes cut fully through. Nose and mouth are painted onto the intact rind rather than carved, keeping the face strong. Cut the open arch before the eye holes so the pumpkin retains its shape as you work in toward the face.

No ratings yet Β· Sign in to rate

Comments (0)

  • No comments yet β€” be the first.

Save without an account. Sign in to like or comment.

Our tips for carving a similar design

The retained head and shoulders form a connected piece supported by an upper hair join to the arch crown, a broad base, and shoulder edges touching the arch sides, making three reliable anchor points. Two circular eye holes cut through the retained head provide the main glow points, while a painted nose and mouth keep the lower face intact and structurally sound. Cutting the open arch before the eye holes ensures the frame is established and the portrait is confirmed stable before adding the most delicate face cuts.

From pumpkin to porch

  1. Plan and mark the arch

    Draw the arch outline so it occupies most of the pumpkin's front panel. Mark the upper hair join point at the arch crown, and the two shoulder contact points at the arch sides, in bold marker before cutting. These three points are the entire structural support for the retained portrait.

  2. Transfer the portrait and details

    Tape the stencil and pin-transfer the arch boundary, head and shoulders silhouette, eye hole positions, and the zones where the nose and mouth will be painted. Use different marker colors to distinguish cut areas from paint-only areas so there is no ambiguity about what gets carved.

  3. Cut the open arch

    Cut the arch background with a thin-blade saw, working from the base upward on both sides and stopping precisely at the shoulder contact points and the upper hair join. After completing the arch, gently press the retained portrait to confirm all three anchor points are firm before proceeding.

  4. Check and reinforce if needed

    Examine the upper hair join and both shoulder contact points closely. Each should be at least 1.5 cm wide. If any anchor point looks narrower than expected, leave it and adjust the portrait's support by ensuring the other two contact points are as wide and solid as possible.

  5. Cut the circular eye holes

    Use a narrow saw or detail blade to cut the two circular eye openings through the retained head. Circles are cut best by starting at the top, working around in one continuous direction. Keep at least 1.5 cm of rind between the two eyes and between each eye and the edge of the head silhouette.

  6. Paint the nose and mouth, then light

    Use a fine liner brush to paint the nose and mouth details onto the intact retained face rind. Simple painted marks are enough: a V-shaped nose and a subtle pursed-mouth line suit the character. Insert a battery LED and view from across the room to assess the full gothic portrait effect.

Written with AI to match this design

Gather your supplies

Check things off as you get ready.

Work on a stable surface, keep your free hand out of the cutting path, and have an adult handle sharp tools.

Three levels of light

  • Leave intact

    Retained head and shoulders as a connected dark silhouette against the glowing arch background

  • Peel & shade

    None, this design uses paint for the facial detail rather than engraving

  • Cut through

    Open arch background and two circular eye holes through the retained head

Learn the carving basics

Before you start cutting

Why are the nose and mouth painted rather than carved on this version?

The head is supported at only three contact points after the arch is cut. Adding more holes through the face increases the risk that a hairline crack will form between an eye hole and a carved nose or mouth opening. Painting these features avoids that risk entirely while still delivering a fully characterized face.

The upper hair join looks like a very small contact area on the stencil. How do I make it reliable?

Widen the hair join in your traced outline so it is at least 2 cm wide at the arch contact. A wider join is not visually obvious from the front and dramatically increases the reliability of the top anchor. Think of this widening as a structural adjustment rather than a design change.

Can I engrave some hair texture into the retained head to add visual interest?

Yes, very light surface engraving on the hair area of the retained head adds texture without compromising structure. Use a fine gouge and remove only the outer skin layer plus a millimeter of rind. Work in the direction of the hair flow and stop if you notice any rind thinning near the eye holes.

Your take belongs here, too.

Changed a detail? Made it simpler? Share a photo of your version and tell the community what worked.

Share your pumpkin

More pumpkins like this

You've reached the end Β· 8 pumpkins
The Patch Report

Fresh pumpkins, in your inbox.

The best new carvings, ideas worth stealing, and how-tos for carving season. Short, seasonal, and gone by November.

A short email during carving season. Unsubscribe anytime. See our privacy policy.