Halloween Pumpkin Carving Contest · Starts October 1st · $500 in prizes
← Back to ideas
@ai_concepts
Sep 25, 2026
Easy Lydia Deetz Pumpkin With Black UpdoAI
0

Report this carving

Tell us what is wrong. Reports are private.

Easy Lydia Deetz Pumpkin With Black Updo

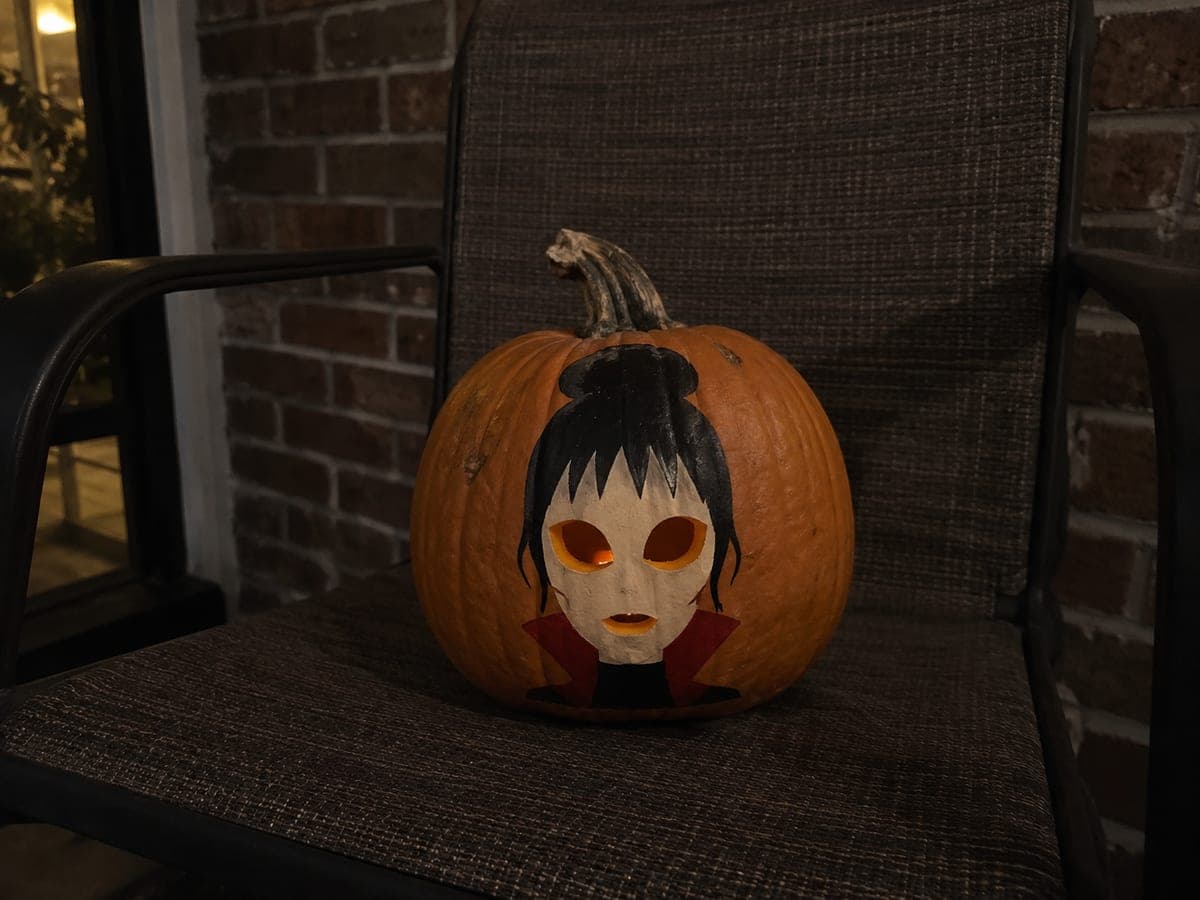
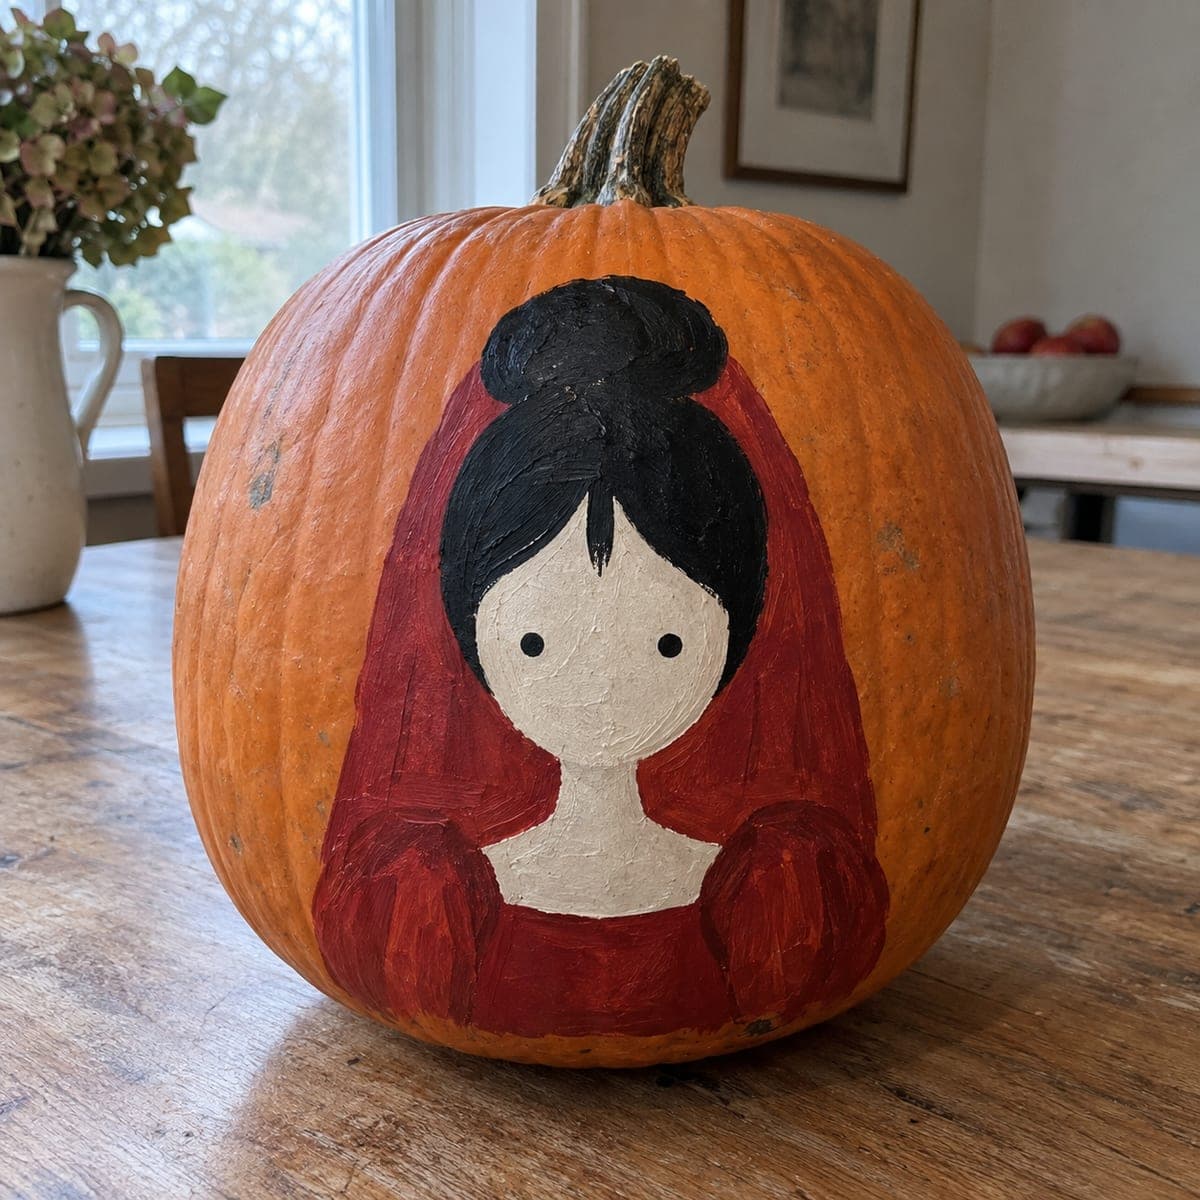
This easy Lydia Deetz pumpkin carving idea cuts two almond eye openings and one short mouth hole through a simple cream-painted face, leaving the black painted bangs, updo, and red collar entirely on intact rind. Paint the cream face oval before cutting so the openings sit precisely within it. A warm candle glow through the almond eyes gives this pumpkin carving idea its moody gothic atmosphere.

No ratings yet · Sign in to rate
Comments (0)

  • No comments yet — be the first.

Save without an account. Sign in to like or comment.

Our tips for carving a similar design

Two almond eye openings and one short mouth hole are the only cuts in this design, while painted black bangs, a dramatic updo, and a red collar create the character's full look on intact rind. Painting the cream face oval before cutting ensures both openings sit precisely within the painted face and that the almond shapes land in the right position relative to the character's eyes. A warm candle glow through the almond eyes creates the moody gothic atmosphere the character calls for.

From pumpkin to porch

  1. Prep and paint the face oval

    Clean and gut the pumpkin. Use a wide flat brush to paint a cream oval in the center of the front face. Let this dry fully. The cream oval is the guide for all subsequent steps: the eye holes should sit within it, the black hair should surround it, and the red collar should sit just below it.

  2. Paint the hair and collar

    Paint the black updo and hanging bangs around and above the cream face oval. Add the red collar detail below the oval. Let these layers dry completely before cutting, as you will be gripping the pumpkin near these areas while sawing and you do not want wet paint on your hands.

  3. Mark the eye openings

    Use a marker to draw two almond shapes within the cream face oval, positioned in the upper half of the oval where eyes would naturally sit. The almond shape has a pointed inner corner and a slightly broader outer curve. Verify they are symmetrical and equal in size before cutting.

  4. Cut the almond eyes

    Use a thin-blade saw to cut each almond eye hole. Start at the widest mid-section of the almond and work toward each pointed tip with short back-and-forth strokes at the ends. Keep at least 1.5 cm of cream-painted rind between the two eye holes and between each eye hole and the edge of the cream oval.

  5. Cut the mouth opening

    Mark and cut a short, slightly curved mouth hole in the lower third of the cream oval. This is a small opening: just wide enough to let some glow out without dominating the design. The moody atmosphere of the character calls for understatement in the mouth more than a wide grin.

  6. Light and display

    Place a warm-white candle or LED inside and view in a darkened room. The warm glow through the almond eyes against the black hair and cream face gives the design its distinctive gothic quality. Display in a spot where the painted hair is visible but in shadow, so the glowing eyes are the focal point.

Written with AI to match this design

Gather your supplies

Check things off as you get ready.

Work on a stable surface, keep your free hand out of the cutting path, and have an adult handle sharp tools.

Three levels of light

  • Leave intact

    Painted black hair mass and red collar area, plus all cream-painted rind between the three openings

  • Peel & shade

    None required for this design

  • Cut through

    Two almond eye holes and one short mouth opening cut fully through

Learn the carving basics

Before you start cutting

How do I get the almond eye shape to look sharp and pointed at the inner corner?

Approach each inner-corner tip by making short, very shallow strokes with the tip of the blade rather than forcing the full saw teeth through. The inner corner is the narrowest part of the cut and requires the most patience. A freshly sharpened or brand-new blade makes the biggest difference in getting clean pointed tips.

My cream paint is showing through as slightly orange where the pumpkin rind is very orange. How do I fix it?

Apply a thin white coat first, let it dry, and then add the cream color on top. The white undercoat neutralizes the orange rind influence and lets the cream read as intended. Two thin coats over white give better coverage than one thick coat and dry more evenly.

Can I add more facial features like a nose or eyebrows in paint?

Yes, subtle painted eyebrows and a simple nose line fit the character well. Keep them understated: a faint arched brow and a minimal nose bridge line in a slightly darker shade of the face color. Over-detailing the face shifts attention from the glowing almond eyes, which are the design's strongest feature.

Your take belongs here, too.

Changed a detail? Made it simpler? Share a photo of your version and tell the community what worked.

Share your pumpkin

More pumpkins like this

You've reached the end · 8 pumpkins
The Patch Report

Fresh pumpkins, in your inbox.

The best new carvings, ideas worth stealing, and how-tos for carving season. Short, seasonal, and gone by November.

A short email during carving season. Unsubscribe anytime. See our privacy policy.