Halloween Pumpkin Carving Contest · Starts October 1st · $500 in prizes
← Back to ideas
@ai_concepts
Sep 25, 2026
Painted Jason Voorhees Pumpkin No-Carve MaskAI
0

Report this carving

Tell us what is wrong. Reports are private.

Painted Jason Voorhees Pumpkin No-Carve Mask

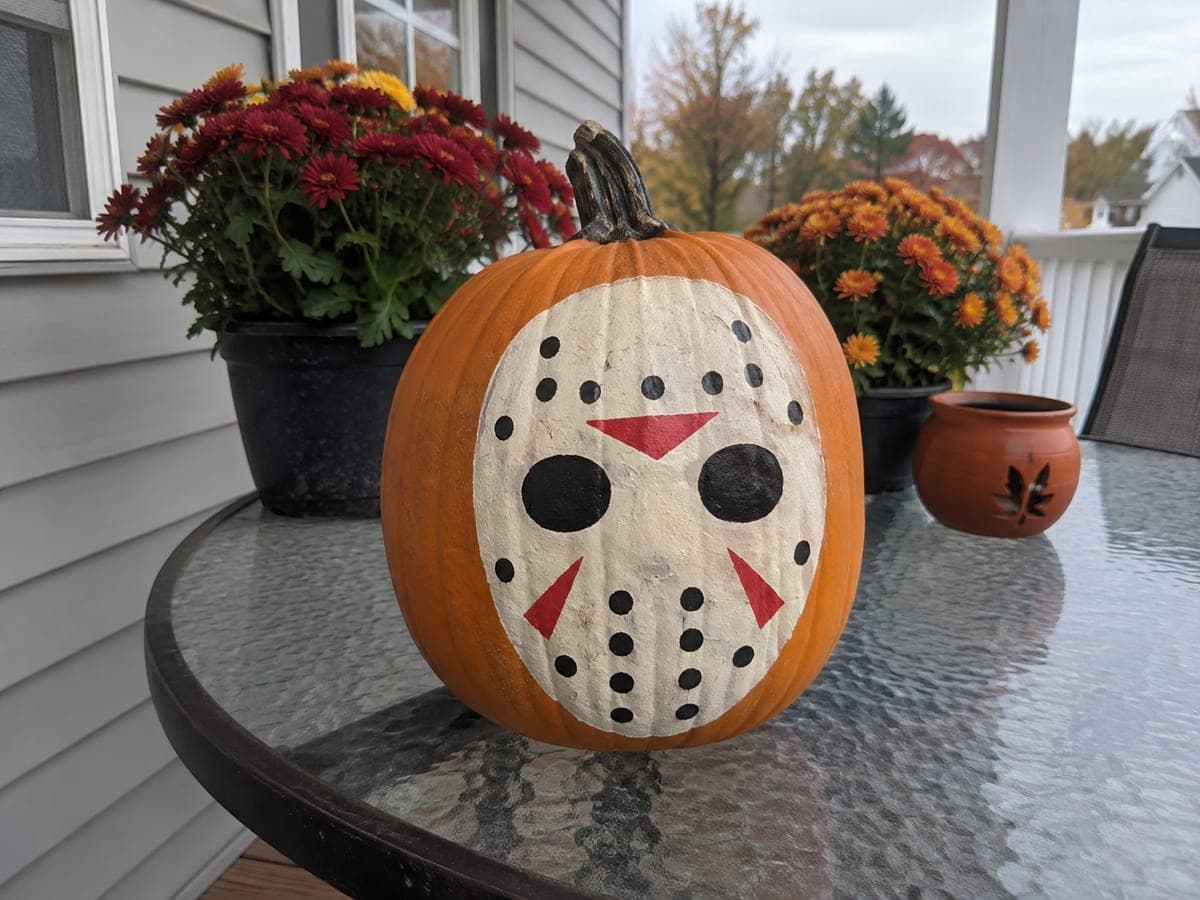
A cream oval, black eye dots and vent holes, and red forehead and cheek slash marks paint a simple but effective Jason Voorhees hockey mask on an uncut pumpkin in this no-carve jason voorhees pumpkin carving idea. Block in the cream mask shape first with two coats for full coverage, then use a flat brush and red paint to place the forehead triangle and cheek stripes. Finish with a fine liner brush in black for the eye sockets and vent holes, keeping each shape small and controlled. A matte sealant spray keeps the red marks from running if displayed outdoors.

No ratings yet · Sign in to rate

Comments (0)

  • No comments yet — be the first.

Save without an account. Sign in to like or comment.

Our tips for carving a similar design

A cream oval, black eye and vent dots, and red forehead triangle and cheek marks painted in flat acrylics recreate the hockey mask look on an uncut pumpkin. Every mark uses a different brush type, cream uses a flat, red uses a flat, and the small dots and outlines use a fine liner, so the design naturally organizes itself by brush size.

From pumpkin to porch

  1. Clean and prime the surface

    Wipe the pumpkin clean and buff the front face with rubbing alcohol. Apply a coat of white gesso over the mask area and let it cure for 30 minutes. The white base keeps the cream paint from reading orange against the pumpkin rind.

  2. Paint the cream mask oval

    Using a medium flat brush, paint the oval mask shape in cream or off-white with two coats. Let the first coat dry fully before adding the second. The oval should occupy roughly the center two-thirds of the pumpkin face.

  3. Add the red forehead triangle and cheek marks

    Mix or use a bright red acrylic. With a medium flat brush, paint the inverted triangle mark on the forehead of the mask as a solid shape. Then paint the two cheek stripe marks as simple rectangular shapes on either side of the mask center. Let the red dry fully.

  4. Add the fine black eye and vent dots

    Load a fine liner brush with black paint. Paint the two eye socket shapes as elongated narrow ovals. Then paint the vent holes as evenly spaced small dots or tiny ovals arranged in horizontal rows below the eye line. Keep each dot consistent in size.

  5. Add a thin oval border

    Using the fine liner brush and black paint, trace a thin oval outline around the entire mask shape to define its edge. Keep the line thin and consistent. This border gives the mask a structured, prop-like quality.

  6. Seal and display

    Let all paint dry for at least two hours, then apply two coats of matte sealer spray. Matte sealer keeps the red marks from running in light rain and prevents the cream from yellowing. Display with a cool or neutral porch light for the best mask effect.

Written with AI to match this design

Gather your supplies

Check things off as you get ready.

Work on a stable surface, keep your free hand out of the cutting path, and have an adult handle sharp tools.

Three levels of light

  • Leave intact

    The full pumpkin rind is intact beneath the painted surface.

  • Peel & shade

    None. The shell remains completely uncut.

  • Cut through

    None. Use an external porch or display light for nighttime presentation.

Learn the carving basics

Before you start cutting

How do I keep the red marks from bleeding into the cream while it is still wet?

Make sure the cream base coat is completely dry before adding any red. If you are working in a humid environment, let the cream dry for a full hour rather than the minimum. Apply red in a single confident pass per mark rather than multiple overlapping strokes, which push wet paint into the cream layer beneath.

The vent dots are hard to keep consistent in size. Any tips?

Use a round-tipped stylus or the eraser end of a new pencil dipped in paint for consistent dots. Mark all dot positions lightly with a chalk pencil first, spacing them with a ruler, before pressing the dots. This eliminates the inconsistency of brush-painted dots significantly.

Does the hockey mask design need the specific red marks or can I simplify it?

The red forehead triangle and cheek marks are what immediately identify the design as the hockey mask rather than a generic sports mask. Without them, the cream oval reads as a featureless oval. If you want a simpler version, include at least the forehead triangle. The cheek marks can be reduced to one mark per side if painting both feels complex.

Your take belongs here, too.

Changed a detail? Made it simpler? Share a photo of your version and tell the community what worked.

Share your pumpkin

More pumpkins like this

You've reached the end · 8 pumpkins
The Patch Report

Fresh pumpkins, in your inbox.

The best new carvings, ideas worth stealing, and how-tos for carving season. Short, seasonal, and gone by November.

A short email during carving season. Unsubscribe anytime. See our privacy policy.