Halloween Pumpkin Carving Contest · Starts October 1st · $500 in prizes
← Back to ideas
@ai_concepts
Sep 25, 2026
Painted Chucky Doll No-Carve PumpkinAI
0

Report this carving

Tell us what is wrong. Reports are private.

Painted Chucky Doll No-Carve Pumpkin

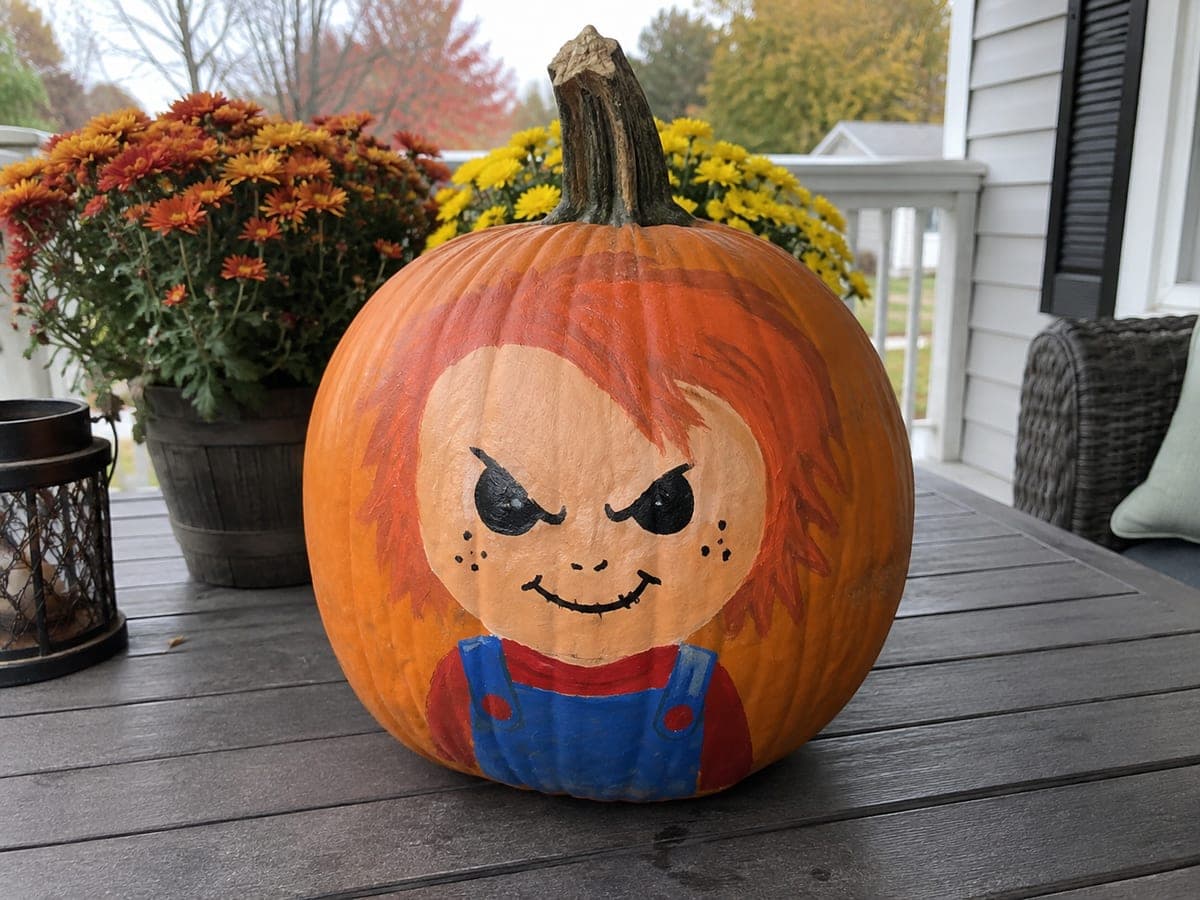
A flat peach face, bright orange hair, black eyes and freckles, a simple grin, and a blue overall bib with a red collar recreate Chucky on an uncut pumpkin in this no-carve chucky pumpkin carving idea. Apply the peach face base first, followed by the orange hair cap, then add the black facial features with a fine liner brush once the base layers are fully dry. The overall bib is most effective when painted as a simple blue rectangle at the bottom of the pumpkin with the red collar strip across the top edge.

No ratings yet · Sign in to rate

Comments (0)

  • No comments yet — be the first.

Save without an account. Sign in to like or comment.

Our tips for carving a similar design

This no-carve Chucky design uses flat acrylic layers to build the doll's face from the skin color up: peach base, then orange hair cap, black facial details, and finally the blue overall bib with its red collar strip at the bottom. The key is letting each layer cure fully before adding the next so colors stay crisp and do not bleed into each other. The result is a bright, eye-catching display that families and younger carvers can tackle together.

From pumpkin to porch

  1. Clean and prep the surface

    Wipe the pumpkin with a damp cloth and let it dry completely for 30 minutes. If the rind has a waxy sheen, wipe it with a little rubbing alcohol on a cotton pad to improve paint adhesion. A smooth, clean surface means the peach base coat will cover in two thin coats rather than four.

  2. Sketch the layout

    Use a soft pencil to sketch the face zone in the center, the hair cap above it, and the overall bib rectangle at the bottom with the collar line at its top edge. Mark the eye and freckle positions lightly. These guide lines will disappear under paint.

  3. Apply the face and hair base coats

    Brush flat peach or light flesh-tone paint across the face zone and let it cure at least 20 minutes. Then paint the orange hair cap over the upper section in two coats, blending the hair boundary into a natural curved hairline. Do not paint over the face zone with the orange.

  4. Paint the overalls and collar

    Mix a clean bright blue and paint a simple bib rectangle across the lower quarter of the pumpkin. Once dry, add a narrow red strip across the top edge of the bib to represent the collar. Two thin coats of each color give better results than one heavy coat.

  5. Add facial features and freckles

    Using a fine liner brush and black acrylic, paint two round or almond-shaped eyes, a small grinning mouth, and a cluster of freckle dots on each cheek. Keep the eyes and mouth simple and slightly oversized so they read clearly from a distance. Chucky's freckles are bold, not subtle.

  6. Seal and display

    Apply two light coats of matte spray varnish once all paint is fully dry. Position the finished pumpkin at eye level so the face and overalls are visible together. A small outdoor spotlight aimed at the front face brings out all the colors after dark.

Written with AI to match this design

Gather your supplies

Check things off as you get ready.

Work on a stable surface, keep your free hand out of the cutting path, and have an adult handle sharp tools.

Three levels of light

  • Leave intact

    Natural orange rind on the back and unpainted sides

  • Peel & shade

    None, the shell stays completely intact

  • Cut through

    None. Use a front-facing porch light or small spotlight to illuminate the painted design after dark.

Learn the carving basics

Before you start cutting

How do I make Chucky's hair look orange without it looking pink?

Use a warm orange acrylic straight from the tube, such as cadmium orange or Halloween orange, rather than mixing red and yellow yourself. Mixing tends to shift warm or cool depending on the pigments. Apply two coats directly over the cured peach base and the orange will read clearly against the lighter face color.

Can I add Chucky's iconic scar line across the face?

Yes. Once the peach face coat is fully dry, use a very fine liner brush loaded with a slightly darker flesh tone or thin red-brown to paint a jagged horizontal line from cheek to cheek. Keep the line thin and uneven rather than a straight cut for a realistic scar effect.

How do I keep the bib boundary line sharp against the face paint?

Run a strip of painter's tape along the collar boundary before painting the blue bib, pressing the tape edge firmly against the pumpkin surface. Paint the bib up to and slightly over the tape, let it dry until tacky, then peel the tape away cleanly. The tape lift gives a sharper line than freehand painting.

Your take belongs here, too.

Changed a detail? Made it simpler? Share a photo of your version and tell the community what worked.

Share your pumpkin

More pumpkins like this

You've reached the end · 8 pumpkins
The Patch Report

Fresh pumpkins, in your inbox.

The best new carvings, ideas worth stealing, and how-tos for carving season. Short, seasonal, and gone by November.

A short email during carving season. Unsubscribe anytime. See our privacy policy.