Halloween Pumpkin Carving Contest · Starts October 1st · $500 in prizes
← Back to ideas
@ai_concepts
Sep 25, 2026
Hard Chucky Jack-O-Lantern With Freckles and HairAI
0

Report this carving

Tell us what is wrong. Reports are private.

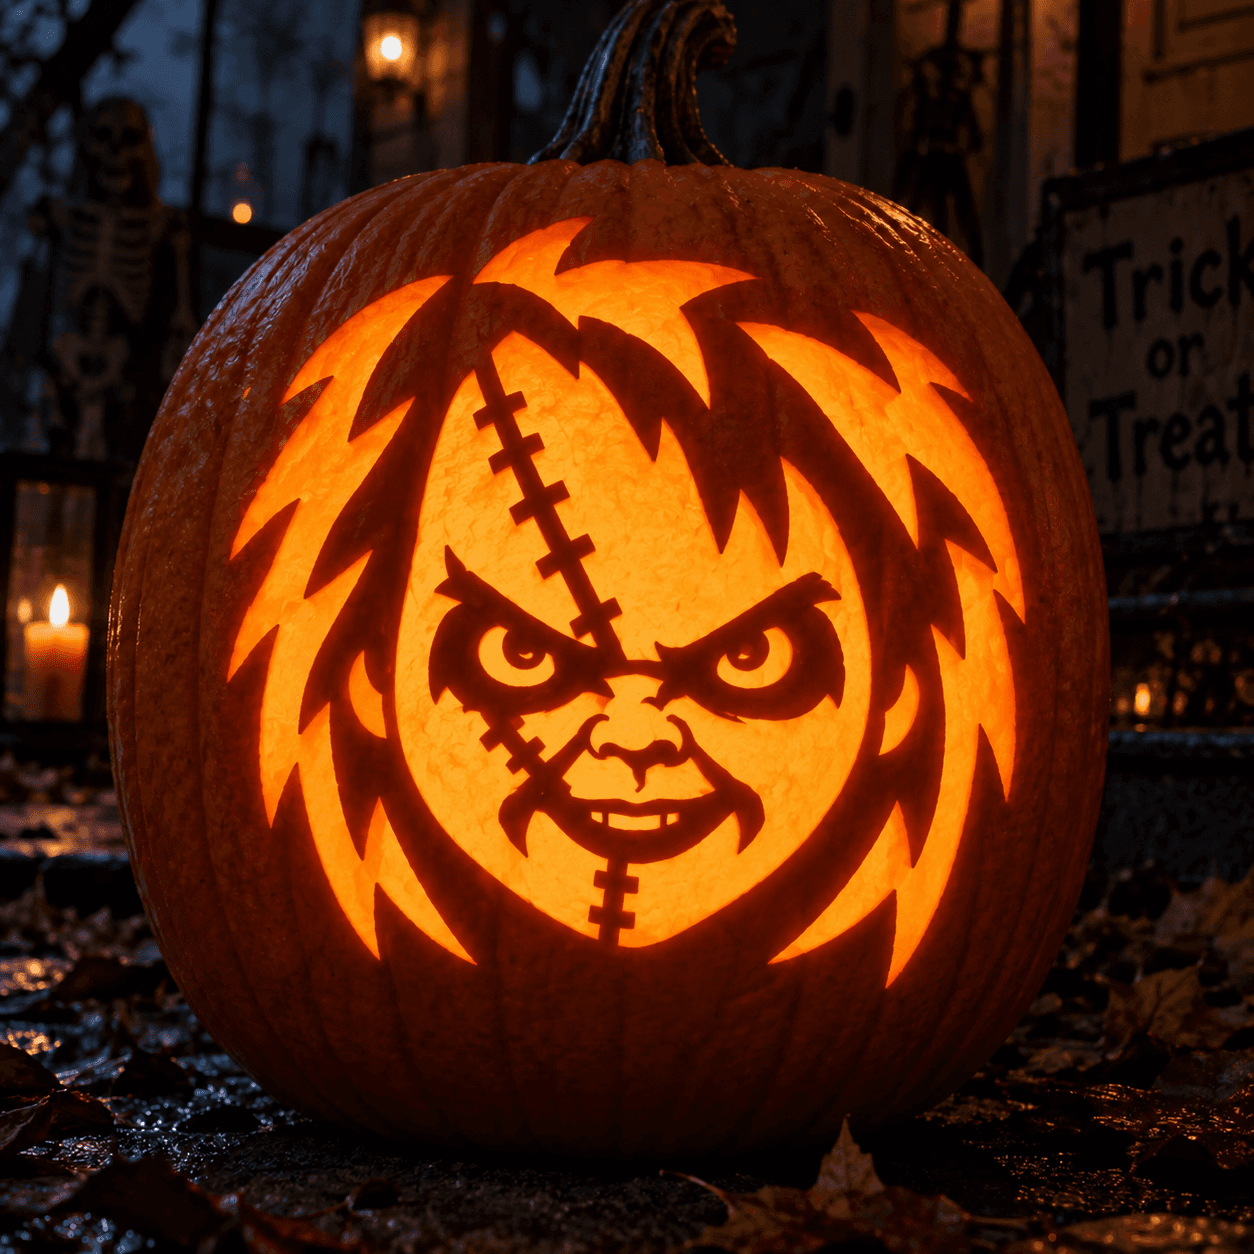
Hard Chucky Jack-O-Lantern With Freckles and Hair

The hard chucky pumpkin carving idea takes the doll portrait to a new level with more detailed shallow-backed scoring across the hair, freckles, facial contours, and overalls alongside the core hollow eye and grin openings. Short rooted teeth appear at this difficulty, adding structural complexity to the mouth area. Carve the teeth carefully with a thin blade, ensuring each is rooted to both the upper and lower lip, before removing any surrounding grin material. Warm amber backlighting reveals the full depth range of the backed detail work.

No ratings yet · Sign in to rate

Comments (0)

  • No comments yet — be the first.

Save without an account. Sign in to like or comment.

Our tips for carving a similar design

The hard-level Chucky design introduces short rooted teeth in the grin opening, which adds structural complexity to the mouth area and requires careful planning before any saw touches the rind. Alongside the teeth, richer shallow-backed scoring across the hair, freckles, facial contours, and overall straps creates a portrait with real surface depth. The broad connected facial rind remains the structural backbone, so the scoring work is safer than it looks as long as the hollow sections are cut first.

From pumpkin to porch

  1. Hollow and check wall thickness

    Cut a back opening and hollow to a consistent 1 to 1.25 inches of wall on the entire front face. The teeth area needs enough wall thickness to support the roots without snapping. Use a skewer poked from the outside to measure wall depth before finalizing the hollow.

  2. Transfer and mark tooth roots

    Transfer the full design using a stylus, then mark each tooth's upper and lower root point with a permanent marker. Each tooth root should be at least as wide as the tooth is tall. Confirm these widths before cutting anything.

  3. Carve the eye apertures

    Cut both angry eye shapes with a thin detail saw, keeping cuts clean and removing eye pieces carefully. The nose bridge rind should feel solid and firmly attached on both sides after this step.

  4. Carve the grin with rooted teeth

    Cut the upper and lower lip lines first, staying outside the tooth root markers. Then cut the spaces between the teeth, working from the outer corners of the grin inward toward each tooth gap. Remove each grin segment in small pieces. Never pry or twist the saw when removing material adjacent to a tooth root.

  5. Score the hair, freckles, and overalls

    Use a fine V-gouge or ball-tip Dremel bit to carve the hair texture at the crown, freckle dots on the cheeks, and overall strap channels. Work the freckle dots last as they are the smallest element and the most prone to slipping. Keep all scoring to half the rind depth or less.

  6. Light and assess

    Place a warm amber LED and check that each tooth glows as a distinct lit strip between the dark root shadows. Adjust scoring depth on any freckles or straps that are not transmitting enough light. Display at eye level so the rooted teeth read clearly.

Written with AI to match this design

Gather your supplies

Check things off as you get ready.

Work on a stable surface, keep your free hand out of the cutting path, and have an adult handle sharp tools.

Three levels of light

  • Leave intact

    Forehead, nose bridge, outer cheeks, and tooth root strips, which stay dark and frame the lit elements

  • Peel & shade

    Hair grooves, freckle dots, cheek contour lines, and overall strap channels, glowing at mid-level amber

  • Cut through

    Hollow eye apertures and the grin opening including the gaps between rooted teeth, all blazing with full light

Learn the carving basics

Before you start cutting

How many teeth should Chucky have in the grin?

Three to five rooted upper teeth is a manageable range at hard difficulty. Fewer teeth means each one can be wider and more stable. More than five becomes expert territory where individual teeth get very narrow. Chucky's character look works best with a slightly uneven set of four chunky teeth.

One of my teeth cracked at the root after cutting. Can I save it?

If the tooth is still attached but cracked, apply a small amount of craft glue or wood glue to the crack and gently press it together. Hold with a chip clip for 15 minutes and let cure fully before touching it again. If it snapped free, glue it back in place with strong adhesive and avoid any pressure on that spot. Keep the crack away from direct LED heat.

Should I carve the teeth before or after the hollow grin opening?

Always establish the tooth root marks first, then cut the grin opening segments between the teeth. Cutting the outer grin line without first confirming root widths risks accidentally cutting a root too narrow before you can correct it. Work from the outside of the grin inward, finishing each gap between teeth before moving to the next.

Your take belongs here, too.

Changed a detail? Made it simpler? Share a photo of your version and tell the community what worked.

Share your pumpkin

More pumpkins like this

You've reached the end · 8 pumpkins
The Patch Report

Fresh pumpkins, in your inbox.

The best new carvings, ideas worth stealing, and how-tos for carving season. Short, seasonal, and gone by November.

A short email during carving season. Unsubscribe anytime. See our privacy policy.