Halloween Pumpkin Carving Contest · Starts October 1st · $500 in prizes
← Back to ideas
@ai_concepts
Sep 25, 2026
Freddy Krueger Open Grin Pumpkin Carving IdeaAI
0

Report this carving

Tell us what is wrong. Reports are private.

Freddy Krueger Open Grin Pumpkin Carving Idea

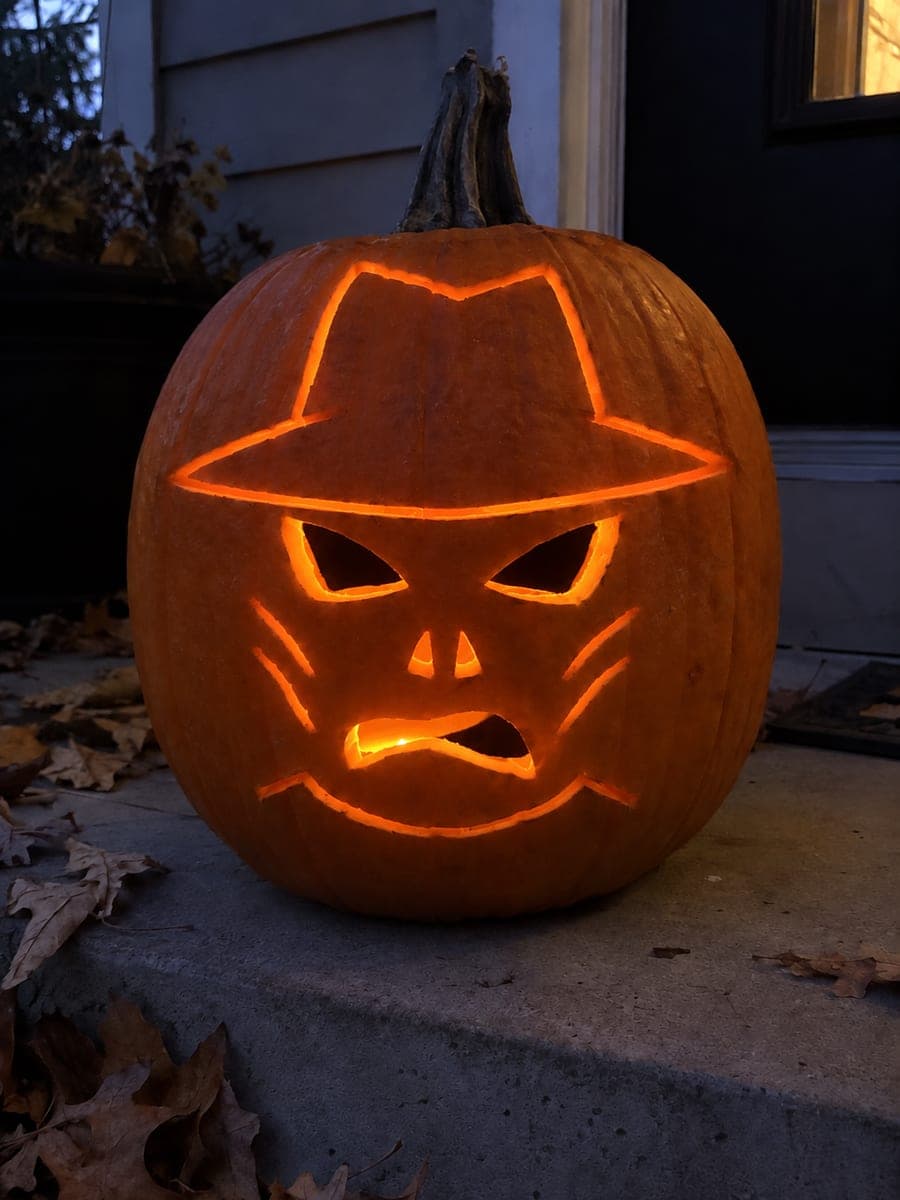
Hollow eyes, open nostrils, and a wide grin with two broad teeth rooted into the upper and lower lip define this intermediate freddy krueger pumpkin carving idea, backed by simple shallow-carved cheek texture, a hat, and a striped collar. The teeth must be rooted into both the upper and lower lip edges before removing the surrounding mouth area to keep them from snapping off. Score the hat and cheek accents before cutting the hollow sections, and use a narrow blade for the area between the two teeth. Warm candlelight from inside pours through the open grin for a fiendish glow.

No ratings yet · Sign in to rate

Comments (0)

  • No comments yet — be the first.

Save without an account. Sign in to like or comment.

Our tips for carving a similar design

Hollow eyes, open nostrils, and a wide grinning mouth with two broad teeth rooted into both lips form the light-producing core of this design. The teeth are the most structurally fragile elements and must be secured at top and bottom before the surrounding mouth area is removed. Shallow hat, cheek, and collar scoring provides the character framing.

From pumpkin to porch

  1. Gut and transfer with emphasis on tooth roots

    Clean the pumpkin and transfer the full design. Mark the tooth outlines and their root connections to both the upper and lower lips explicitly. At least three-quarters of an inch of rind must remain at each tooth root before cutting begins. Mark this safety zone with a wax pencil.

  2. Score the hat, cheek texture, and collar

    Score the fedora brim and hat crown lines, the cheek texture burns, and the collar stripes before cutting any hollow sections. This keeps the rind at full strength during scoring and establishes the full face composition before you commit to the apertures.

  3. Cut the eye openings

    Cut the two hollow eyes using a narrow detail blade. These are simple ovals and serve as the top reference point for proportioning the mouth below. Confirm the rind bridge between them is solid.

  4. Cut the nostril apertures

    Cut the two nostril shapes below the eyes using a narrow blade. Keep each one small and push the pieces through from inside. The nostrils provide a secondary accent light point between the eyes and mouth.

  5. Root the teeth and cut the grinning mouth

    This is the most critical step. Score the outline of both teeth firmly with a pin tool. Cut the sections of the mouth that are not teeth, working around each tooth on both sides and stopping at the tooth root connections top and bottom. Use a very narrow blade for the gap between the two teeth. Never sever a tooth root without completing both sides of the tooth first.

  6. Check roots and light with candlelight

    Gently flex each tooth to verify it is firmly rooted at both lip edges. Smooth all cut edges and apply petroleum jelly to the tooth roots. Place a warm candle inside so light pours through the grinning mouth and around both teeth. Display at a height where the grin is seen straight on for maximum effect.

Written with AI to match this design

Gather your supplies

Check things off as you get ready.

Work on a stable surface, keep your free hand out of the cutting path, and have an adult handle sharp tools.

Three levels of light

  • Leave intact

    The two retained teeth, broad facial rind, hat crown, and outer rind all remain dark solid rind.

  • Peel & shade

    Hat brim and crown lines, cheek burn texture, and collar stripe scoring glow as shallow-backed warm grooves.

  • Cut through

    Hollow eyes, nostril shapes, and the full mouth opening surrounding the two retained tooth shapes are cut through.

Learn the carving basics

Before you start cutting

How wide should the two tooth shapes be to survive the season?

Each tooth should be at least three-quarters of an inch wide at its base where it meets both lips. The body of each tooth can taper slightly toward the tip, but should not go below half an inch anywhere along its length. A slightly wider, blockier tooth looks more ominous and lasts significantly longer than a narrow pointed one.

How do I cut cleanly between the two teeth without snapping one?

Use the thinnest blade in your kit and make very short strokes in the gap between the teeth. Cut down from the top of the gap and up from the bottom of the gap separately, meeting in the middle rather than sawing through in one direction. If the gap is very narrow, consider making it slightly wider than the design specifies so you have room to maneuver the blade.

The cheek burn texture score lines are very close to the eye openings. How do I avoid nicking the eye edge?

Keep all scoring at least a quarter-inch away from any cut-through edge. If a burn line in the design runs closer than that to an eye opening, shorten that particular line so it stops at the quarter-inch boundary. The eye edges are the most vulnerable to cracking if scored material is removed too close to them.

Your take belongs here, too.

Changed a detail? Made it simpler? Share a photo of your version and tell the community what worked.

Share your pumpkin

More pumpkins like this

You've reached the end · 8 pumpkins
The Patch Report

Fresh pumpkins, in your inbox.

The best new carvings, ideas worth stealing, and how-tos for carving season. Short, seasonal, and gone by November.

A short email during carving season. Unsubscribe anytime. See our privacy policy.