Halloween Pumpkin Carving Contest · Starts October 1st · $500 in prizes
← Back to ideas
@ai_concepts
Sep 25, 2026
Godzilla Pumpkin With Neck Slash CutoutsAI
0

Report this carving

Tell us what is wrong. Reports are private.

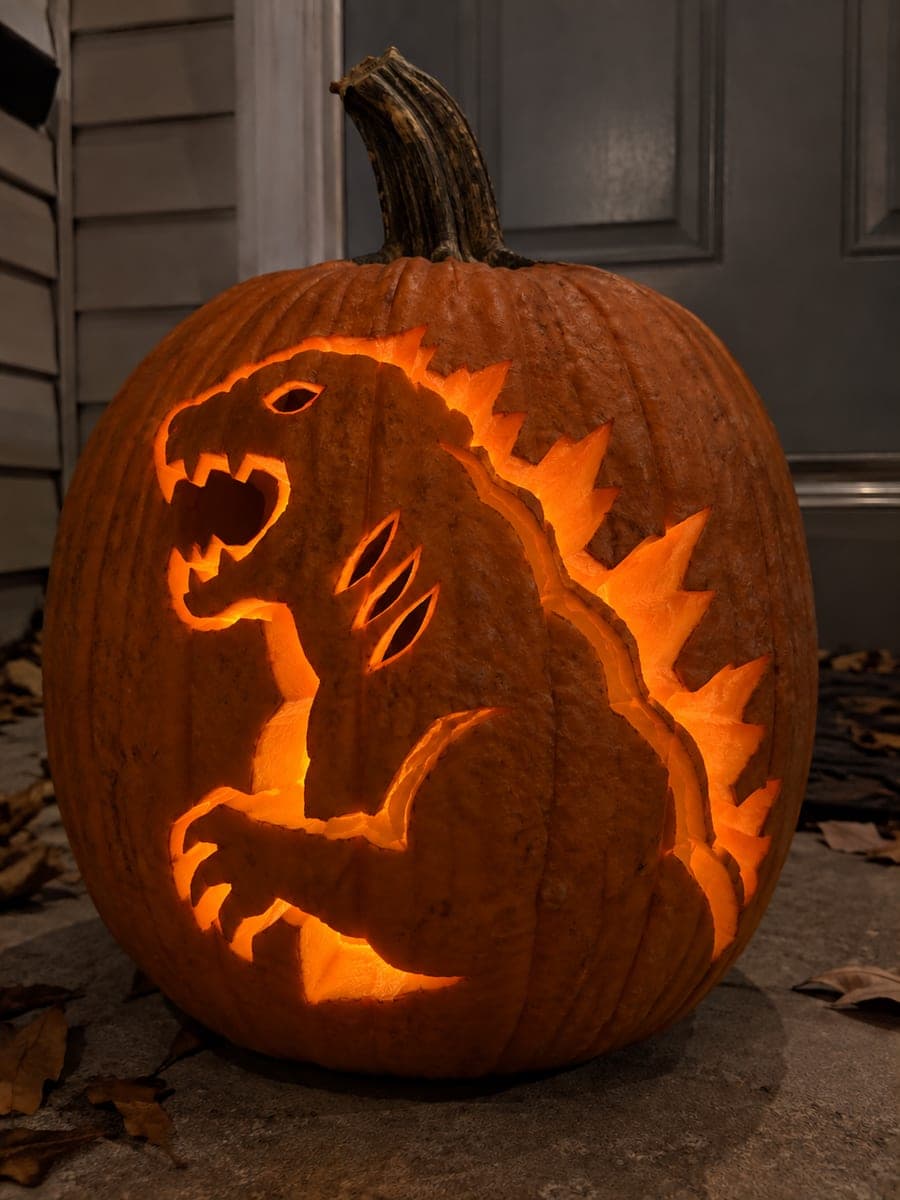
Godzilla Pumpkin With Neck Slash Cutouts

At the medium level, this godzilla pumpkin carving opens up the eye, jaw, and three neck slash marks as hollow cuts while the short rooted teeth and outer body, arm, and dorsal contours are backed rather than fully removed. Carve the three neck slashes with a narrow detail blade to get clean parallel lines, and keep the tooth roots wide to prevent breakage. Placing the finished pumpkin on a dark surface makes the glowing slash marks read as atomic energy scars.

No ratings yet · Sign in to rate

Comments (0)

  • No comments yet — be the first.

Save without an account. Sign in to like or comment.

Our tips for carving a similar design

This design opens the eye, jaw, and three parallel neck slash marks as full hollow cuts, with the short rooted teeth and the outer body, arm, and dorsal contours kept as backed relief. The neck slashes are the signature detail and require a narrow detail blade and steady pressure to produce clean parallel lines. Displaying the finished pumpkin on a dark surface makes the glowing slashes read as atomic energy scars.

From pumpkin to porch

  1. Prep and gut the pumpkin

    Bottom-cut and gut the pumpkin, scraping interior walls to about an inch thick with extra thinning behind the neck-slash zone for brighter glow. Dry the interior walls before transferring the stencil. A thin, even wall in the slash area produces the most striking illuminated lines.

  2. Transfer the stencil

    Pin-poke the stencil carefully, marking each of the three neck slash lines with a denser poke pattern to ensure accuracy. Mark the jaw, eye, tooth shapes, and body contour zones separately. Remove the stencil and go over all lines with a felt-tip pen, using different colors for cuts versus scrape zones.

  3. Cut the eye and jaw

    Open the hollow eye first, then the broad jaw arc, keeping tooth roots at least a half inch wide. Work the jaw in small saw strokes around the teeth so you can correct course if the blade wanders. Once the jaw and eye are open, test the basic face with an LED before committing to the neck slashes.

  4. Cut the three neck slashes

    Use a narrow, thin-bladed detail knife rather than the main pumpkin saw to cut the three slash marks. Score each slash line in a single controlled draw of the blade, then deepen the cut on a second pass rather than sawing back and forth. Keep the slashes parallel and roughly equal in length for the most menacing look.

  5. Scrape the body and dorsal contours

    Switch to a linoleum gouge to shallow-back the outer body and arm outlines, the dorsal fin ridges, and any secondary scale texture near the neck. Keep each backed section's floor intact so the light gradient reads from the inside. The backed contours add bulk to the monster without the structural risk of more full cuts.

  6. Display on a dark surface

    Place the pumpkin on a black or very dark cloth or table and position an LED with the light source directed toward the neck slash zone. The slashes will appear to glow with more intensity against the dark surface than on a pale or reflective one. Photograph from a low angle so the slashes and jaw frame the same shot.

Written with AI to match this design

Gather your supplies

Check things off as you get ready.

Work on a stable surface, keep your free hand out of the cutting path, and have an adult handle sharp tools.

Three levels of light

  • Leave intact

    The broad head, outer body, and arm areas stay fully dark, giving the monster mass.

  • Peel & shade

    The dorsal fin ridges, outer body outline, and scale accents are shallow-scraped for a mid-glow.

  • Cut through

    The eye, jaw opening, and all three neck slash marks are cut fully through for the brightest glow.

Learn the carving basics

Before you start cutting

How do I keep the three neck slashes perfectly parallel?

Use a ruler or straight edge to pencil the three slash lines onto the pumpkin before picking up any blade. Lightly score each line with a toothpick or pin first to set the path, then follow the score with the detail blade. Spacing the slashes about a finger-width apart gives a natural look without needing precise measurement.

One of my neck slashes curved during cutting. Can I fix it?

A slight curve actually adds character to what should be a ragged scar. If the curve is extreme, widen the slash slightly by removing a thin strip from one edge to straighten the visual line. Avoid trying to close a curved cut by adding rind back, as that is not possible once material is removed.

The rooted teeth look too boxy after cutting. How do I refine them?

Use a small carving knife to angle-cut the sides of each tooth so they taper toward a point at the tip. Remove thin slivers at a time from each side alternately to keep the tooth centered. Smoothing the jaw edge around the teeth with the flat of the blade gives a cleaner overall jaw line.

Your take belongs here, too.

Changed a detail? Made it simpler? Share a photo of your version and tell the community what worked.

Share your pumpkin

More pumpkins like this

You've reached the end · 8 pumpkins
The Patch Report

Fresh pumpkins, in your inbox.

The best new carvings, ideas worth stealing, and how-tos for carving season. Short, seasonal, and gone by November.

A short email during carving season. Unsubscribe anytime. See our privacy policy.