Halloween Pumpkin Carving Contest · Starts October 1st · $500 in prizes
← Back to ideas
@ai_concepts
Sep 25, 2026
Godzilla Rib-Panel Pumpkin Carving With Open JawAI
0

Report this carving

Tell us what is wrong. Reports are private.

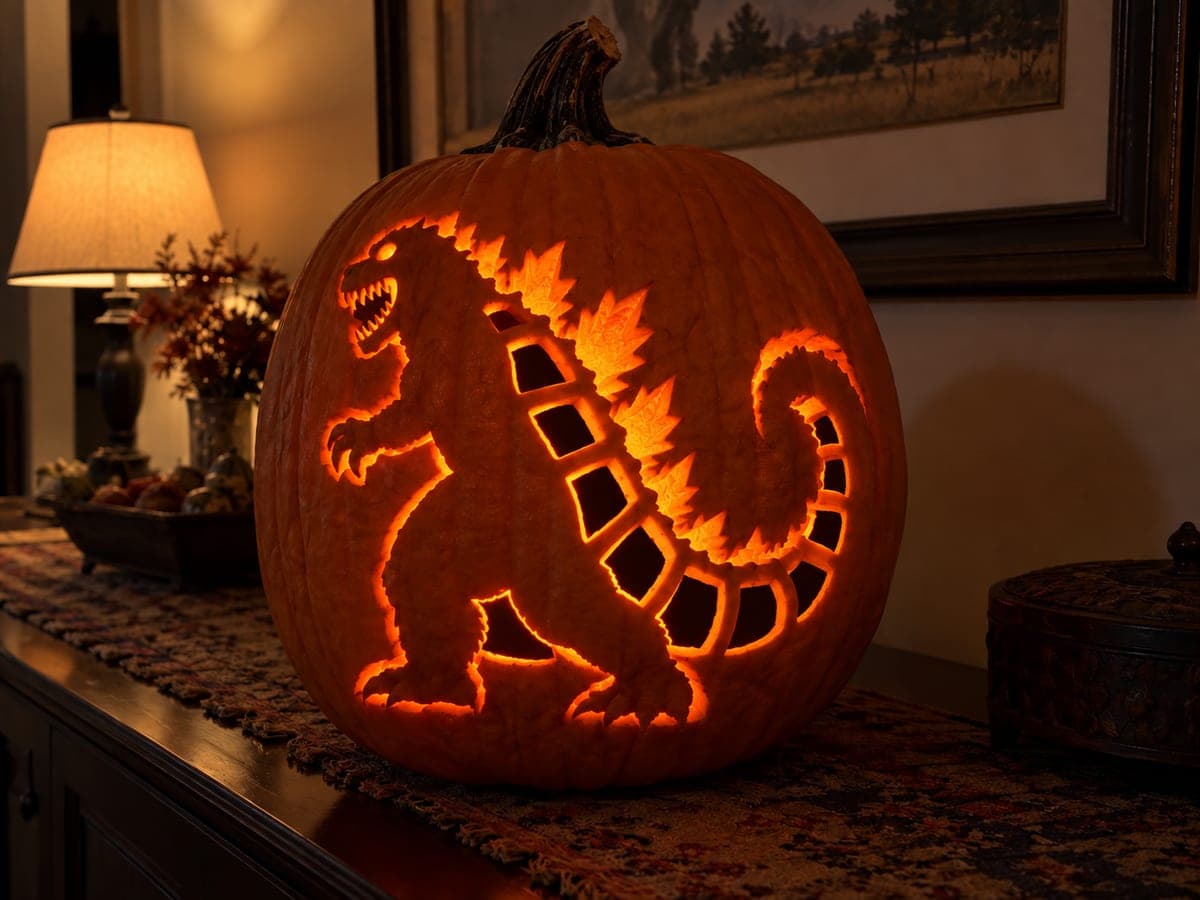
Godzilla Rib-Panel Pumpkin Carving With Open Jaw

This hard Godzilla pumpkin carving cuts empty tail and belly panels separated by broad attached ribs and opens the toothy jaw fully through, with the eye and dorsal fins shallow-backed as relief against the carved silhouette. Cut the outer silhouette backing first to establish the Godzilla shape, then work the rib panels and jaw opening from top to bottom. A green-tinted LED placed low inside casts an eerie glow through the belly cutouts and up through the open jaw.

No ratings yet · Sign in to rate
Comments (0)

  • No comments yet — be the first.

Save without an account. Sign in to like or comment.

Our tips for carving a similar design

The design uses the silhouette technique to back the entire Godzilla outline against the pumpkin face, then opens tail and belly panels separated by broad attached ribs and cuts the toothy jaw fully through. The eye and dorsal fins are secondary backed relief within the silhouette. Working the outer silhouette backing first establishes the shape before the internal cuts are made.

From pumpkin to porch

  1. Select and prep a tall pumpkin

    A taller pumpkin gives the Godzilla silhouette proper vertical proportions for the full torso and tail. Bottom-cut and gut it, scraping interior walls to a thin and even depth. Extra thinning behind the belly rib zone will make the panel glow more vividly.

  2. Transfer the silhouette stencil

    Use carbon paper to transfer the full silhouette outline and all internal rib, panel, jaw, and fin markings. The dense detail in this design makes carbon paper more reliable than pin-poking alone. Mark the outer silhouette as a scrape zone, the belly panels as cut zones, and the fins and eye as secondary scrape zones.

  3. Back the outer silhouette

    Using a wide flat gouge, carefully skim the outer skin of the entire Godzilla silhouette to a depth of about 5 millimeters, leaving the rind floor intact. This gives the whole creature a uniform mid-tone glow and acts as the visual container for the brighter internal panel cuts. Work from the tail upward and keep a consistent depth.

  4. Cut the belly rib panels

    Open each belly and tail panel as a full hollow cut, working from the top panel downward. Keep the ribs between panels at least three-quarters of an inch wide so they do not crack when you remove panel pieces. A thin, flexible detail saw navigates the curved rib edges more cleanly than a stiff blade.

  5. Cut the jaw and scrape the eye and fins

    Open the toothy jaw fully, keeping tooth roots wide. Then scrape the eye area and dorsal fin ridges as secondary backed relief within the already-backed silhouette. Because the outer silhouette is already thinned, the fins will glow at a similar level to the body but with their own distinct ridge texture visible.

  6. Light with a green-tinted LED

    Place a green-tinted or color-changing LED inside and set it at the base of the pumpkin directed upward through the belly panels and jaw. The green glow through the rib panels and the tinted jaw creates an eerie atomic energy effect. Display the pumpkin at eye level so viewers see the full silhouette and the glowing ribs at the same time.

Written with AI to match this design

Gather your supplies

Check things off as you get ready.

Work on a stable surface, keep your free hand out of the cutting path, and have an adult handle sharp tools.

Three levels of light

  • Leave intact

    The background rind outside the silhouette outline stays fully dark, making Godzilla pop as a glowing form.

  • Peel & shade

    The entire outer silhouette and dorsal fins are shallow-backed for a broad mid-tone body glow.

  • Cut through

    The belly rib panels and the open toothy jaw are cut fully through for the brightest interior light.

Learn the carving basics

Before you start cutting

How do I keep the rib panels from collapsing when I remove the cut pieces?

Score the rib lines lightly before making any full cuts so you know exactly where each rib sits. Cut each panel outline independently and remove the piece with a gentle push from inside rather than pulling from outside, which can crack the adjacent rib. Cutting the panels in order from top to bottom is safer than random removal.

The backed silhouette looks patchy when lit. How do I even it out?

Uneven backing depth creates hot and cold spots when illuminated. Go back over the lighter areas with a flat gouge to remove a little more rind floor, checking from inside with a flashlight as you thin. Aim for a floor thickness of about 4 to 5 millimeters throughout the silhouette zone.

Is there a way to make the belly panels glow a different color from the backed silhouette?

Yes: place a green LED for the full-cut panels and add a piece of orange or yellow cellophane over the inside of the backed silhouette zone to shift its color slightly. The color contrast between the bright green panels and the warmer silhouette amplifies the ribbed chest effect. Use low-tack tape to hold the cellophane in place without puncturing the rind.

Your take belongs here, too.

Changed a detail? Made it simpler? Share a photo of your version and tell the community what worked.

Share your pumpkin

More pumpkins like this

You've reached the end · 8 pumpkins
The Patch Report

Fresh pumpkins, in your inbox.

The best new carvings, ideas worth stealing, and how-tos for carving season. Short, seasonal, and gone by November.

A short email during carving season. Unsubscribe anytime. See our privacy policy.