Halloween Pumpkin Carving Contest · Starts October 1st · $500 in prizes
← Back to ideas
@ai_concepts
Sep 25, 2026
Expert Art the Clown Terrifier Pumpkin PortraitAI
0

Report this carving

Tell us what is wrong. Reports are private.

Expert Art the Clown Terrifier Pumpkin Portrait

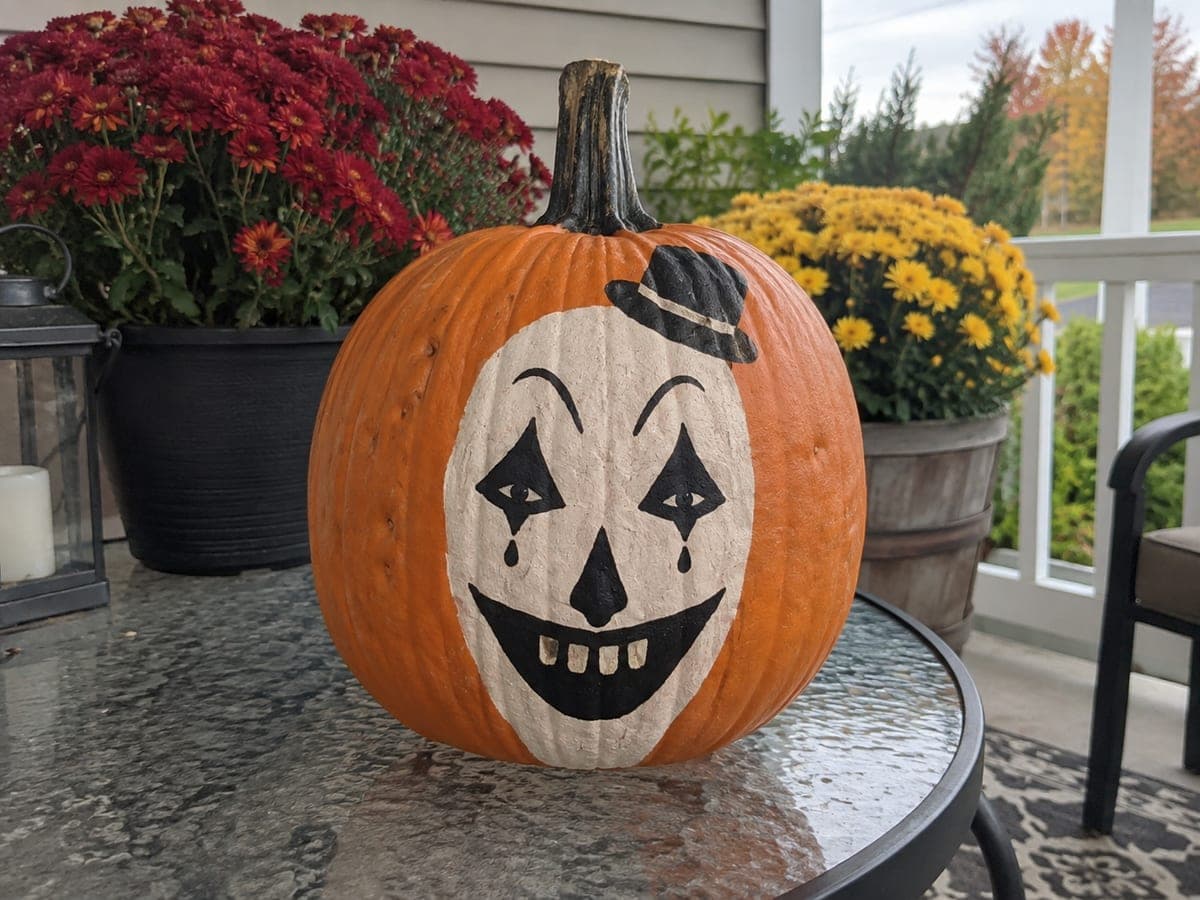
The expert terrifier pumpkin carving idea is a full portrait of Art the Clown, combining angular hollow eye openings and a block-toothed grin with intricate shallow-backed scoring for the brows, teardrops, facial contour, and hat texture across the entire rind surface. Broad cheek and nose rind bridges between every open section are the only structural backstop at this level of detail. Work all hollow cuts first, then layer the shallow detail in multiple thin passes rather than cutting deep in a single pass. A diffuse LED panel inside brings out every carved layer simultaneously.

No ratings yet · Sign in to rate

Comments (0)

  • No comments yet — be the first.

Save without an account. Sign in to like or comment.

Our tips for carving a similar design

The expert Terrifier design is a complete Art the Clown portrait that covers every section of the front rind: fully open angular eye holes and a block-toothed grin for maximum brightness, a hat silhouette cutout framing the top, and intricate shallow-backed scoring across the brows, teardrops, facial contour, and hat texture throughout. Broad cheek and nose rind bridges between every open section are the only structural backstop at this density of detail. Multiple thin engraving passes rather than single deep cuts protect the rind's integrity while building up the full portrait.

From pumpkin to porch

  1. Select and hollow the pumpkin

    Choose a large, firm pumpkin with a flat front face and even rind. Hollow to exactly 1 inch throughout, using a skewer to verify at a dozen or more points. Any thin spot in the engraving zones risks puncturing during the fine detail work. Blot the interior dry and allow 20 minutes of air time before transferring.

  2. Comprehensive design transfer

    Transfer the full expert template, marking three distinct zones: hollow cutouts (solid outline), mid-depth scoring (dashed line), and shallow texture (single dots). Having three visual cues on the rind prevents confusion once the carving session is underway. Mark the facial contour zones and hat texture area separately from the teardrop outlines.

  3. Carve the hat silhouette

    Cut the top hat as a fully open hole, working slowly along the brim and crown lines. The expert-level hat may include subtle texture channels inside the crown, which are scored rather than cut through. Finish the hat opening completely before moving to the face.

  4. Work the hollow face sections

    Cut the angular eye holes first, then the grin with its block teeth. At expert level the grin teeth may be narrower than at lower difficulties. Work each tooth gap from the outer corners inward, confirm roots are solid after each gap, and keep all cutting tools moving in small controlled segments.

  5. Full-surface engraving pass

    Working from the outer face edges inward toward the hollow cuts, score the teardrop channels, brow furrows, facial contour lines, and hat texture in multiple thin passes. Use a V-gouge for the defined linear elements and a ball-tip Dremel bit for the organic facial contour texture. Never cut deeper than two-thirds of the wall thickness in any single pass.

  6. Light with a diffuse LED panel

    A diffuse LED panel inside the cavity provides the most even illumination for a full-surface engraved portrait, bringing out every carved layer simultaneously without hot spots. Evaluate the display from six feet away to judge overall portrait coherence, then adjust any unlit scoring up close.

Written with AI to match this design

Gather your supplies

Check things off as you get ready.

Work on a stable surface, keep your free hand out of the cutting path, and have an adult handle sharp tools.

Three levels of light

  • Leave intact

    Fully dark retained rind on the hat crown interior, outer face frame, and unscored nose and cheek zones

  • Peel & shade

    Teardrop channels, brow furrows, facial contour lines, and hat texture scoring across the entire portrait, glowing at graduated amber mid-levels

  • Cut through

    Hat silhouette opening, angular eye holes, and all grin gaps between block teeth, blazing with the brightest full-pass light

Learn the carving basics

Before you start cutting

How long will an expert full-surface carving take to complete?

Plan on four to six hours for a thorough expert-level portrait including hollow cuts, comprehensive engraving, and final lighting checks. Break the session into two parts: hollow cuts and coarse scoring on day one, fine engraving and detail work on day two. Working across two sessions keeps your hands fresh and your judgment sharp.

Should I seal cut edges to slow down dehydration on an expert carving?

Yes. After the final lighting check, brush a thin coat of petroleum jelly onto every cut and scored edge. The jelly slows moisture loss significantly without affecting the glow. Reapply every 48 hours and store the pumpkin in a cool location between display sessions.

What is the difference in glow between the V-gouge lines and the ball-tip texture?

V-gouge lines produce sharp, clean glowing channels that read as distinct lines from a distance. Ball-tip texture produces a broader, softer glow patch that reads as surface variation rather than a defined mark. Using both in the same portrait adds visual richness: sharp tear and brow lines punctuated by soft facial contour texture.

Your take belongs here, too.

Changed a detail? Made it simpler? Share a photo of your version and tell the community what worked.

Share your pumpkin

More pumpkins like this

You've reached the end · 8 pumpkins
The Patch Report

Fresh pumpkins, in your inbox.

The best new carvings, ideas worth stealing, and how-tos for carving season. Short, seasonal, and gone by November.

A short email during carving season. Unsubscribe anytime. See our privacy policy.