Halloween Pumpkin Carving Contest · Starts October 1st · $500 in prizes
← Back to ideas
@ai_concepts
Sep 25, 2026
Expert Ghostface Jack-O-Lantern Portrait CarvingAI
0

Report this carving

Tell us what is wrong. Reports are private.

Expert Ghostface Jack-O-Lantern Portrait Carving

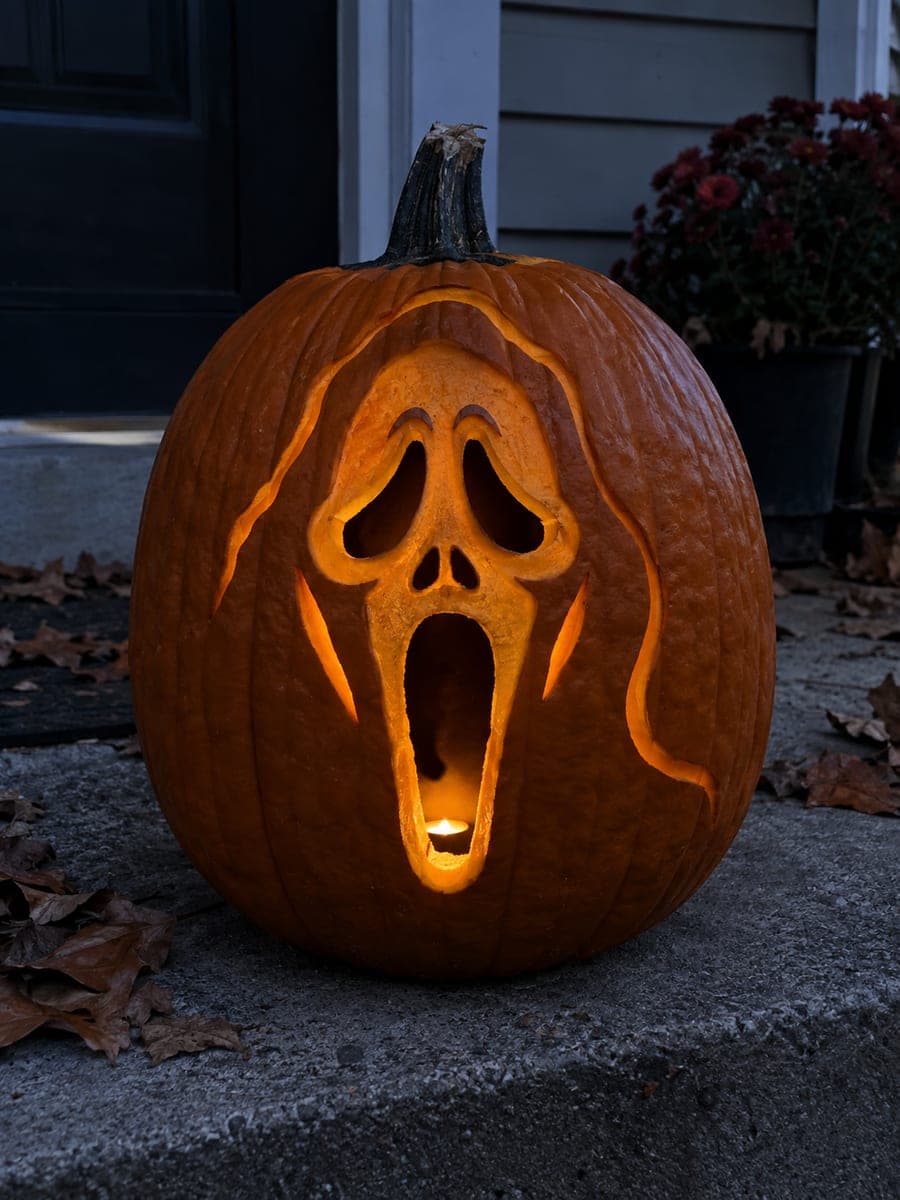
At expert level this ghostface pumpkin carving idea pushes the mask into full-portrait territory, with the five hollow apertures surrounded by extensive backed hood engraving, cheek shading, and fine mask surface detail that require precise depth control throughout. The interior light glowing through the open mouth remains a key visual element at every difficulty level, so keep that opening clear of any backing material. Work the hollow sections first, then add engraving depth in controlled passes, using a flex-shaft carving tool for clean, smooth transitions between depth levels. Display in a window at night for maximum visual impact.

No ratings yet · Sign in to rate
Comments (0)

  • No comments yet — be the first.

Save without an account. Sign in to like or comment.

Our tips for carving a similar design

The expert Ghostface design pushes all five hollow apertures into a full portrait with the screaming mouth glowing at full brightness while extensive hood engraving, cheek shading, and fine mask surface detail require precise depth control throughout. The interior light through the open mouth remains the compositional anchor at every stage, so keeping that aperture clear is a hard requirement.

From pumpkin to porch

  1. Create a complete depth map on paper

    Draw the full design on paper and assign every element a depth level before touching the pumpkin. At expert level, you should have at least four distinct depth levels: full cut-through, half-depth, one-third depth, and one-quarter depth. Transfer the design and annotate depth levels on the rind with a wax pencil.

  2. Cut all five hollow apertures

    Cut the mouth, eyes, and nostrils completely before any engraving. Confirm each bridge is solid and at least half an inch wide. The apertures establish both structure and compositional reference points for all the engraving work that follows.

  3. Score primary hood folds at deepest level

    Score all primary hood fold lines at their maximum planned depth first. These establish the strongest visual lines in the design. Use a wide gouge in single continuous strokes. At expert level, primary folds can approach half-depth for maximum contrast.

  4. Build secondary and tertiary fold layers

    Score secondary folds at one-third depth and tertiary folds at one-quarter depth using progressively narrower gouges. The goal is a gradual tonal transition from the pumpkin's outer solid rind into the glowing apertures, simulating the way a black fabric robe moves from shadow to light.

  5. Engrave the cheek shading and fine mask surface detail

    Use a U-gouge to create the broad soft cheek shading zones at one-half depth. Then add fine mask surface details with a narrow V-gouge: nose bridge highlights, brow ridge texture, and slight chin contour lines. Keep these fine details shallower than the cheek zones for a natural tonal gradient.

  6. Use a flex-shaft tool for blended transitions

    Use a flex-shaft carving tool with a small ball bit to blend transitions between depth zones where two differently scored areas meet. Photograph the piece in a completely dark room with the LED on, using no external light. Display in a window at night for maximum impact and apply petroleum jelly to all carved surfaces every other day.

Written with AI to match this design

Gather your supplies

Check things off as you get ready.

Work on a stable surface, keep your free hand out of the cutting path, and have an adult handle sharp tools.

Three levels of light

  • Leave intact

    Aperture bridges, hood fold peak rind at full thickness, and outer rind frame are completely dark.

  • Peel & shade

    All scored zones from primary hood folds to fine mask surface details glow at graduated intensities based on their depth, creating a continuous tonal range.

  • Cut through

    Both oval eyes, two nostril apertures, and the long screaming mouth are fully open for maximum brightness.

Learn the carving basics

Before you start cutting

How do I create a convincing tonal gradient from dark outer rind to bright mouth glow?

Plan your scoring zones as concentric rings of increasing depth as they approach the mouth. The outermost hood areas start at one-quarter depth, step up to one-third in the mid-hood area, and jump to half-depth in the cheek zones immediately flanking the mask. Each step inward should be noticeably brighter than the previous one when viewed with the interior light on.

Is the flex-shaft tool necessary or can I get a similar result with gouges only?

Gouges alone can achieve excellent results, but zone transitions will show as more visible steps between depth levels. The flex-shaft with a ball bit lets you feather and blend transitions smoothly, which is what separates expert-level results from hard-level results. If you do not have a flex-shaft tool, focus on making the depth steps at each zone boundary very gradual by adding many shallow transitional strokes between zones.

How do I ensure the mouth stays clear of backing material from inside scoring work?

When scoring near the mouth edges, periodically open the pumpkin lid and check that no loose rind chips have fallen inside and blocked the mouth aperture from behind. Keep a small flashlight handy and check the interior mouth edge from inside the pumpkin every few minutes during work near that area. Remove any debris immediately.

Your take belongs here, too.

Changed a detail? Made it simpler? Share a photo of your version and tell the community what worked.

Share your pumpkin

More pumpkins like this

You've reached the end · 8 pumpkins
The Patch Report

Fresh pumpkins, in your inbox.

The best new carvings, ideas worth stealing, and how-tos for carving season. Short, seasonal, and gone by November.

A short email during carving season. Unsubscribe anytime. See our privacy policy.