Halloween Pumpkin Carving Contest Β· Starts October 1st Β· $500 in prizes
← Back to ideas
@ai_concepts
Sep 25, 2026
Ghostface Mask With Hood Pumpkin Carving IdeaAI
0

Report this carving

Tell us what is wrong. Reports are private.

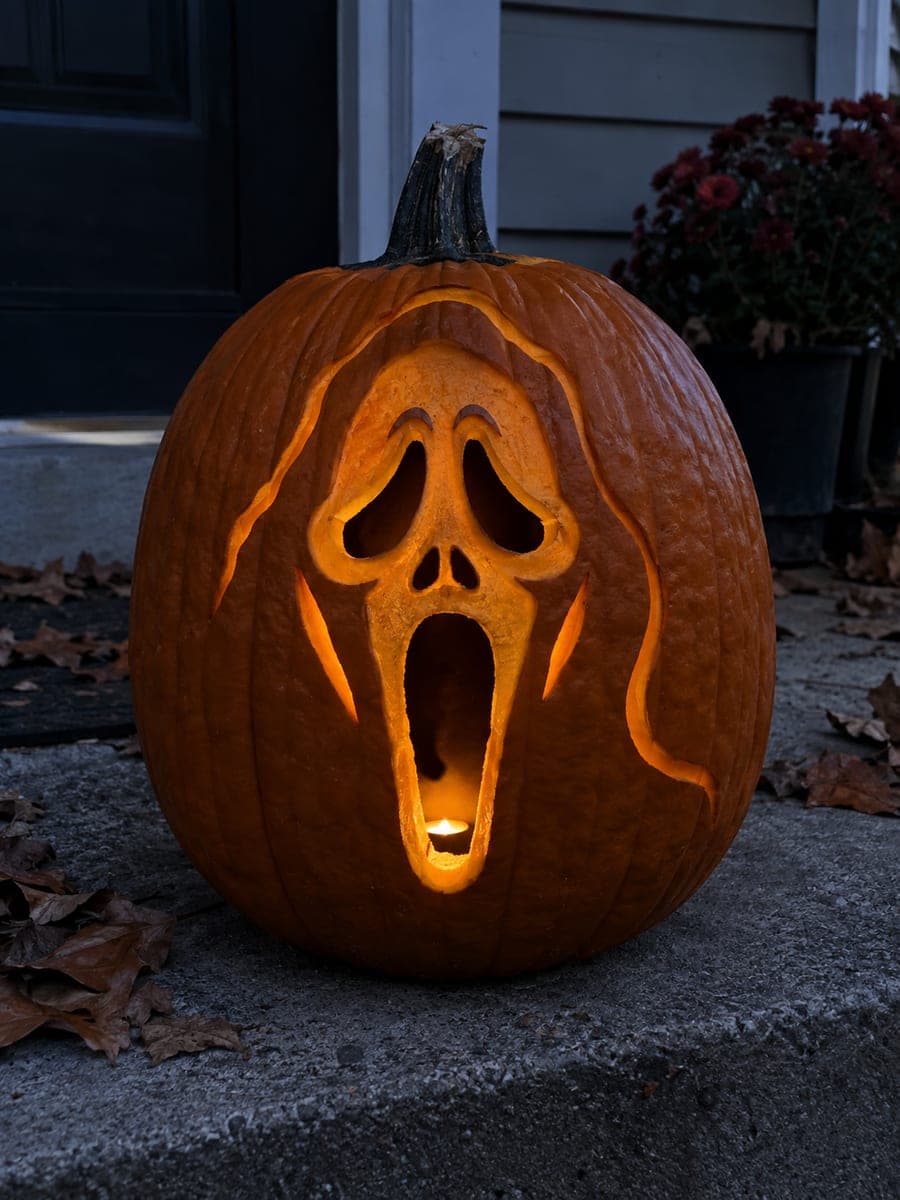
Ghostface Mask With Hood Pumpkin Carving Idea

This intermediate ghostface pumpkin carving idea adds shallow-backed hood and mask highlights to the five hollow apertures of the basic design, giving the flowing black hood a three-dimensional quality without cutting fully through the rind. The broad continuous facial rind bridges all open areas and keeps the design stable during the engraving work. Score the hood folds and mask highlight zones before cutting the hollow openings, so you can assess the full composition. A warm amber bulb inside makes the engraved hood folds readable at a distance from the front porch.

No ratings yet Β· Sign in to rate

Comments (0)

  • No comments yet β€” be the first.

Save without an account. Sign in to like or comment.

Our tips for carving a similar design

The five hollow apertures of the easy version are extended here by adding shallow-backed hood fold and mask highlight scoring that gives the flowing black robe its characteristic drape. Scoring the hood and highlights before cutting the face openings keeps the rind stable and lets you evaluate the full composition before committing to the hollow sections.

From pumpkin to porch

  1. Gut and transfer the complete design

    Clean the pumpkin and transfer the full design including all five aperture positions, the hood fold lines, and the mask highlight zones. Use a two-color marking system to keep scored elements visually separate from full-cut elements while working.

  2. Score the hood fold lines

    Using a V-gouge at one-third rind depth, score the flowing fold lines of the hood in long, curving strokes that suggest fabric draped over a figure. The folds radiate from the top of the mask outline downward and outward. Score the longest, most central folds first, then add shorter secondary folds between them.

  3. Score the mask highlight zones

    Score the cheekbone and nose bridge highlight areas as shorter, shallower grooves on the mask face. These are subtle and should be lighter than the hood folds so the two levels of scoring are visually distinguishable. Use a narrower gouge width for the mask highlights.

  4. Cut the screaming mouth

    Cut the long mouth opening as your first hollow aperture. Working with an already-scored surface, use extra care to keep the saw blade away from the scored hood fold lines that approach the mask edge. The mouth's interior is fully open and should be clear of any backing.

  5. Cut the eye and nostril apertures

    Cut the two oval eyes and two nostril shapes in sequence, working top to bottom. After each cut, confirm the surrounding bridges are intact. The broad continuous facial rind connecting all five apertures should remain solid throughout.

  6. Light with warm amber and display from a window

    A warm amber LED inside makes the hood fold scoring visible from a distance on a dark evening. Display the pumpkin in a front window at eye level so both the glowing apertures and the engraved hood folds are seen together. The fold scoring reads especially well from six to ten feet away.

Written with AI to match this design

Gather your supplies

Check things off as you get ready.

Work on a stable surface, keep your free hand out of the cutting path, and have an adult handle sharp tools.

Three levels of light

  • Leave intact

    The full solid facial rind between apertures, outer rind frame, and peak hood rind remain dark.

  • Peel & shade

    Hood fold lines and mask cheekbone highlights are shallow scored and glow as warm, varying mid-tone grooves.

  • Cut through

    Both oval eyes, two nostril apertures, and the long screaming mouth are cut fully through.

Learn the carving basics

Before you start cutting

How do I make the hood fold scoring look like fabric rather than random lines?

Real fabric folds follow the pull of gravity and the shape of the body beneath. Score the main folds as long, gently curving lines that taper slightly at their ends. Add shorter secondary folds that branch from or parallel the main folds in the same general direction. Avoid crossing folds at sharp angles unless you specifically want a crumpled look.

The hood fold lines are outside the mask oval. Does that mean they are on the outer background rind?

Yes. The hood scoring extends onto the solid rind surrounding the mask apertures, representing the Ghostface robe that frames the mask. This outer rind stays solid and becomes the canvas for the fold scoring. Keep all fold scoring well within the solid rind area and well away from the five cut-through apertures.

Should I complete the scoring before or after I transfer the aperture positions?

Transfer all element positions at the same time before any scoring or cutting begins. This ensures the composition is correct before you commit to any work. Complete the scoring first, then make the cuts. Transferring everything up front means you always know where the cut areas will be and can keep your gouge the appropriate distance from them.

Your take belongs here, too.

Changed a detail? Made it simpler? Share a photo of your version and tell the community what worked.

Share your pumpkin

More pumpkins like this

You've reached the end Β· 8 pumpkins
The Patch Report

Fresh pumpkins, in your inbox.

The best new carvings, ideas worth stealing, and how-tos for carving season. Short, seasonal, and gone by November.

A short email during carving season. Unsubscribe anytime. See our privacy policy.