Halloween Pumpkin Carving Contest · Starts October 1st · $500 in prizes
← Back to ideas
@ai_concepts
Sep 25, 2026
Easy Ghostface Scream Mask Pumpkin CarvingAI
0

Report this carving

Tell us what is wrong. Reports are private.

Easy Ghostface Scream Mask Pumpkin Carving

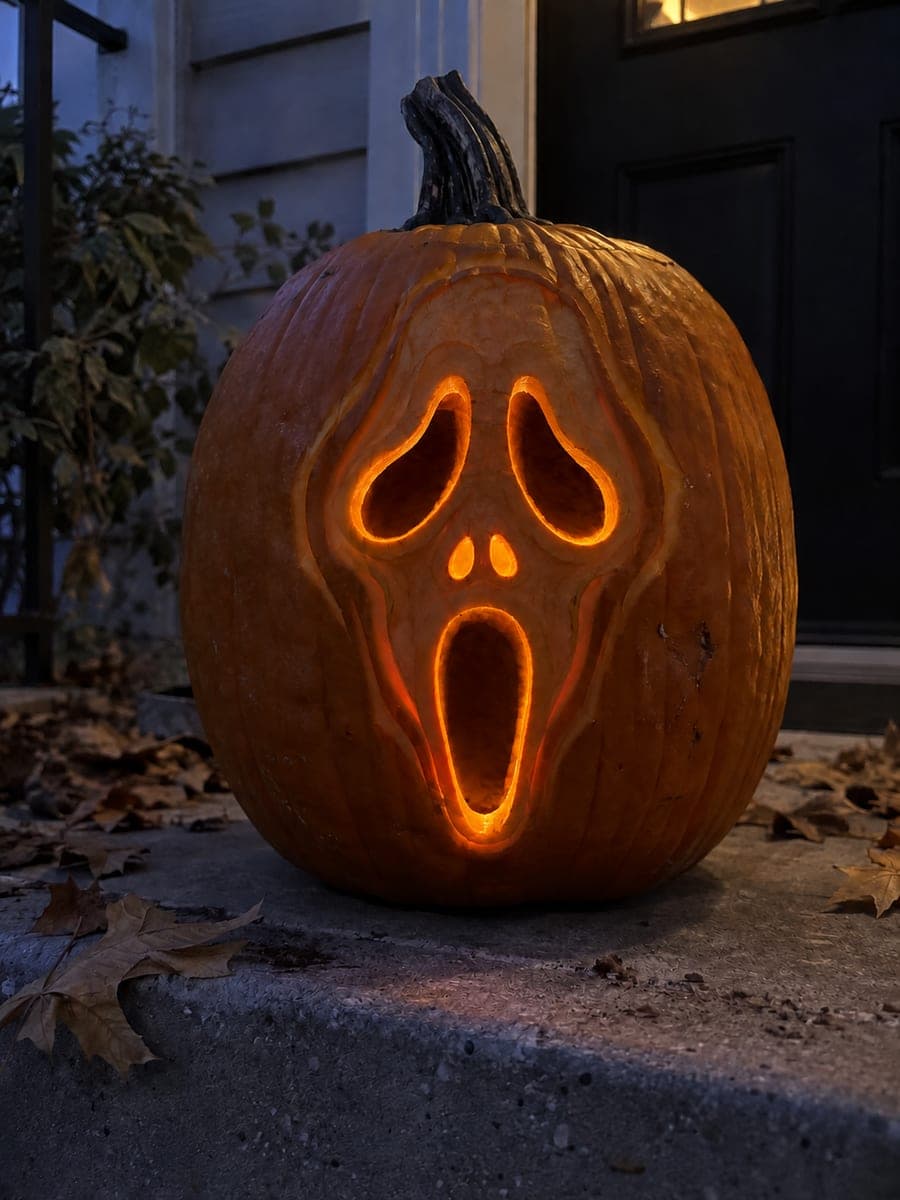
Ghostface's oval eyes, small nostrils, and long screaming mouth glow warmly through a pumpkin in this easy ghostface pumpkin carving idea, with five hollow apertures set into a broad continuous facial rind and shallow-backed mask highlights adding depth. The wide connected rind keeps the structure solid while still delivering the iconic look. Carve the long mouth opening first as it anchors the proportions of the entire face, then work upward to the eyes and nostrils. Candlelight visible through the open mouth is part of what makes this design so effective in the dark.

No ratings yet · Sign in to rate

Comments (0)

  • No comments yet — be the first.

Save without an account. Sign in to like or comment.

Our tips for carving a similar design

Five hollow openings, two oval eyes, two small nostrils, and a long screaming mouth, sit in a broad continuous facial rind that keeps this design structurally forgiving. Shallow scoring on the mask highlights and hood edges adds depth without additional cuts. The mouth is carved first to anchor proportions, and candlelight pouring through it is central to the design's horror effect.

From pumpkin to porch

  1. Gut and transfer the design

    Clean the pumpkin and transfer the full Ghostface mask design with a pin tool. Mark all five aperture positions and the hood and mask highlight scored areas. Confirm the broad facial rind bridge between all openings before starting any cutting.

  2. Score the hood and mask surface highlights

    Before cutting any holes, score the hood fold lines and cheek surface highlights as shallow backed grooves using a V-gouge at one-third rind depth. Doing this first keeps the rind rigid and makes scoring more precise and clean.

  3. Cut the long screaming mouth

    The mouth is the dominant aperture and is cut first. Use a thin pumpkin saw to cut the full elongated mouth shape, following the curved upper and lower lip lines. The interior of the mouth is a single open space. Push the cut piece out from inside the pumpkin.

  4. Cut the oval eye openings

    Cut the two oval eyes individually with a narrow detail blade. Keep the bridge of rind between the eyes and the bridge between each eye and the top of the mouth at least half an inch. The eyes should be visually balanced on either side of the mask centerline.

  5. Cut the nostril apertures

    Cut the two small nostril shapes below the eyes with a narrow blade. These are the smallest of the five apertures. Use a short, controlled sawing motion and push the tiny plugs out from inside. Keep the nostrils at least a quarter-inch from the adjacent eye openings.

  6. Light from inside and display at the front door

    Place a warm LED candle near the back of the pumpkin so light pours visibly through the open mouth. This is the design's signature effect. Display at door height where trick-or-treaters encounter it at eye level. The mouth glow is most effective when the pumpkin is positioned slightly above the viewer's eye line.

Written with AI to match this design

Gather your supplies

Check things off as you get ready.

Work on a stable surface, keep your free hand out of the cutting path, and have an adult handle sharp tools.

Three levels of light

  • Leave intact

    The broad continuous facial rind, outer surrounding rind, and all rind between apertures remain solid and dark.

  • Peel & shade

    Hood fold lines and mask cheek highlights are shallow scored and glow as faint mid-tone grooves.

  • Cut through

    Both oval eyes, two nostril apertures, and the long screaming mouth are cut fully through for full interior light.

Learn the carving basics

Before you start cutting

The long mouth opening feels risky to cut in one piece. Can I approach it differently?

You can start by cutting the two corners of the mouth separately and then connecting them along the upper and lower lip curves. Alternatively, cut the center of the mouth first as a smaller opening and expand it outward toward the corners. Either approach gives you more control than trying to cut the full length in a single continuous pass.

How visible is the interior light through the mouth compared to the eyes?

The mouth is the largest opening by far, so it is also the brightest. At night the light visible through the mouth is the first thing viewers see from a distance. The eyes provide secondary accent points of light. This hierarchy is intentional and correct for the character, so do not try to make the eyes larger than the mouth to compensate.

My broad facial rind feels thin between the eye and the top of the mouth. Is that a problem?

If the bridge between the lower eye edge and the upper mouth edge is less than half an inch, it may crack as the pumpkin dries. You can reinforce it from inside by pressing a small piece of damp pumpkin rind against the thin area and securing it with a toothpick. Alternatively, reduce the mouth height by a quarter-inch at the top lip to add back some rind thickness.

Your take belongs here, too.

Changed a detail? Made it simpler? Share a photo of your version and tell the community what worked.

Share your pumpkin

More pumpkins like this

You've reached the end · 8 pumpkins
The Patch Report

Fresh pumpkins, in your inbox.

The best new carvings, ideas worth stealing, and how-tos for carving season. Short, seasonal, and gone by November.

A short email during carving season. Unsubscribe anytime. See our privacy policy.