Halloween Pumpkin Carving Contest · Starts October 1st · $500 in prizes
← Back to ideas
@ai_concepts
Sep 25, 2026
Easy Michael Myers Mask Pumpkin CarvingAI
0

Report this carving

Tell us what is wrong. Reports are private.

Easy Michael Myers Mask Pumpkin Carving

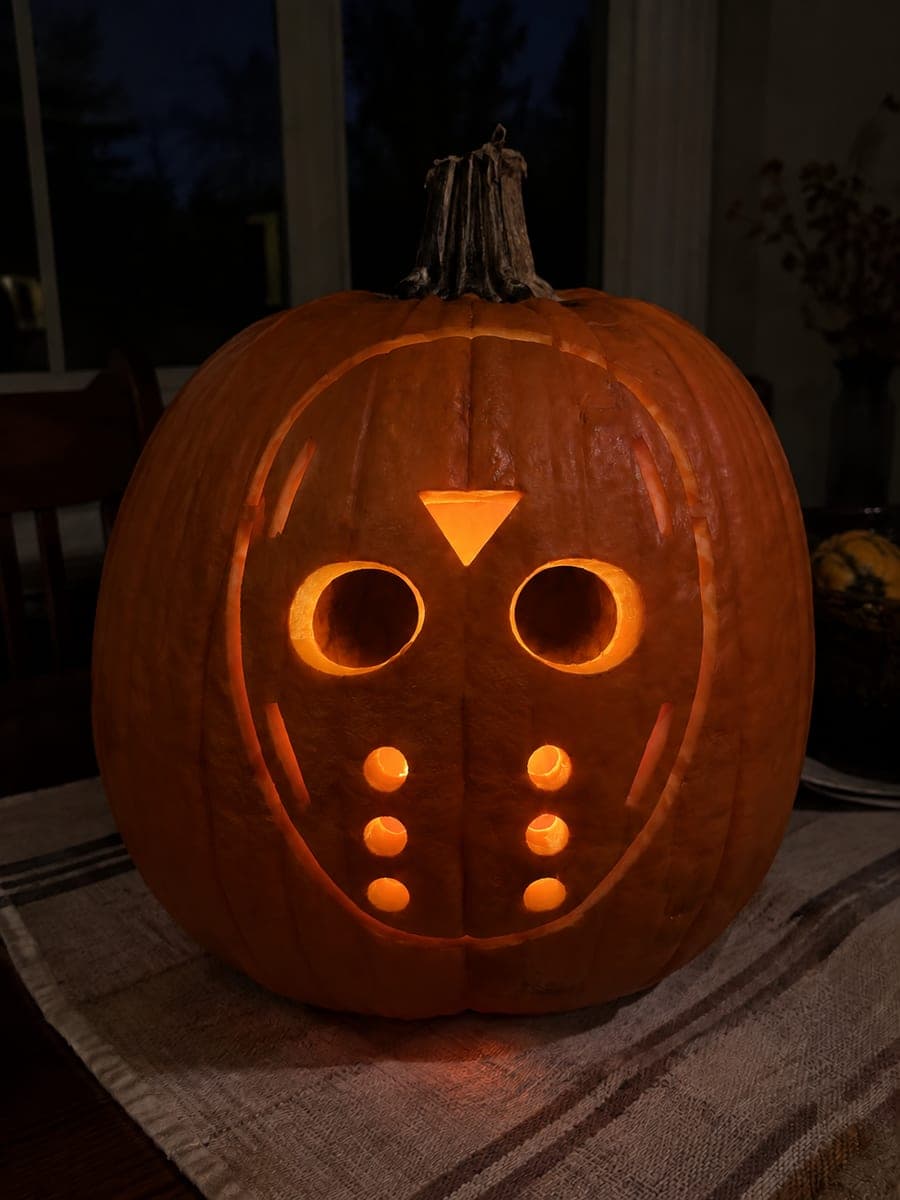
Michael Myers's blank pale face glows through a pumpkin with five simple openings for eyes, nostrils, and mouth in this easy michael myers pumpkin carving idea, backed by a thinned oval of rind and a shallow-carved hair cap at the top. The broad retained face keeps the design stable even though the wall is thinned, so the backing shows as a faint warm glow rather than full candlelight. Thin the rind behind the face area to about half its original depth with a Dremel or scraper before cutting the five apertures.

No ratings yet · Sign in to rate

Save this design for carving night, then share a photo of your own jack-o'-lantern once it's glowing.

Comments (0)

  • No comments yet — be the first.

Save without an account. Sign in to like or comment.

Our tips for carving a similar design

The trick to the Michael Myers mask design is thinning the rind across the oval face area so the solid mask surface glows with a faint, eerie light, while only five small apertures for eyes, nostrils, and mouth go all the way through. A shallow-carved hair cap at the top adds the character detail. The thinning step comes before any aperture cutting.

From pumpkin to porch

  1. Gut and plan the face zone

    Clean the pumpkin and transfer the mask oval, the five aperture positions, and the hair cap area with a pin tool. Before cutting anything, identify the oval face zone where you will thin the rind. This area spans roughly the center of the face from just below the hair cap down to the chin.

  2. Thin the face oval rind

    Using a Dremel with a drum sanding attachment or a large flat scraper, thin the interior rind behind the face oval to about half its original depth from the inside. Work in circular passes and check your progress frequently by pressing gently on the exterior, stopping when the surface feels slightly flexible but not soft. Even thinning gives a consistent pale glow.

  3. Carve the hair cap

    Score the hair cap at the top of the face as a shallow-backed groove using a V-gouge, removing the outer rind layer to reveal the paler inner pumpkin. The hair cap is a simple dark curved shape above the face; keep it broad and flat rather than adding fine strand detail.

  4. Cut the eye and nostril openings

    Using a narrow detail blade, cut the two almond-shaped eye openings through the thinned rind. Because the rind is now thinner, use lighter saw pressure and shorter strokes. Cut the two small nostril shapes below the eye line.

  5. Cut the mouth opening

    Cut the mouth as a simple thin horizontal rectangle or narrow oval below the nostrils. This represents the mask's closed, blank expression rather than a screaming one. Keep the cut narrow so the face retains its expressionless quality.

  6. Light and display

    Place a warm or slightly cool white LED inside. The thinned face oval will glow as a soft even field, making the mask look pale and blank, while the five openings show as brighter points. Display at a slight angle against a doorframe or porch post where viewers approach from the side.

Written with AI to match this design

Gather your supplies

Check things off as you get ready.

Work on a stable surface, keep your free hand out of the cutting path, and have an adult handle sharp tools.

Three levels of light

  • Leave intact

    The hair cap zone and all rind outside the mask oval remain full-thickness and dark.

  • Peel & shade

    The thinned oval face area glows as a broad, pale, even backing glow. The hair cap is shallow-scored for a slightly darker tone.

  • Cut through

    The two eye openings, two nostril shapes, and thin mouth rectangle are cut fully through the thinned rind.

Learn the carving basics

Before you start cutting

How do I thin the rind evenly without going through accidentally?

Work in passes rather than trying to reach final depth in one go. After each pass, check progress by holding a flashlight to the exterior face. When you can see a faint glow through the rind in a dark room, you are at a good depth. Keep the Dremel moving constantly rather than dwelling in one spot, which creates uneven thin patches.

Can I thin the rind with a spoon instead of a Dremel?

Yes. A metal kitchen spoon or a pumpkin scraper with a serrated edge works, but requires more patience. Scrape the inner wall in circular motions, checking depth frequently. It is harder to achieve perfectly even thinning by hand, but slight unevenness in the glow actually adds to the eerie quality of the mask.

The five openings are very small. How do I keep them from tearing in the soft thinned rind?

Chill the pumpkin for an hour before cutting the apertures so the thinned rind firms up. Use the narrowest blade you have and keep strokes short. Cut the eye openings from the outside inward rather than from the thinned inside. If a small tear happens near an edge, a toothpick inserted through the tear from the inside can temporarily stabilize it while you finish the adjacent cuts.

Your take belongs here, too.

Changed a detail? Made it simpler? Share a photo of your version and tell the community what worked.

Share your pumpkin

More pumpkins like this

You've reached the end · 8 pumpkins
The Patch Report

Fresh pumpkins, in your inbox.

The best new carvings, ideas worth stealing, and how-tos for carving season. Short, seasonal, and gone by November.

A short email during carving season. Unsubscribe anytime. See our privacy policy.