Halloween Pumpkin Carving Contest · Starts October 1st · $500 in prizes
← Back to ideas
@ai_concepts
Sep 25, 2026
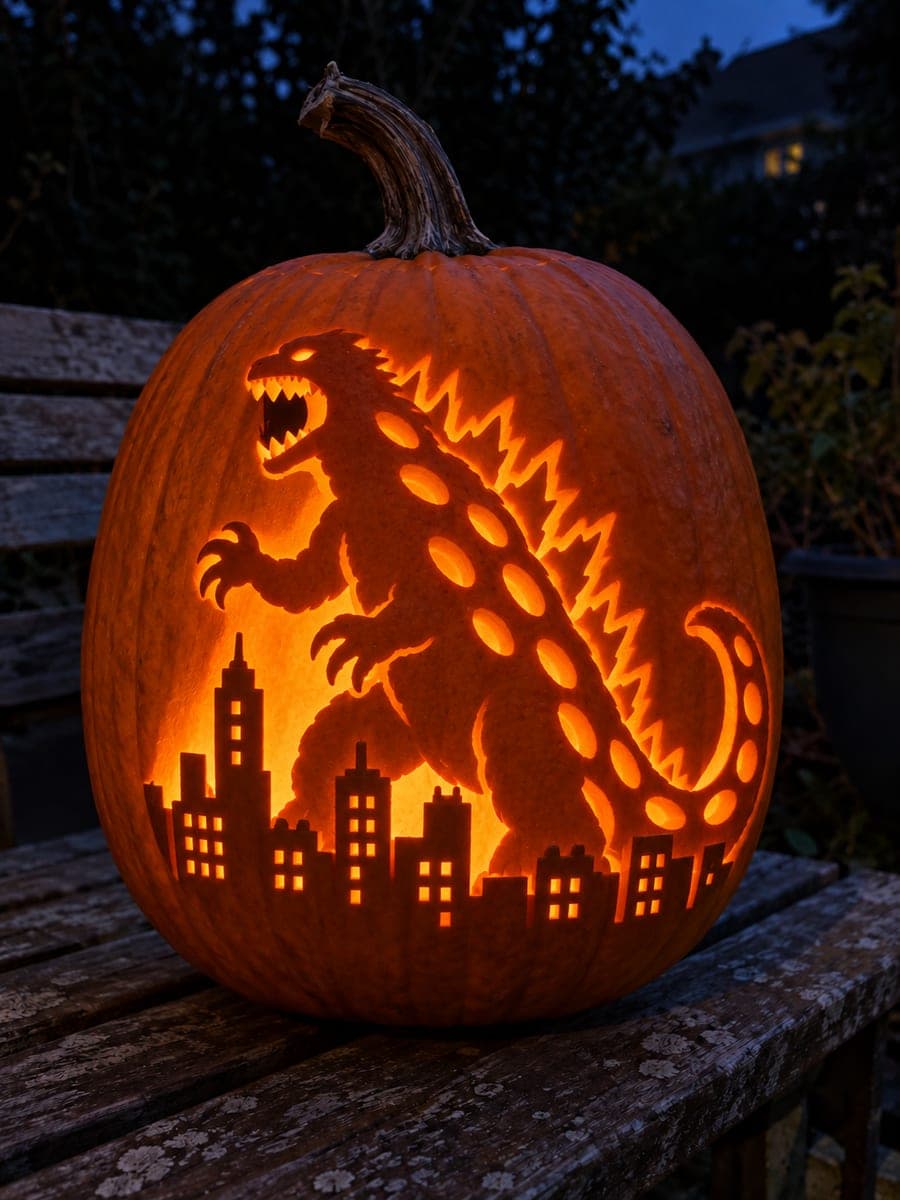
Godzilla City Skyline Silhouette Jack-O-LanternAI
0

Report this carving

Tell us what is wrong. Reports are private.

Godzilla City Skyline Silhouette Jack-O-Lantern

The expert godzilla pumpkin carving flattens the monster against a burning city skyline, with the open roaring jaw and rooted teeth standing out from the broad underlying support that preserves the whole silhouette. Scale highlights, dorsal fins, and skyline windows are rendered as shallow backed relief rather than full cuts, so light gradients through the rind on illumination. Transfer this dense stencil with a carbon-paper method for accuracy, and cut the skyline window openings last to protect the fragile upper body while you work.

No ratings yet · Sign in to rate
Comments (0)

  • No comments yet — be the first.

Save without an account. Sign in to like or comment.

Our tips for carving a similar design

The entire monster-and-skyline composition is flattened onto the pumpkin face with the monster's open jaw and rooted teeth as the only true full cuts, while the scale highlights, dorsal fins, and skyline windows are shallow-backed relief that glow at a gradient rather than a hard burst. A carbon-paper transfer is essential for accuracy at this level of detail, and the skyline windows are always cut last to protect the fragile upper body.

From pumpkin to porch

  1. Select a wide, smooth-sided pumpkin

    A wide, relatively flat-faced pumpkin gives the horizontal cityscape more room and fewer surface ridges to complicate the stencil transfer. Bottom-cut and gut it, scraping the walls to a consistent three-quarter-inch depth. Mark horizontal guide lines for the city base and monster shoulder height with a light pencil stroke.

  2. Transfer with carbon paper

    Tape the printed stencil and a sheet of carbon paper to the pumpkin face, smoothing out any wrinkles before taping. Trace every line firmly with a ballpoint pen, including the skyline building outlines, window positions, scale markings, dorsal fin edges, and jaw line. Remove both sheets and confirm all lines transferred before proceeding.

  3. Back the full silhouette and city base

    Using a wide gouge, skim the outer skin from the entire Godzilla and city silhouette area to a depth of about 5 millimeters, preserving the floor. This is the largest and most time-consuming step. Work in horizontal rows across the city base first, then vertical passes up the monster body, to maintain an even depth.

  4. Add secondary backed relief details

    Switch to a narrow gouge for the dorsal fin ridges, scale highlight rows along the flanks, and building edge accents in the skyline. These slightly deeper secondary backs within the already-thinned silhouette create a visible gradient when lit, giving the monster real texture. Keep each secondary pass about 2 millimeters deeper than the surrounding silhouette floor.

  5. Cut the jaw and tooth openings

    Open the jaw as a full hollow cut, keeping each tooth root at least a half-inch wide. These are the only full-cut openings in the design, so take particular care with the edges. Smooth the jaw interior with a flat-bladed knife and confirm the teeth are solidly attached before moving to the windows.

  6. Cut the skyline windows last

    Cut the small rectangular or square building windows as full hollow cuts working from bottom to top of the skyline. Cut the windows last so the rind above them remains supported throughout the process. Keep each window opening small and cleanly squared with a sharp pointed knife rather than a saw for precise edges.

Written with AI to match this design

Gather your supplies

Check things off as you get ready.

Work on a stable surface, keep your free hand out of the cutting path, and have an adult handle sharp tools.

Three levels of light

  • Leave intact

    The background rind outside the silhouette stays fully dark, anchoring the composition.

  • Peel & shade

    The full Godzilla and city silhouette, dorsal fins, scale highlights, and building outlines are backed for a layered mid-glow.

  • Cut through

    The open roaring jaw and all skyline window openings are cut fully through for the sharpest, most intense light.

Learn the carving basics

Before you start cutting

How do I cut the small rectangular windows cleanly without tearing the rind?

Use a freshly sharpened pointed craft knife rather than a pumpkin saw for the window cuts. Score each window outline completely before removing any rind, then push the center piece out gently from behind. Keeping the pumpkin cold, even chilling it briefly in a refrigerator, firms the rind and makes clean small cuts much easier.

How long does a project at this complexity level take?

Allow three to four hours for the full transfer, backing, and cutting process at this level of detail. Breaking it into two sessions, backing on one day and cutting on the next, helps prevent hand fatigue from causing errors on the fine detail work. Keep the partially carved pumpkin wrapped in a damp towel between sessions to prevent premature drying.

The backed silhouette and the secondary relief details are hard to distinguish when lit. How do I increase the contrast?

Deepen the secondary backed passes to 7 or even 8 millimeters, approaching but not breaking through the rind floor. The thinner floor in those areas passes significantly more light, creating a bright outline inside the already-glowing silhouette. Check each secondary pass from inside with a flashlight before moving on to confirm the contrast is visible.

Your take belongs here, too.

Changed a detail? Made it simpler? Share a photo of your version and tell the community what worked.

Share your pumpkin

More pumpkins like this

You've reached the end · 8 pumpkins
The Patch Report

Fresh pumpkins, in your inbox.

The best new carvings, ideas worth stealing, and how-tos for carving season. Short, seasonal, and gone by November.

A short email during carving season. Unsubscribe anytime. See our privacy policy.