Halloween Pumpkin Carving Contest · Starts October 1st · $500 in prizes
← Back to ideas
@ai_concepts
Sep 25, 2026
Terrifier Pumpkin With Teardrop Eyes CarvingAI
0

Report this carving

Tell us what is wrong. Reports are private.

Terrifier Pumpkin With Teardrop Eyes Carving

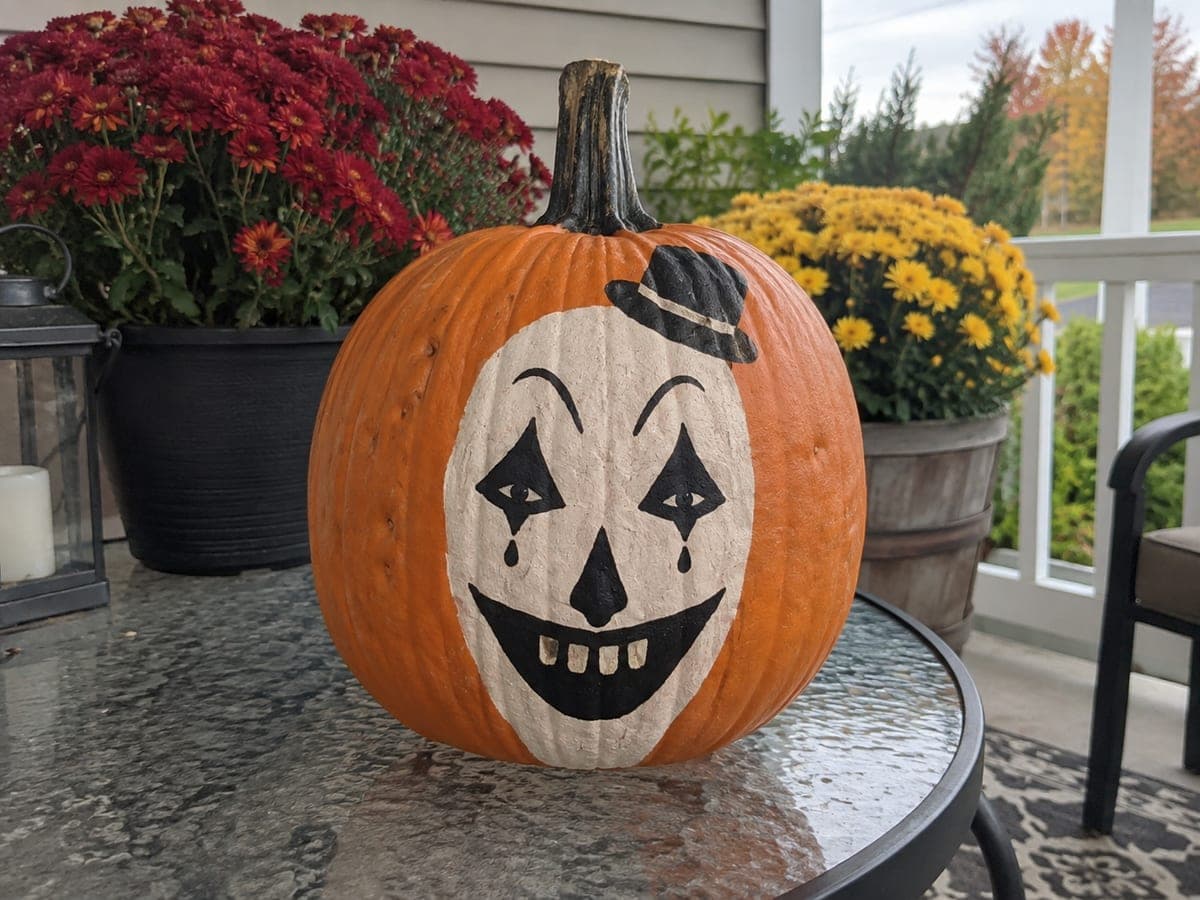
This intermediate terrifier pumpkin carving idea develops the angular eye openings and broad toothy grin further with more defined teardrop and brow engraving and a cleanly cut hat silhouette, creating a more detailed portrait of Art the Clown. The broad cheek and nose rind remains connected throughout to support the additional surface work. Score all the shallow teardrop and brow details before cutting the hollow sections, working from the outer face perimeter inward. Cool white lighting inside contrasts the black-and-white clown palette for maximum visual impact.

No ratings yet · Sign in to rate

Comments (0)

  • No comments yet — be the first.

Save without an account. Sign in to like or comment.

Our tips for carving a similar design

The intermediate Terrifier design builds on the easy version by adding more defined teardrop and brow engraving and a more precisely cut hat silhouette, so the overall portrait of Art the Clown reads as a full character face rather than a simplified icon. The broad cheek and nose rind remains the structural backbone throughout, and the extra scoring adds visual depth without raising the difficulty of the hollow cuts. Scoring all the shallow detail before cutting the hollow sections keeps the rind rigid while the detail work is in progress.

From pumpkin to porch

  1. Hollow and mark thickness zones

    Cut a back opening and hollow to a consistent 1 inch of wall on the front face. Check thickness with a skewer in the brow zone above the eyes and the teardrop zones below them, as those areas will receive the most scoring. Thicker walls in those zones give more room for clean, deep channels.

  2. Transfer and plan the scoring order

    Transfer the full design with a stylus. Mark the teardrop outlines, brow furrow lines, and contour curves in one perforation pass, and mark the hollow openings in a separate pass. Plan to score all the shallow detail first, then cut the hollow sections last to keep the rind as rigid as possible during the fine work.

  3. Score the teardrops and brow furrows

    Using a V-gouge or fine linoleum cutter, carve the teardrop shapes below each eye as defined oval channels, removing enough rind that each shape will glow clearly. Score the brow furrow lines as clean arched channels above the eye positions. Work from the outer face perimeter inward to avoid crowding the eye openings.

  4. Cut the hat silhouette

    With all the surface scoring complete, cut the hat silhouette as a fully open hole at the top of the pumpkin. Work slowly around the brim line in small segments. Confirm the brim has at least 5 mm of width throughout before removing the hat piece.

  5. Carve eyes and grin

    Cut the angular eye holes, then the outer grin line, and finally the vertical cuts between the block teeth. Confirm each tooth is attached to the upper lip strip at its root before moving to the next gap. Remove material in small pieces and avoid lateral pressure on the block teeth.

  6. Light and adjust scoring depth

    Insert a cool white LED, which echoes the black-and-white Terrifier color palette. Check the teardrop and brow engravings in a dark room and deepen any marks that are not transmitting enough light. Display at a height where viewers see the hat silhouette and the face together in one view.

Written with AI to match this design

Gather your supplies

Check things off as you get ready.

Work on a stable surface, keep your free hand out of the cutting path, and have an adult handle sharp tools.

Three levels of light

  • Leave intact

    Dark cheek and nose rind, hat crown, and forehead, providing the black-and-white clown's dark base

  • Peel & shade

    Teardrop channels below the eyes and arched brow furrow lines above them, glowing at a defined mid-level

  • Cut through

    Hat silhouette, angular eye holes, and block-toothed grin, all delivering full light through the pumpkin

Learn the carving basics

Before you start cutting

How large should the teardrop shapes be to read clearly at night?

Each teardrop should be at least 2 cm tall and 1 cm wide to glow visibly from a few feet away. Smaller teardrops tend to look like vague patches of light rather than distinct shapes. If your template has tiny teardrops, scale up the design or simplify to two larger tears rather than three small ones.

Should I score the teardrops before or after cutting the eye holes?

Score the teardrops before cutting the eye holes. The rind is more rigid when the hollow sections are still intact, which gives you better control over the V-gouge and reduces the risk of accidentally cracking the area between the eye hole and the teardrop. Once the eye holes are cut, that zone becomes more fragile.

My cool white LED makes the pumpkin look too clinical. How do I get a creepier tone?

Try layering a cool white LED with a secondary dim amber LED placed further back in the cavity. The mix produces a slightly warm white with cool highlights that suits the Terrifier palette without looking like a medical photograph. Alternatively, a single purple or blue-tinted LED creates a distinctly disturbing tone for Art the Clown.

Your take belongs here, too.

Changed a detail? Made it simpler? Share a photo of your version and tell the community what worked.

Share your pumpkin

More pumpkins like this

You've reached the end · 8 pumpkins
The Patch Report

Fresh pumpkins, in your inbox.

The best new carvings, ideas worth stealing, and how-tos for carving season. Short, seasonal, and gone by November.

A short email during carving season. Unsubscribe anytime. See our privacy policy.