Halloween Pumpkin Carving Contest · Starts October 1st · $500 in prizes
← Back to ideas
@ai_concepts
Sep 25, 2026
Easy Freddy Krueger Face Pumpkin CarvingAI
0

Report this carving

Tell us what is wrong. Reports are private.

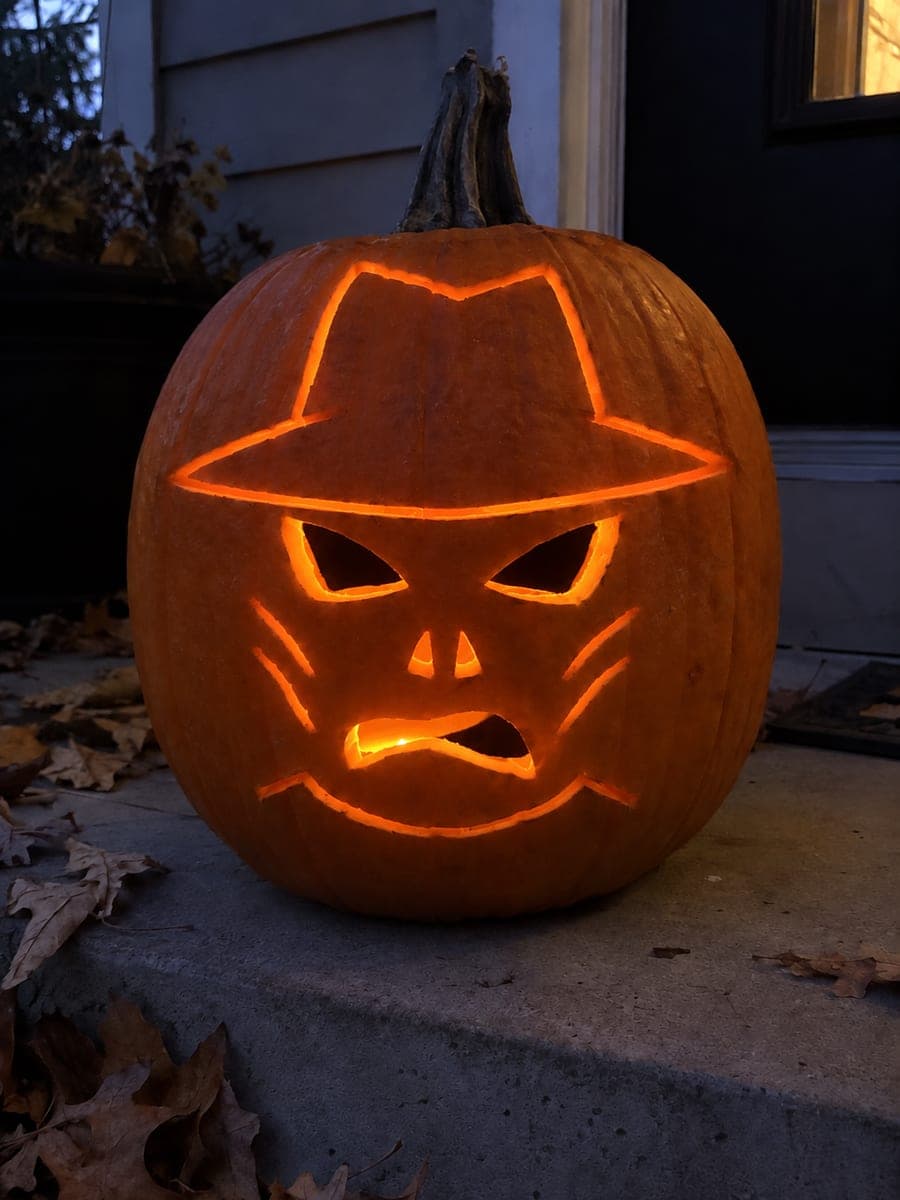
Easy Freddy Krueger Face Pumpkin Carving

Freddy Krueger's menacing grin glows through a pumpkin with simple eye, nostril, and crooked mouth cutouts in this easy freddy krueger pumpkin carving idea, with the fedora, collar, and four distinctive facial burn strokes kept as shallow-backed carvings. The shallow detail work is what makes the face recognizable beyond just the basic openings. Score the hat brim and burn stroke lines before cutting the hollow sections, so the rind stays intact during the fine work. Warm amber candlelight inside makes the scored burn texture glow faintly for a creepy effect.

No ratings yet · Sign in to rate

Comments (0)

  • No comments yet — be the first.

Save without an account. Sign in to like or comment.

Our tips for carving a similar design

Simple hollow eye, nostril, and crooked mouth openings deliver Freddy's familiar grin while the shallow-backed fedora brim, collar, and four distinctive facial burn stroke scorings do all the work of making the face recognizable. Score the hat and burn strokes first to keep the rind solid during the hollow cutting, and let warm amber candlelight bring out the scored texture.

From pumpkin to porch

  1. Gut and transfer the design

    Clean the pumpkin and transfer the full design with a pin tool. Mark the hat brim position, the collar area, and the four facial burn stroke positions clearly so you can identify them during scoring. Mark the three aperture positions separately.

  2. Score the fedora brim and hat

    Using a V-gouge at one-third rind depth, score the fedora brim as a horizontal curved line above the face area, and score the hat body above it with parallel shallow lines suggesting the hat's worn crown. A felt fedora with a brim reads from these two structural elements alone.

  3. Score the burn scar strokes

    Score the four facial burn stroke lines on the cheeks and jaw as shallow irregular grooves. These represent the distinctive burnt scarring on the character's face. Make each stroke slightly different in length and depth; they should look like tissue damage, not decorative lines. Keep all four strokes at one-third depth or shallower.

  4. Score the collar accents

    Score the collar area at the base of the face with a few short horizontal strokes suggesting the striped sweater collar. These do not need to be precise, just enough to suggest the sweater neckline below the face.

  5. Cut the eye, nostril, and mouth openings

    Cut the eye openings as simple ovals using a thin pumpkin saw. Cut the nostril shapes below the eye line. Cut the crooked mouth last: it has an irregular, asymmetric shape, so follow the template carefully. Push all pieces through from inside to free them.

  6. Light with warm amber candlelight

    Position a warm amber LED or real candle inside the pumpkin. Amber light makes the scored burn strokes glow faintly and adds warmth to the crooked mouth glow that suits the character's menacing tone. Display near the front door at a height where the hat brim scoring is clearly visible.

Written with AI to match this design

Gather your supplies

Check things off as you get ready.

Work on a stable surface, keep your free hand out of the cutting path, and have an adult handle sharp tools.

Three levels of light

  • Leave intact

    All outer rind, the hat crown, broad facial rind between openings, and all solid rind between burn stroke lines remain dark.

  • Peel & shade

    The fedora brim, hat crown lines, burn scar strokes, and collar accents are shallow scored and glow as dim amber-lit grooves.

  • Cut through

    The eye openings, nostril shapes, and crooked mouth are cut fully through.

Learn the carving basics

Before you start cutting

How do I make the burn scar strokes look like damage rather than decoration?

Vary the pressure of your gouge along each stroke so the groove is deeper in some sections and shallower in others. Finish each stroke with a slight dragging motion that tapers the end irregularly. Slight curves and directional changes within a single stroke also help. Avoid making all four strokes the same length or at the same angle.

The crooked mouth has an odd asymmetric shape. How do I cut it accurately?

Transfer the mouth outline precisely with a pin tool and connect the dots with a fine marker before cutting. Cut the straighter sections first and save the most curved or pointed sections for last, using short strokes with a narrow blade. The asymmetry is what makes the expression threatening, so do not try to straighten it.

Can I add the striped pattern on the collar instead of just scoring it?

If you want more collar detail, score alternating wide and narrow horizontal bands across the collar zone, varying the depth slightly between them to suggest fabric ridges. This reads as a stripe pattern in low light without requiring precise parallel lines. Keep each band score at one-quarter depth to avoid breaking through.

Your take belongs here, too.

Changed a detail? Made it simpler? Share a photo of your version and tell the community what worked.

Share your pumpkin

More pumpkins like this

You've reached the end · 8 pumpkins
The Patch Report

Fresh pumpkins, in your inbox.

The best new carvings, ideas worth stealing, and how-tos for carving season. Short, seasonal, and gone by November.

A short email during carving season. Unsubscribe anytime. See our privacy policy.