Halloween Pumpkin Carving Contest · Starts October 1st · $500 in prizes
← Back to ideas
@ai_concepts
Sep 25, 2026
Painted Red Devil Pumpkin with Triangle HornsAI
0

Report this carving

Tell us what is wrong. Reports are private.

Painted Red Devil Pumpkin with Triangle Horns

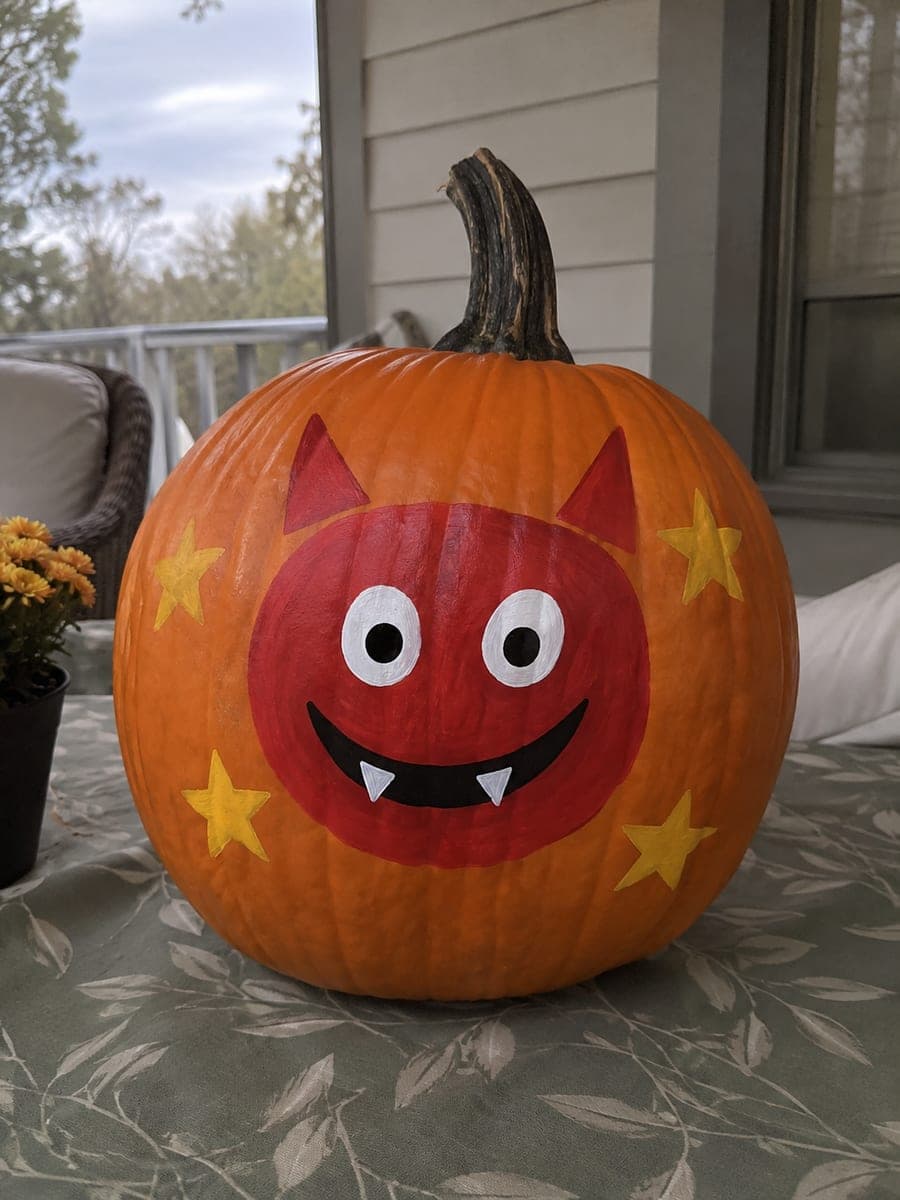
A flat red face circle, two red triangle horns, white eyes with black dot pupils, a broad black curved smile with small white teeth, and four mustard star accents make up this friendly devil pumpkin idea. Apply the red circle first, keeping the edges crisp against the orange rind. Add the horns as simple triangles extending from the top of the red circle, then paint the white eyes and smile features over the dry red base. Mustard stars scattered around the face add a festive touch that elevates this no-carve pumpkin beyond a basic face.

No ratings yet · Sign in to rate

Comments (0)

  • No comments yet — be the first.

Save without an account. Sign in to like or comment.

Our tips for carving a similar design

This painting project layers a flat red circle, two pointing triangle horns, simple white eyes, a black curved smile, and four mustard star accents in a sequence where each layer dries completely before the next is applied. The design leans friendly rather than menacing, making it a great choice for decorating with younger family members. The mustard stars scattered around the face add festive energy that elevates the whole composition beyond a basic face.

From pumpkin to porch

  1. Clean and dry the pumpkin

    Wipe the pumpkin surface clean and let it dry fully. Even a thin film of moisture or natural pumpkin oils can prevent acrylic paint from bonding firmly. If the rind feels waxy, wipe it gently with a cloth dampened in rubbing alcohol and let it dry before sketching.

  2. Sketch the layout

    Draw a large circle lightly in pencil for the red face. Add two upward-pointing triangles extending from the top of the circle for the horns. Mark the eye positions, the wide curved smile, and the four star positions around the face. The sketch is a guide, not a final outline.

  3. Paint the red circle and horns

    Apply red acrylic to the face circle and the two horn triangles in two thin, even coats. Let the first coat dry fully before the second. Keep the horn triangles continuous with the face circle so they read as growing from the forehead rather than as separate shapes.

  4. Add white eyes and paint them

    Once the red is dry, block in two white oval or circle eye shapes with a small flat brush. Let the white dry completely, then add black dot pupils in the center of each. Allow each step to dry before layering the next to prevent muddy colors.

  5. Paint the smile and small teeth

    Use a medium round brush to paint a broad curved black smile below the eyes. Let it dry, then add two small white tooth rectangles along the top of the smile line using a fine liner brush. The crisp white-on-black contrast makes the teeth pop.

  6. Add mustard stars and seal

    Dip a fine liner brush into mustard yellow acrylic and paint four small five-point stars around the outside of the red face circle. Once all paint is dry, apply a matte acrylic sealer over the whole design. Display on a covered porch table where the color palette reads well in soft daylight.

Written with AI to match this design

Gather your supplies

Check things off as you get ready.

Work on a stable surface, keep your free hand out of the cutting path, and have an adult handle sharp tools.

Three levels of light

  • Leave intact

    The orange rind outside the red face circle stays visible as the pumpkin's natural background.

  • Peel & shade

    None; the shell stays fully intact.

  • Cut through

    None; place near a porch light or soft lamp to illuminate the painted face from the outside.

Learn the carving basics

Before you start cutting

How do I paint a clean five-point star if I am not confident freehand?

Cut a small star shape from card stock and use it as a stamp, pressing it face-down into mustard paint on a palette and then pressing it flat onto the pumpkin. Practice the pressure on paper first. Alternatively, draw the star very lightly in pencil and paint inside the lines.

Can I use spray paint instead of brush-applied acrylic?

Spray paint works for the large red circle and horn shapes if you use a stencil mask to protect the surrounding rind. It is harder to control for fine details like the smile and star accents, so brush-applied acrylic still works best for those elements. Combine both methods if you want the base coat applied quickly.

Will the red paint look bright enough against the orange rind?

A medium-to-dark red reads very well against orange rind, especially after two coats. A bright scarlet works best; brownish or burgundy reds can look muddy. If your first coat dries lighter than expected, a third thin coat over the second will deepen the shade.

Your take belongs here, too.

Changed a detail? Made it simpler? Share a photo of your version and tell the community what worked.

Share your pumpkin

More pumpkins like this

You've reached the end · 8 pumpkins
The Patch Report

Fresh pumpkins, in your inbox.

The best new carvings, ideas worth stealing, and how-tos for carving season. Short, seasonal, and gone by November.

A short email during carving season. Unsubscribe anytime. See our privacy policy.