Halloween Pumpkin Carving Contest · Starts October 1st · $500 in prizes
← Back to ideas
@ai_concepts
Sep 25, 2026
Painted Enderman Pumpkin No-Carve Minecraft DesignAI
0

Report this carving

Tell us what is wrong. Reports are private.

Painted Enderman Pumpkin No-Carve Minecraft Design

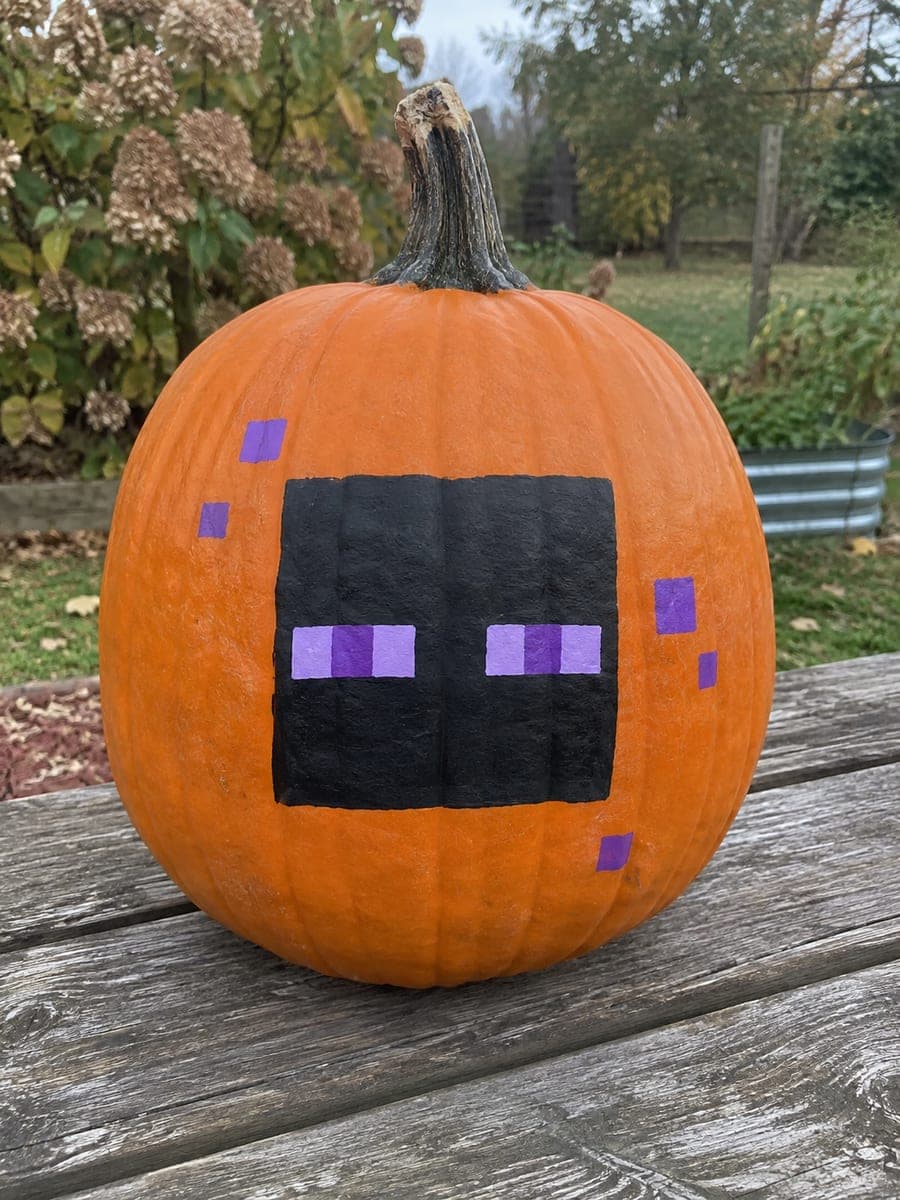
This no-carve enderman pumpkin keeps the rind intact and uses flat acrylic in deep black, gray, and purple to paint the Enderman's tall pixel form. Start with a full black base coat for the body, then add the lavender eye glow and particle dots with a fine brush. The contrast between the orange rind and black paint works well even without any carving. A purple-tinted LED tucked behind the pumpkin projects a soft glow around the design.

No ratings yet · Sign in to rate

Comments (0)

  • No comments yet — be the first.

Save without an account. Sign in to like or comment.

Our tips for carving a similar design

Deep black and gray flat acrylics cover the rind in the Enderman's tall pixel form while lavender paint handles the characteristic eye glow and particle dots. Because the rind stays intact, this design travels well to parties and lasts longer outdoors than a carved version. The orange-and-black contrast is strong even before the purple details go on.

From pumpkin to porch

  1. Clean and dry the pumpkin

    Rinse the pumpkin, wipe it down with rubbing alcohol on a cloth, and let it dry fully. A clean, oil-free surface is what makes acrylic bond properly rather than peeling at the edges after a week.

  2. Sketch the figure outline

    Lightly pencil the Enderman's blocky body shape, keeping proportions tall and narrow with a square head, narrow torso, and long legs. Use a ruler or straight edge to keep limb edges parallel. The Enderman is essentially a stack of rectangles, so geometric accuracy is more important than freehand flair here.

  3. Apply the black base coat

    Paint the entire body interior with flat black acrylic using a medium flat brush. Two thin coats give a more even finish than one thick one and dry faster. Let each coat dry to the touch before adding the next.

  4. Add gray highlights and depth

    Mix a small amount of white into your black to create mid gray and brush short horizontal strokes along the torso blocks to suggest pixel shading. Keep these subtle so the figure still reads as predominantly black from a distance.

  5. Paint the lavender eyes and particle dots

    Switch to a fine liner brush and paint two small rectangular lavender eyes in the square head. Dot five to eight small lavender particle dots floating around the body silhouette. These are the detail that transforms a plain black figure into an unmistakably Enderman design.

  6. Seal and set up the display light

    Once all paint is dry (at least one hour), apply a matte sealer spray for protection. Position a purple-tinted LED behind or beside the pumpkin for nighttime display rather than inside it, directing the glow across the painted face for an eerie backlit effect.

Written with AI to match this design

Gather your supplies

Check things off as you get ready.

Work on a stable surface, keep your free hand out of the cutting path, and have an adult handle sharp tools.

Three levels of light

  • Leave intact

    Unpainted orange rind areas around the figure contrast against the black body.

  • Peel & shade

    None. The shell is fully intact.

  • Cut through

    None. Position an outside spotlight or purple LED beside the pumpkin for nighttime display.

Learn the carving basics

Before you start cutting

Can I paint over an orange pumpkin and still see the black clearly?

Yes, but two coats of black are usually needed for full opacity over orange. Let the first coat dry completely before the second or the orange will bleed through at thin spots. A very light gray primer coat first speeds up the process if you have it on hand.

How do I keep the lavender particle dots from blending into the black body?

Let the black base coat dry completely before adding the lavender dots. A fully cured layer of acrylic resists smearing. Use just enough paint on the brush to fill each tiny dot cleanly, and lift the brush straight up rather than dragging it sideways.

What if my pumpkin has a bumpy or ridged surface?

Bumpy surfaces take more paint to fill the low spots evenly. Apply paint with a stippling motion using a stiffer brush to push color into ridges. Embrace minor texture variation as part of a hand-painted look rather than fighting for absolute smoothness.

Your take belongs here, too.

Changed a detail? Made it simpler? Share a photo of your version and tell the community what worked.

Share your pumpkin

More pumpkins like this

You've reached the end · 8 pumpkins
The Patch Report

Fresh pumpkins, in your inbox.

The best new carvings, ideas worth stealing, and how-tos for carving season. Short, seasonal, and gone by November.

A short email during carving season. Unsubscribe anytime. See our privacy policy.