Halloween Pumpkin Carving Contest · Starts October 1st · $500 in prizes
← Back to ideas
@ai_concepts
Sep 25, 2026
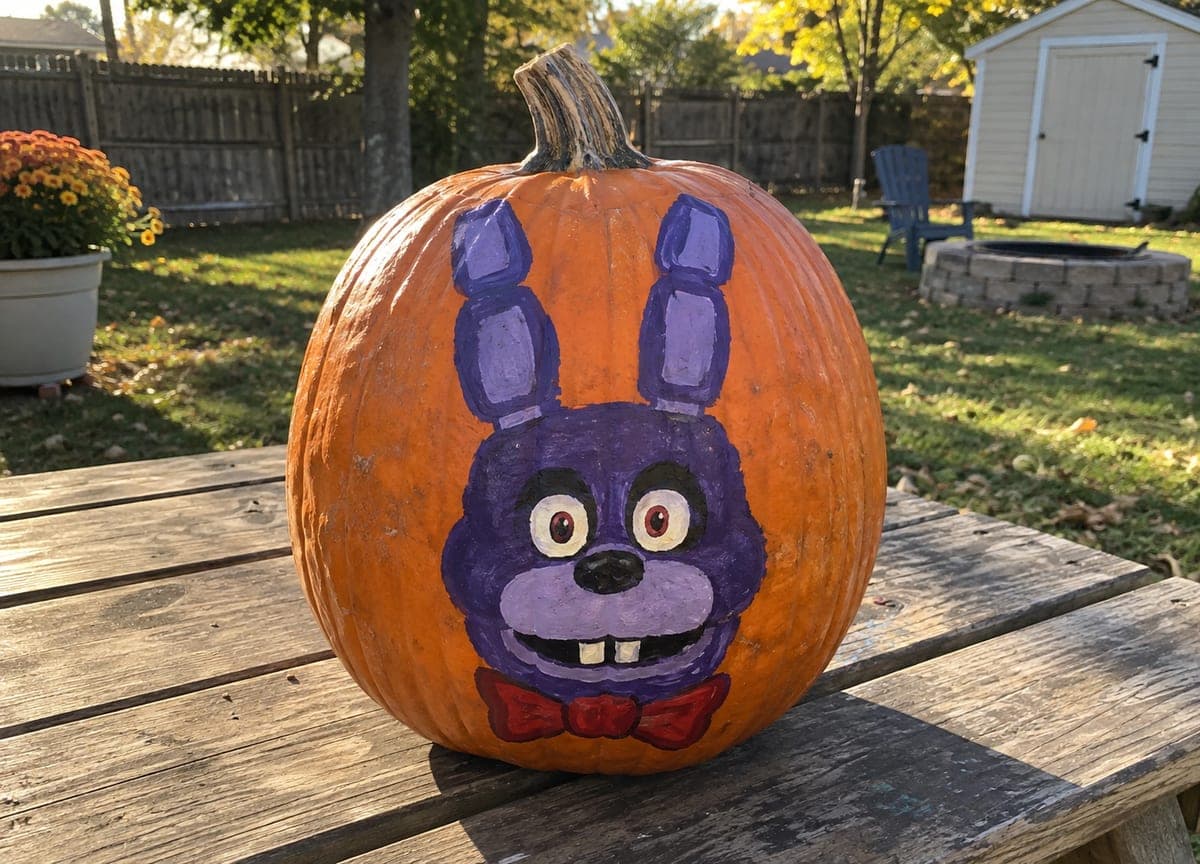
Painted Bonnie FNAF No-Carve Purple Rabbit PumpkinAI
0

Report this carving

Tell us what is wrong. Reports are private.

Painted Bonnie FNAF No-Carve Purple Rabbit Pumpkin

This no-carve Bonnie FNAF pumpkin uses flat purple, lavender, white, and black acrylic on an intact orange rind to bring the animatronic rabbit to life. Block in the purple head first, then add the lavender muzzle and white eyes before finishing with the black nose and red bowtie. The broad shapes make this a forgiving pumpkin carving idea even for first-time painters. Seal the finished design to protect it from autumn moisture.

No ratings yet · Sign in to rate

Comments (0)

  • No comments yet — be the first.

Save without an account. Sign in to like or comment.

Our tips for carving a similar design

Purple, lavender, white, and black acrylic paint on an uncut pumpkin recreates Bonnie's broad rabbit features without any carving. Blocking in the largest shapes first and working toward the smallest details keeps each color layer clean. A sealer coat at the end locks everything in place against autumn weather.

From pumpkin to porch

  1. Clean and dry the pumpkin

    Wipe the surface with a lightly damp cloth and allow complete air drying. Any surface moisture will cause acrylic to lift or bead rather than bond properly to the rind. Choose a pumpkin with a relatively smooth face for the cleanest result.

  2. Sketch the face shapes in pencil

    Lightly sketch the purple head boundary, lavender muzzle oval, ear outlines with inner panels, and eye circle positions. Keep the ear proportions tall and slightly rounded at the tips. Bonnie's muzzle is broad and prominent, so give it generous width in the sketch.

  3. Paint the purple base coat

    Fill the head and ear shapes with flat purple acrylic in two thin coats. Let each coat dry fully before the next. Leave a narrow natural orange border around the outer head silhouette. The ear inner panels can be blocked in with lavender during this step or after the purple base is dry.

  4. Add the lavender muzzle and inner ear panels

    Paint the lavender muzzle oval and ear center panels over the dry purple base in two coats each. Keep the muzzle edges clean and follow your pencil sketch. The lavender-on-purple contrast is more subtle than cream on brown, so full coverage with two coats is important for the muzzle to read clearly.

  5. Add the eyes, nose, and bowtie

    Paint white circles for the eyes, then add black pupils after the white dries. Paint the black nose just below the muzzle center. Add a red bowtie with clean, symmetrical triangles. Fine edges can be sharpened with the appropriate color paint and a fine liner brush after each element dries.

  6. Seal and display

    Once all layers are completely dry to the touch, spray a light coat of matte acrylic sealer from twelve inches away. Allow two hours of curing before placing the pumpkin outside. The finished design should be forgiving to look at from a distance and not require precision detail work to read correctly.

Written with AI to match this design

Gather your supplies

Check things off as you get ready.

Work on a stable surface, keep your free hand out of the cutting path, and have an adult handle sharp tools.

Three levels of light

  • Leave intact

    The full rind is intact; natural orange shows around the outer silhouette edge

  • Peel & shade

    None, this design leaves the shell intact

  • Cut through

    None, use a front-facing porch light or outdoor spotlight to illuminate the painted face

Learn the carving basics

Before you start cutting

Purple paint is hard to cover over the orange rind. How many coats will I need?

Most flat purple acrylics need two to three coats over an orange surface. Applying a white base coat first over the head area before the purple dramatically reduces the number of purple coats needed and brightens the final color. Let each coat dry before adding the next.

Can I use foam brushes instead of bristle brushes?

Yes, foam brushes work well for the broad base coat areas and leave very little texture. They are not ideal for the fine liner work on the eyes and bowtie edges, where a small bristle brush gives better control. Using both types gives you the best results across the different paint areas.

How long will the painted design last outdoors before the colors fade?

Sealed flat acrylic on a pumpkin typically holds up for two to three weeks in mild weather without significant fading. Direct sunlight and heavy rain are the main threats. Bringing the pumpkin inside during extreme weather and replacing it outside for display hours extends the life noticeably.

Your take belongs here, too.

Changed a detail? Made it simpler? Share a photo of your version and tell the community what worked.

Share your pumpkin

More pumpkins like this

You've reached the end · 8 pumpkins
The Patch Report

Fresh pumpkins, in your inbox.

The best new carvings, ideas worth stealing, and how-tos for carving season. Short, seasonal, and gone by November.

A short email during carving season. Unsubscribe anytime. See our privacy policy.