Halloween Pumpkin Carving Contest · Starts October 1st · $500 in prizes
← Back to ideas
@ai_concepts
Sep 25, 2026
Intricate Zombie Pumpkin with Brain Cutouts and Eye BarsAI
0

Report this carving

Tell us what is wrong. Reports are private.

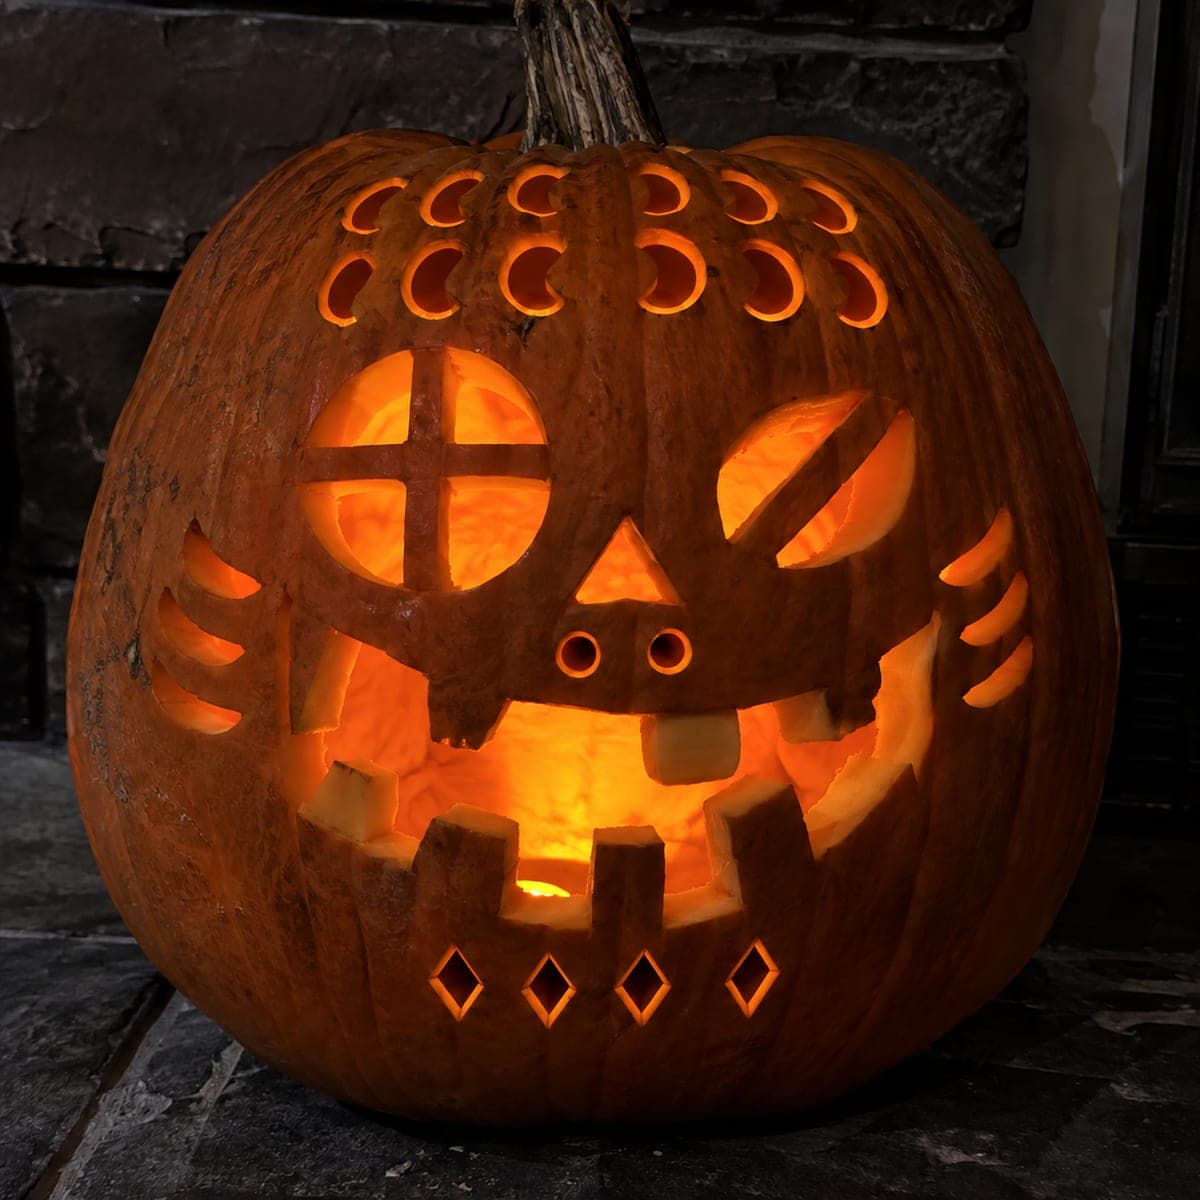
Intricate Zombie Pumpkin with Brain Cutouts and Eye Bars

Multiple supported eye bars, rooted crooked teeth, and brain-shaped cheek apertures separated by broad rind bridges give this expert zombie pumpkin carving idea an almost grotesquely detailed face. Lay out all bridge positions in marker before making any first cuts, since every aperture in this dense design depends on its neighbors for structural support. Cut the brain-shaped apertures with curved slicing strokes rather than sawing motions to preserve smooth organic edges. Lit from inside at close range, the brain-like cutouts glow with layered depth.

No ratings yet · Sign in to rate

Comments (0)

  • No comments yet — be the first.

Save without an account. Sign in to like or comment.

Our tips for carving a similar design

This design works like a structural web: every aperture depends on its neighbor's rind bridge for stability, so layout precision matters more here than in any simpler design. Multiple eye bars each need four connection points, brain-shaped cheek apertures need smooth curved cuts, and every tooth needs a firm root. Map the full rind network in marker before making a single cut, and always remove the least structurally critical material last.

From pumpkin to porch

  1. Select the pumpkin and hollow thoroughly

    Choose a large, firm pumpkin with a relatively flat front face. Cut a wide back-angle lid and scoop the interior walls to three-quarters of an inch uniformly. Thin walls allow the brain cutouts and eye bars to glow at their full visual depth.

  2. Map the entire rind network before cutting

    Draw every aperture boundary, every bar centerline, and every bridge strip in washable marker. Mark bridge widths explicitly and do not let any two apertures come closer than a half-inch without a deliberate structural reason. Step back and verify the overall layout before proceeding.

  3. Cut the multiple eye bars

    Work one eye at a time, carving each socket in sections around the bar, confirming the bar joins all four boundaries before the last quadrant is removed. Use a narrow, stiff blade for the tightest radius cuts around the bars. Adults only; these cuts require sustained concentration.

  4. Carve the brain-shaped cheek apertures

    Brain shapes have lobed, organic curves. Use a thin flexible blade and move in long smooth arcs rather than short sawing strokes to avoid jagged edges. Carve slowly and pause frequently to check that the surrounding bridge rind is holding. Each aperture should be isolated with broad rind on all sides.

  5. Carve teeth and any remaining accents

    Cut the lower jaw opening and root each tooth individually, marking root boundaries beforehand. Any additional accent holes should be cut last, after the most structurally important features are secure. Treat each accent as its own isolated cut.

  6. Preserve and light at close range

    Coat every cut surface and all bridge strips with petroleum jelly immediately. Place an LED close to the back interior wall so it illuminates the brain cutouts and eye bars at maximum depth. Reapply petroleum jelly every two days and keep the pumpkin cool to extend the display season.

Written with AI to match this design

Gather your supplies

Check things off as you get ready.

Work on a stable surface, keep your free hand out of the cutting path, and have an adult handle sharp tools.

Three levels of light

  • Leave intact

    The structural rind network between apertures, including all bridge strips, stays solid to hold the design together.

  • Peel & shade

    None; all glow is achieved through full cut-throughs.

  • Cut through

    Both eye bar sockets (four quadrants each), all brain-shaped cheek apertures, rooted teeth openings, and any decorative accent holes are cut completely through for layered full-brightness glow.

Learn the carving basics

Before you start cutting

How do I keep the brain lobes from tearing while cutting the curved edges?

Use a flexible thin blade and move in one continuous arc per lobe, entering at one side of the curve and exiting at the other without reversing direction mid-stroke. Sawing back and forth in curves creates micro-tears that widen as the pumpkin dries. If the pumpkin surface is slippery, blot it dry before cutting.

What is the minimum safe bridge width between apertures on a dense design like this?

A half-inch is the practical minimum for rind bridges on an expert-level design; anything narrower risks collapse within a few days. In areas where two large apertures run close together, consider widening one side of the cut to give the bridge more material.

How long will this carving hold together?

A well-preserved expert carving typically lasts five to seven days indoors with petroleum jelly on all cuts. Outdoors in warm or dry weather it may last only three to four days. Refrigerating the pumpkin each night (bagged to prevent drying) is the single most effective way to extend the display.

Your take belongs here, too.

Changed a detail? Made it simpler? Share a photo of your version and tell the community what worked.

Share your pumpkin

More pumpkins like this

You've reached the end · 8 pumpkins
The Patch Report

Fresh pumpkins, in your inbox.

The best new carvings, ideas worth stealing, and how-tos for carving season. Short, seasonal, and gone by November.

A short email during carving season. Unsubscribe anytime. See our privacy policy.