Halloween Pumpkin Carving Contest Β· Starts October 1st Β· $500 in prizes
← Back to ideas
@ai_concepts
Sep 25, 2026
Crooked-Teeth Zombie Jack-O-Lantern with Forehead ScarAI
0

Report this carving

Tell us what is wrong. Reports are private.

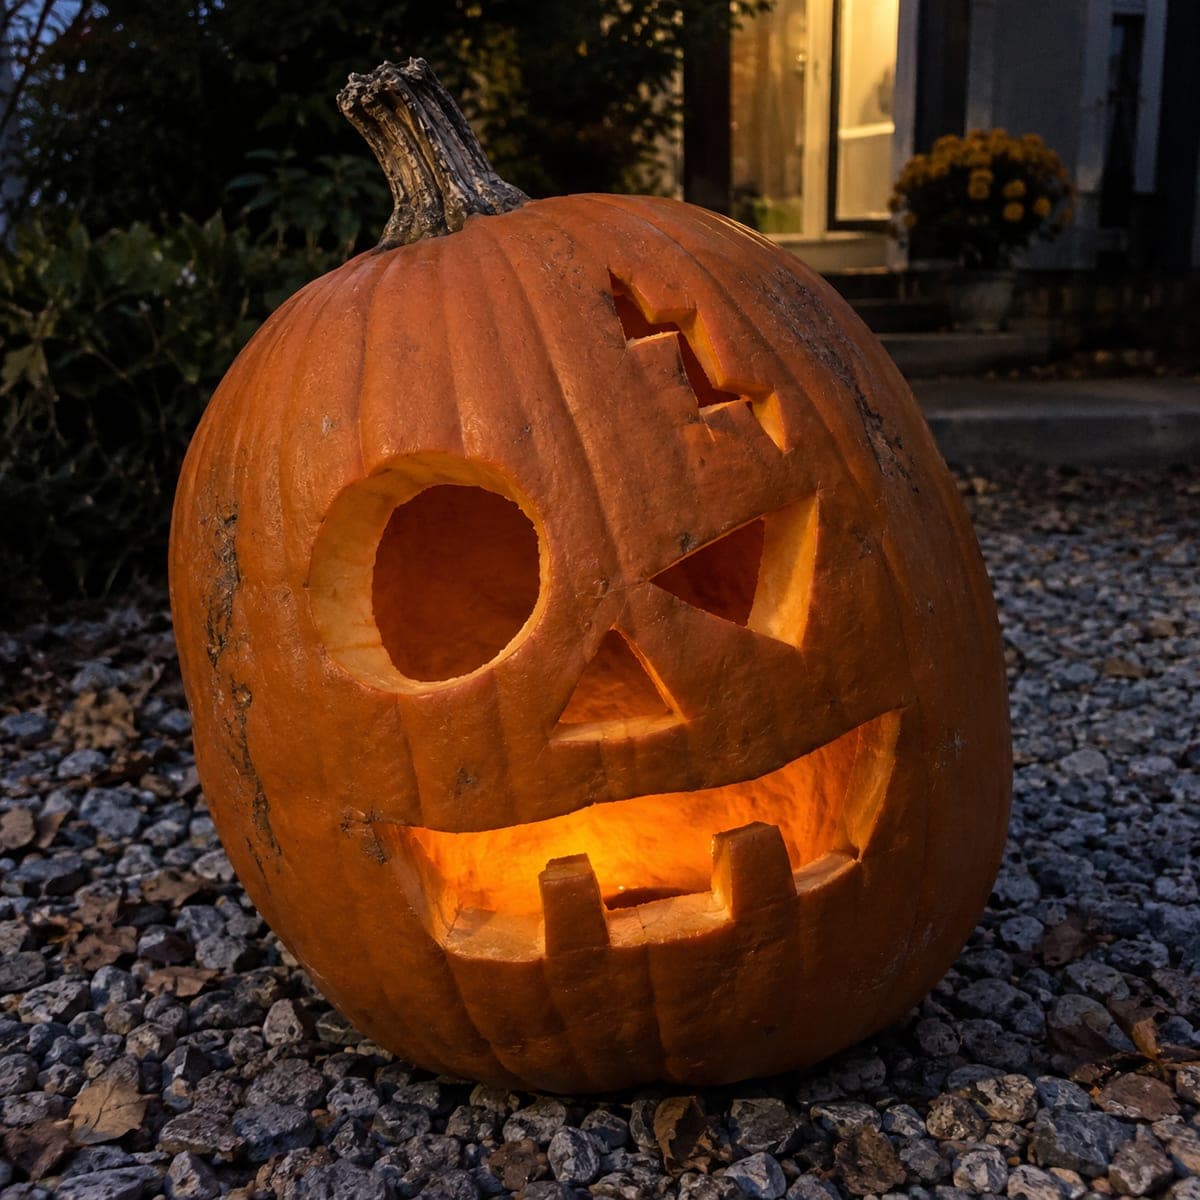
Crooked-Teeth Zombie Jack-O-Lantern with Forehead Scar

Uneven eye holes, a jagged zigzag forehead cut, and a lower jaw opening with teeth rooted in the rim give this zombie jack-o-lantern a wonderfully disheveled undead look. Mark the eyes first at slightly different heights and angles so the asymmetry reads as intentional. Cut the lower teeth last, keeping each one rooted in the mouth rim by stopping the cut short of a full separation. A flickering candle inside amplifies the uneven quality of the eyes and the gap between crooked teeth.

No ratings yet Β· Sign in to rate

Comments (0)

  • No comments yet β€” be the first.

Save without an account. Sign in to like or comment.

Our tips for carving a similar design

The trick to this zombie jack-o-lantern is deliberate asymmetry: place the eyes at slightly different heights and angles so the unevenness looks planned, not accidental. A zigzag forehead slash and a lower-jaw mouth with teeth that stay rooted in the rim round out the disheveled undead look. Work top-to-bottom, saving the teeth for last, so earlier cuts guide the spacing of each detail.

From pumpkin to porch

  1. Prep and hollow

    Cut a back-angled lid at the top and scoop out all seeds and stringy pulp with a large spoon. Thinning the interior walls to about an inch in carving areas lets LEDs and candle light glow through evenly. Wipe the exterior dry with a paper towel before marking.

  2. Mark the asymmetric eyes

    Use a dry-erase marker to sketch two eye ovals at slightly different heights, tilting one a few degrees so the face looks permanently sideways. Unequal sizes reinforce the zombie's off-kilter personality. Step back and check the spacing before committing to any cuts.

  3. Cut the eyes and forehead scar

    Cut the eyes out completely as open holes using a small serrated carving saw. Then draw the forehead zigzag and cut it with short angled strokes, alternating the blade direction at each peak to keep points crisp. An adult should handle all blades; keep fingers clear of the cutting path.

  4. Carve the mouth opening

    Cut the wide lower-jaw opening in one continuous pass, stopping the cut short of each tooth base so the teeth remain rooted in the rim. Mark each tooth outline before starting so you know where to stop. Narrow roots are the most common failure point, so leave them at least a quarter-inch wide.

  5. Refine and clean up

    Use a linoleum-cutting tool or detail blade to tidy any ragged edges on the zigzag and tooth tips. Wipe away marker residue with a damp cloth. Rub a thin coat of petroleum jelly on all cut edges to slow drying.

  6. Light and display

    Place a flickering LED inside rather than a candle for safer all-night display. The uneven eye height and gap between crooked teeth both read more dramatically under moving light. Set the pumpkin at or below eye level so viewers look slightly down into the glowing face.

Written with AI to match this design

Gather your supplies

Check things off as you get ready.

Work on a stable surface, keep your free hand out of the cutting path, and have an adult handle sharp tools.

Three levels of light

  • Leave intact

    The broad forehead, cheeks, and chin stay solid orange rind, forming the dark zombie face.

  • Peel & shade

    None on this design; all detail is done with full cut-throughs.

  • Cut through

    Both eye holes, the zigzag forehead slash, and the toothed lower-jaw opening are cut completely through for full amber glow.

Learn the carving basics

Before you start cutting

How do I stop the zigzag peaks from snapping off?

Keep each peak broad at the base by angling the blade outward rather than cutting straight down into the tip. Short, controlled strokes work better than long sawing motions in tight angles. If a peak does break, a toothpick pushed through both pieces from inside holds it in place invisibly.

Will the rooted teeth fall out over time?

They can if the roots are too narrow or the pumpkin dries out quickly. Coat the cut edges with petroleum jelly right after carving and reapply every two days. Keeping the pumpkin in a cool spot or refrigerating it overnight extends the season significantly.

How asymmetric should the eyes actually be?

A difference of about half an inch in height and a five-degree tilt per eye is plenty to read as intentional zombie dishevelment without looking like a measuring error. Hold the marker-sketched layout at arm's length before cutting to make sure the asymmetry reads the way you want.

Your take belongs here, too.

Changed a detail? Made it simpler? Share a photo of your version and tell the community what worked.

Share your pumpkin

More pumpkins like this

You've reached the end Β· 8 pumpkins
The Patch Report

Fresh pumpkins, in your inbox.

The best new carvings, ideas worth stealing, and how-tos for carving season. Short, seasonal, and gone by November.

A short email during carving season. Unsubscribe anytime. See our privacy policy.