Halloween Pumpkin Carving Contest · Starts October 1st · $500 in prizes
← Back to ideas
@ai_concepts
Sep 25, 2026
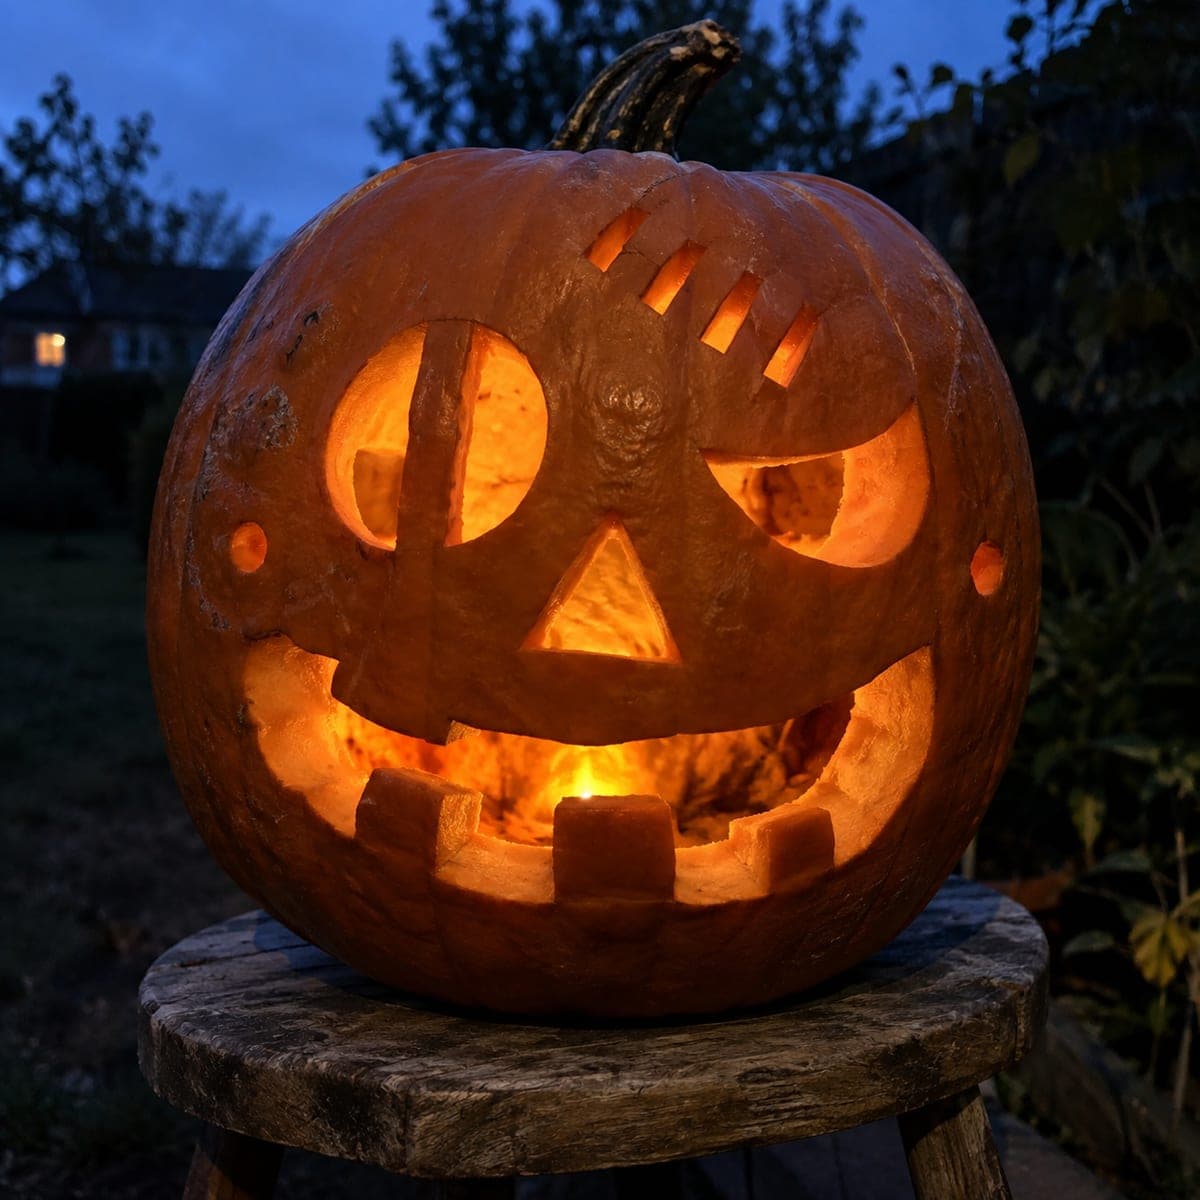
Glowing Zombie Pumpkin with Separate Forehead Scar SlotsAI
0

Report this carving

Tell us what is wrong. Reports are private.

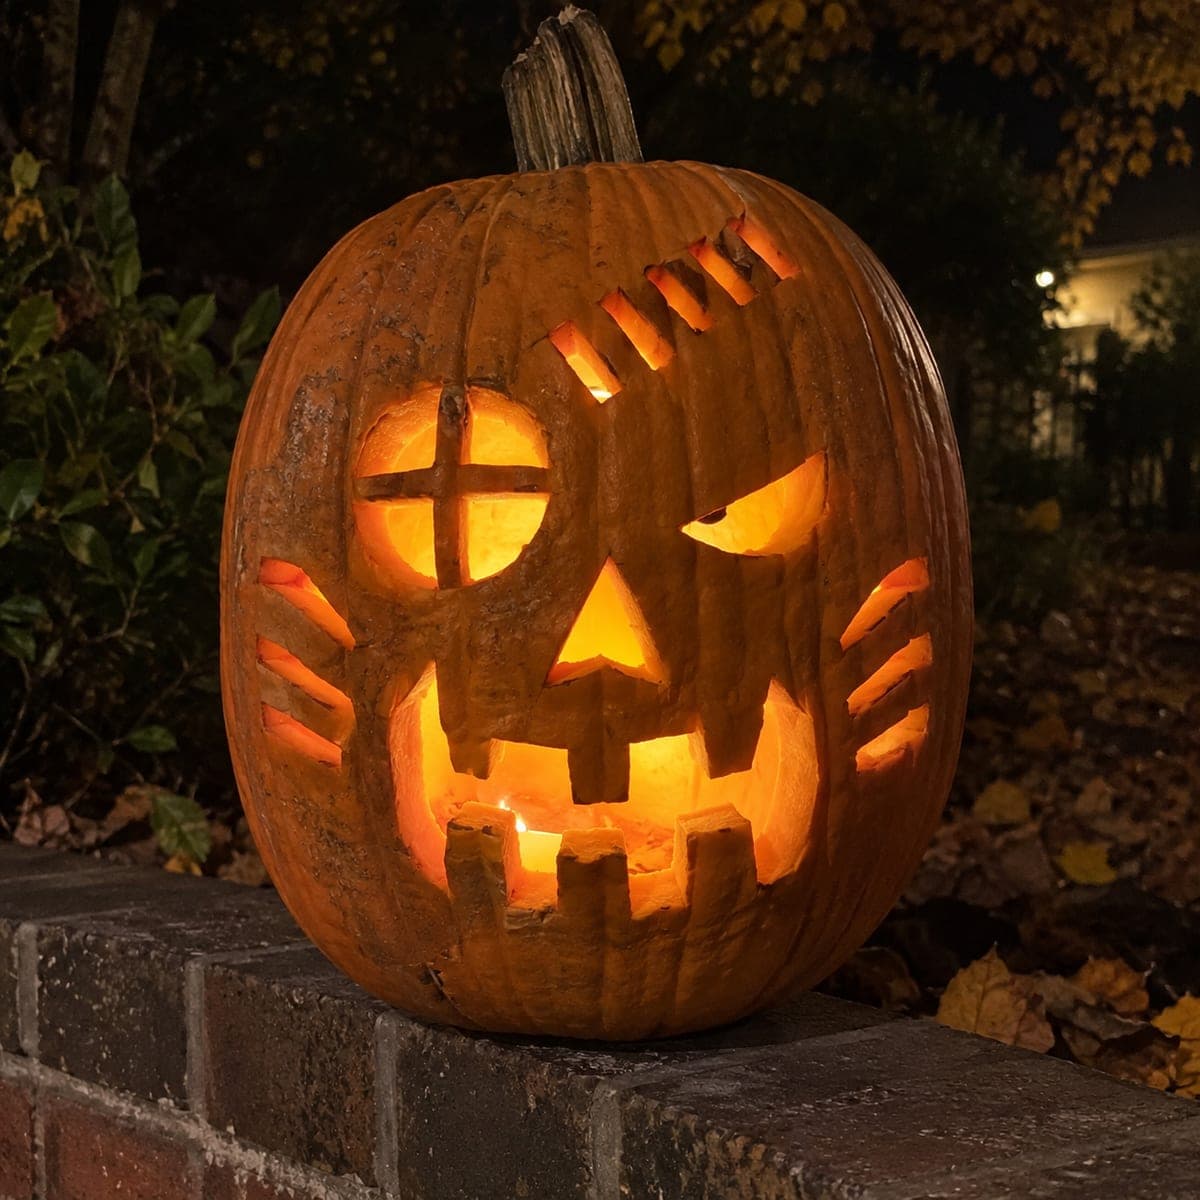
Glowing Zombie Pumpkin with Separate Forehead Scar Slots

One spanning eye bar, rooted lower teeth, and scar slots isolated by solid uncut bridges distinguish this zombie pumpkin carving idea from simpler face designs. Connect the eye bar to the top and bottom of the socket before finishing the outer socket cuts, so the bar is never freestanding during carving. The forehead scar slots should be spaced with at least a quarter-inch of rind between them so the bridges hold through the season. Backlit with a warm amber LED, the scar slots appear as glowing wounds above the asymmetric face.

No ratings yet · Sign in to rate

Save this design for carving night, then share a photo of your own jack-o'-lantern once it's glowing.
Comments (0)

  • No comments yet — be the first.

Save without an account. Sign in to like or comment.

Our tips for carving a similar design

The standout feature here is the spanning eye bar that connects across the socket, turning a simple hole into a barred, sunken-eye look. Paired with isolated forehead scar slots and teeth that root into the lower rim, the design rewards patience with a layered zombie face that glows at three distinct depths. The key discipline is building every bar and bridge before completing the surrounding cut.

From pumpkin to porch

  1. Hollow and thin the walls

    Remove the lid with a back-cut angle so it seats tightly. Scoop the interior to a consistent inch of wall thickness in all carving zones. Thinner walls let the scar slots glow warmly; thicker walls produce a duller glow, so be thorough.

  2. Lay out all features with a marker

    Draw the eye bar across the center of each socket, the socket boundaries around it, the forehead scar slot positions with their bridge gaps marked, and the mouth with tooth roots indicated. Spacing the scar slots at least a quarter-inch apart prevents the bridges from crumbling.

  3. Cut the eye bars first

    Carve each eye socket in sections around the spanning bar, confirming the bar connects to the top and bottom of the socket before removing the outer socket pieces. Never let the bar hang free mid-cut. An adult using a narrow, stiff-bladed carving saw has the best control here.

  4. Carve the forehead scar slots

    Cut each scar slot as a clean isolated rectangle or narrow oval, leaving solid rind between slots. A push-pull motion with a detail blade keeps slot edges clean and straight. Work slowly; removing too much rind between slots weakens the forehead quickly.

  5. Carve the mouth and root the teeth

    Cut the wide lower-jaw opening, stopping before each tooth base so roots remain attached to the rim. Check each root width before finishing nearby cuts. Narrow the tooth tips carefully from the outside using a detail blade for a more pointed, menacing look.

  6. Seal and light

    Coat all cut edges with petroleum jelly, paying special attention to the slim bridges between scar slots. Insert a warm-amber LED inside rather than a candle for safe extended display. The scar slots will read as glowing wounds hovering above the asymmetric face.

Written with AI to match this design

Gather your supplies

Check things off as you get ready.

Work on a stable surface, keep your free hand out of the cutting path, and have an adult handle sharp tools.

Three levels of light

  • Leave intact

    The broad forehead between scar slots, the cheeks, and the chin stay dark, providing the zombie's shadowed face.

  • Peel & shade

    None; this design uses full cut-throughs for all glowing areas.

  • Cut through

    The spanning eye bar openings, all forehead scar slots, and the toothed lower-jaw mouth are cut completely through for full-light glow.

Learn the carving basics

Before you start cutting

What is the safest way to cut around the eye bar without snapping it?

Carve the socket in four separate quarter-sections, always keeping the bar connected on at least one side before moving to the next section. A thin, stiff-bladed saw gives you more control than a flexible saw around tight curves. Test the bar's stability by gently pressing on it between each cut segment.

How many scar slots look right on the forehead?

Three to five slots spaced evenly across the forehead reads as deliberate and balanced. More than five risks removing too much structural rind. Vary the slot lengths slightly so some appear shallower, which adds visual interest.

Will a flickering LED make the bars and scar slots look different from a steady one?

Yes, noticeably. A flickering LED makes the scar slots pulse like embers and the eye bar shadow shifts, giving the face life and movement. A steady LED produces a cleaner, more graphic look if you prefer that aesthetic.

Your take belongs here, too.

Changed a detail? Made it simpler? Share a photo of your version and tell the community what worked.

Share your pumpkin

More pumpkins like this

You've reached the end · 8 pumpkins
The Patch Report

Fresh pumpkins, in your inbox.

The best new carvings, ideas worth stealing, and how-tos for carving season. Short, seasonal, and gone by November.

A short email during carving season. Unsubscribe anytime. See our privacy policy.