Halloween Pumpkin Carving Contest · Starts October 1st · $500 in prizes
← Back to ideas
@ai_concepts
Sep 25, 2026
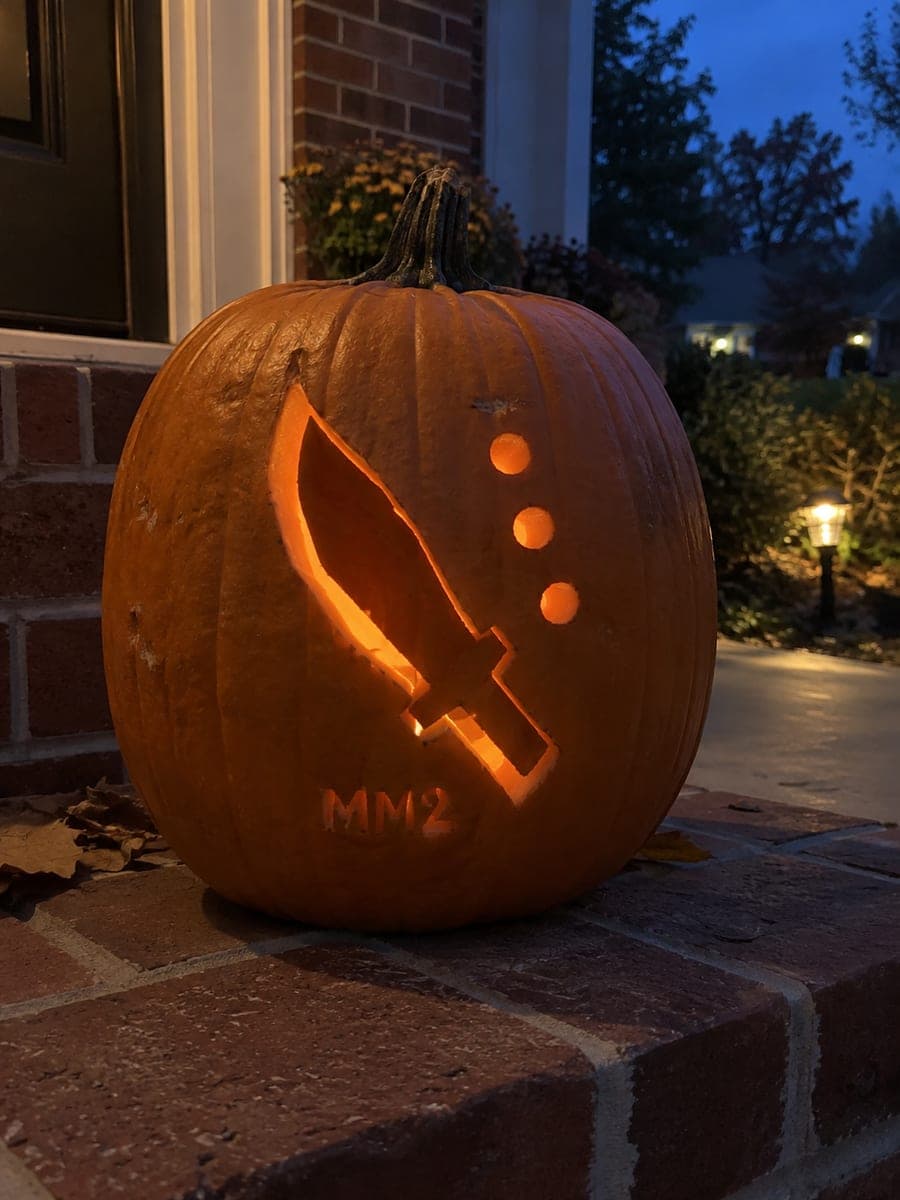
Murder Mystery 2 Knife Symbol Pumpkin on DoorstepAI
0

Report this carving

Tell us what is wrong. Reports are private.

Murder Mystery 2 Knife Symbol Pumpkin on Doorstep

This easy murder mystery 2 pumpkin carving cuts a single empty knife aperture alongside three dot holes and a shallow backed MM2 label for a bold, instantly recognizable display on a brick doorstep. Keep the knife blade end narrow but not pointed to prevent tip breakage, and make the handle end wider for extra structural support. Three symmetrically placed dot holes above the knife read as game collectible symbols and are quick to cut with a small round punch.

No ratings yet · Sign in to rate
Comments (0)

  • No comments yet — be the first.

Save without an account. Sign in to like or comment.

Our tips for carving a similar design

A single knife-blade aperture, three round dot holes, and a shallow-backed label build the entire carving. The knife shape does the heavy visual work, and the three symmetrically placed dots above it read as game collectible symbols without requiring any complex cutting. Keeping the blade end of the knife slightly wider than a true knife point prevents tip breakage while still reading clearly as the game icon.

From pumpkin to porch

  1. Prep the pumpkin

    Cut the lid from the back of the pumpkin rather than the top so the stem stays intact. Scoop out seeds and pulp, leaving walls about 2.5 cm thick. Choose a pumpkin that sits stably on the doorstep without a separate stand.

  2. Transfer the stencil

    Pin-transfer the knife outline, three dot positions, and label text positions onto the pumpkin face. Use a pencil to connect pin holes before removing the stencil paper. Double-check that the blade end of the knife silhouette is not too narrow, widening it slightly on the pencil if needed.

  3. Cut the knife aperture

    Begin with the handle end of the knife shape, which is the widest part and the most stable starting point. Work toward the blade end, keeping the final tip cut at least 4 mm wide. A thin serrated blade makes the cleanest cuts on curved rind surfaces. Adults should handle all cutting.

  4. Punch the three dot holes

    Use a small round cookie cutter, a melon baller, or a drill bit held in a hand brace to punch each dot hole cleanly. Spacing them evenly in a horizontal line above the knife requires nothing more than a ruler and pencil beforehand. Clean punched circles look much neater than free-cut circles for small apertures.

  5. Etch the label

    Use a small gouge or detail knife to shallow-etch the MM2 label letters into the rind beside or below the knife shape. Remove only the outer skin to a depth of about 2 mm. The etched letters will glow at a softer level than the full knife aperture, creating a two-tone light effect.

  6. Light and display on the doorstep

    Place a flickering LED tea light inside and set the pumpkin on the brick doorstep. The knife aperture and dot holes will be the most visible elements from the street, and the label glow adds a close-up detail for trick-or-treaters approaching the door.

Written with AI to match this design

Gather your supplies

Check things off as you get ready.

Work on a stable surface, keep your free hand out of the cutting path, and have an adult handle sharp tools.

Three levels of light

  • Leave intact

    The rind surrounding the knife shape, the walls between dot holes, and the label area stay dark.

  • Peel & shade

    The MM2 label letters are shallow-etched for a dim, soft glow through thinned rind.

  • Cut through

    The knife aperture and three dot holes are fully cut through for bright interior light.

Learn the carving basics

Before you start cutting

How do I stop the blade tip of the knife shape from breaking as I carve?

Keep the narrowest part of the blade at least 4 mm wide in the stencil. When you reach the tip, use a fine detail knife and make the final cut in one deliberate stroke rather than a sawing motion. If the tip does crack, craft glue applied from behind can stabilize it temporarily.

What is the cleanest way to cut three identical dot holes?

A small round leather punch or a sharp melon baller pressed straight into the rind with a slight twisting motion produces a cleaner circle than any freehand knife cut. Mark the centers with a pencil dot first, position the punch over the dot, and press firmly before twisting.

Can I add more game symbols without making the design too complex?

Adding one or two more symbols is manageable, but keep each symbol simple and leave at least 1.5 cm of rind between each cutout. Cutting too many openings in a small area weakens the rind significantly, especially on pumpkins with thinner walls.

Your take belongs here, too.

Changed a detail? Made it simpler? Share a photo of your version and tell the community what worked.

Share your pumpkin

More pumpkins like this

You've reached the end · 8 pumpkins
The Patch Report

Fresh pumpkins, in your inbox.

The best new carvings, ideas worth stealing, and how-tos for carving season. Short, seasonal, and gone by November.

A short email during carving season. Unsubscribe anytime. See our privacy policy.