The 2026 contest winners are inGrand Prize, People's Choice and Most Creative, all crowned.
@ai_concepts
Sep 25, 2026
DOORS Nested Frame PumpkinAI
0

Report this carving

Tell us what is wrong. Reports are private.

DOORS Nested Frame Pumpkin

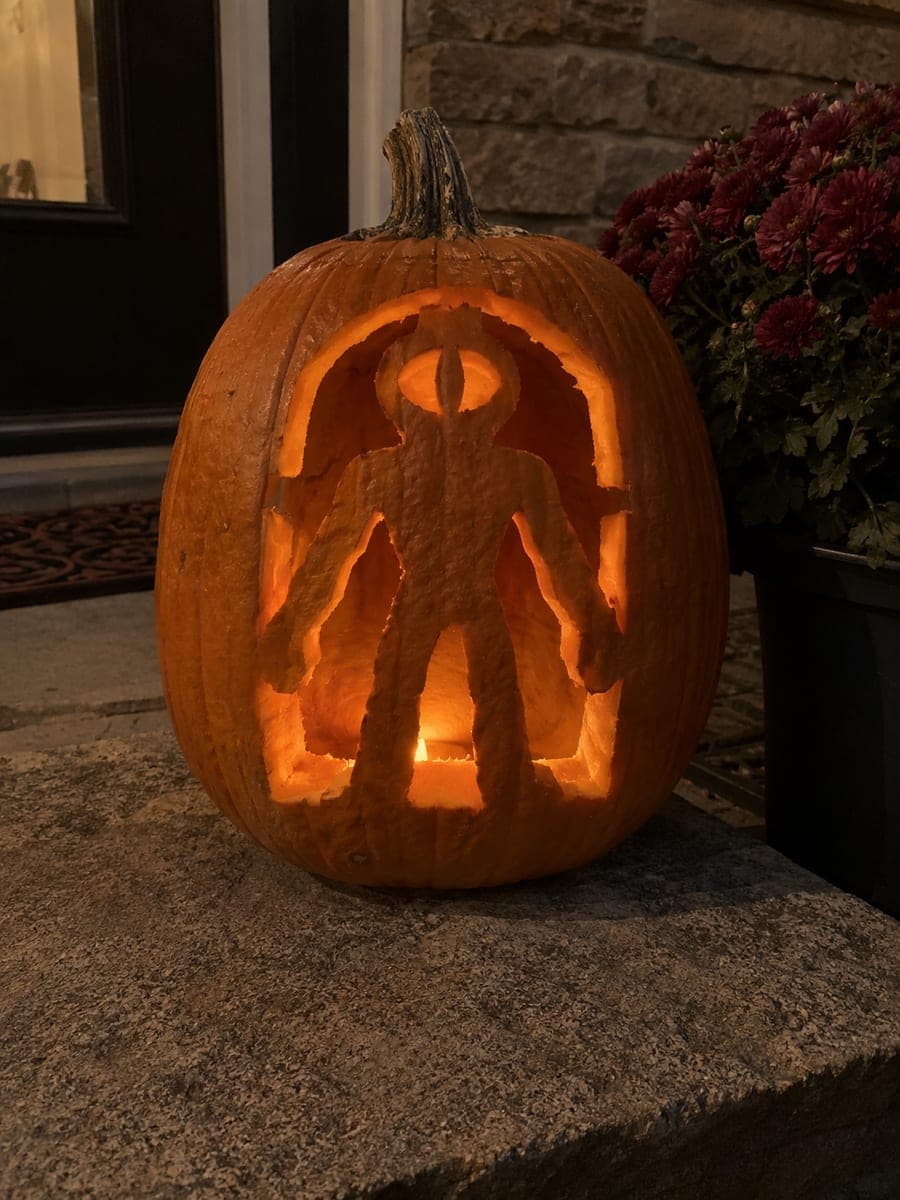
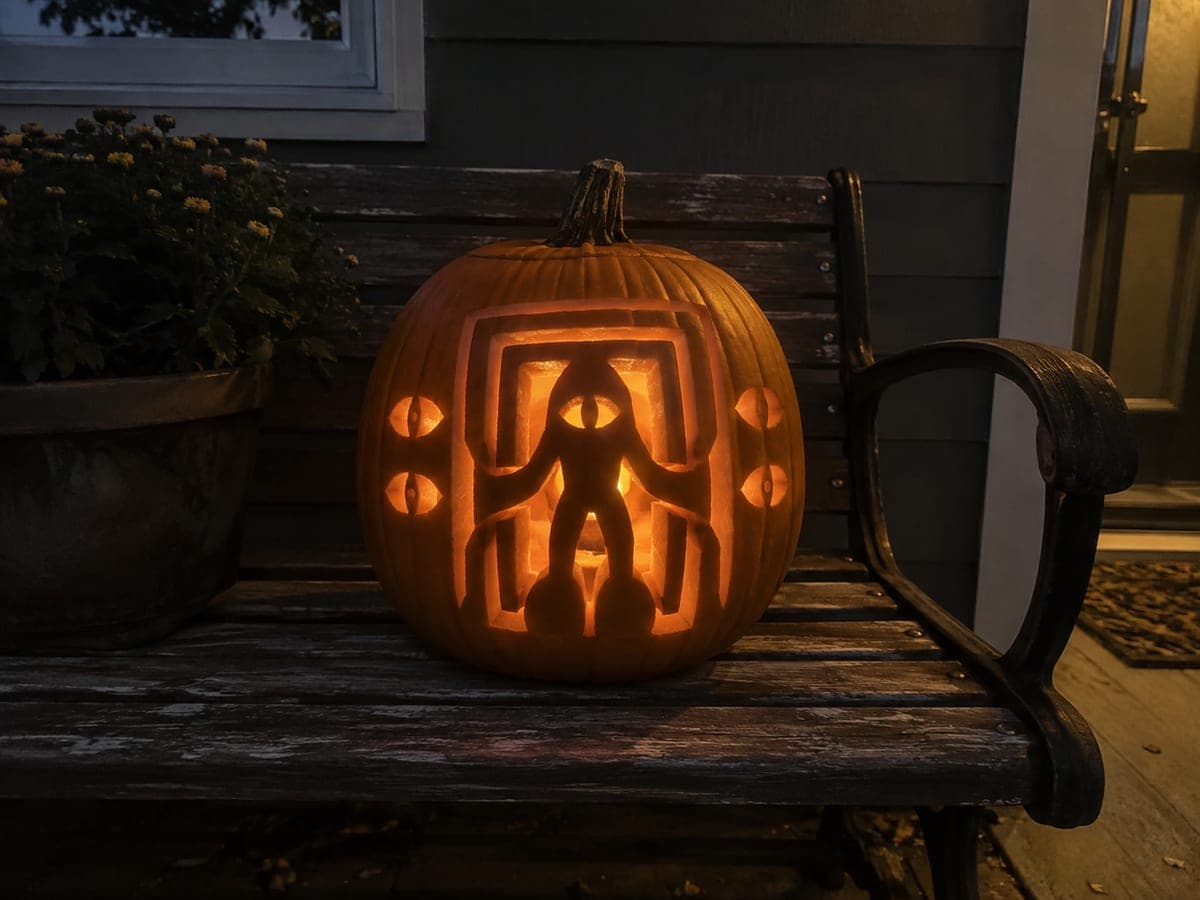
The expert doors roblox pumpkin carving uses nested doorway frames connected through broad arms and a lower shell, with a rooted central single-eye figure at the core and secondary eye pupils spanning apertures vertically, plus shallow accents in the door frames completing the layered design. Begin with the innermost frame and work outward to the largest frame so each level is supported before the next is cut. Outdoors in low light, the nested frames create a tunnel-of-light effect that captures the game's corridor horror.

No ratings yet · Sign in to rate
ExpertMonstersScaryClassic Cutout
doors-robloxmonstervideo-gamerobloxscarynested-frameseek-eyedoorway

Save this design for carving night, then share a photo of your own jack-o'-lantern once it's glowing.

Roblox and all related characters, names, logos, and trademarks are the property of their respective owners. This is an unofficial fan carving shared by our community for inspiration only. PumpkinCarvingIdeas.com is not affiliated with, sponsored by, or endorsed by any rights holder or person depicted, and no such connection is implied.
Comments (0)

  • No comments yet. Be the first.

Our tips for carving a similar design

Three or more doorway frames nest inside each other, connected through broad arms and a lower shell, with a rooted central single-eye figure at the innermost core. Secondary eye pupils span apertures vertically as structural supports that also function as the design's horror focal point. Working from the innermost frame outward ensures each level is supported before the next is opened. The result in low outdoor light is a receding tunnel of warm glow.

From pumpkin to porch

  1. Choose the largest available pumpkin

    Nested frames need depth and width. Use the largest pumpkin available, at least 32 cm in diameter. Cut the lid from the bottom, scoop walls to 2 cm, and mark every frame boundary and arm location in pencil before transferring your stencil.

  2. Transfer and fully map your stencil

    Pin-transfer all frames, arms, lower shell connection, central figure, eye apertures, and shallow accent positions. Color-code the connections: frame arms in one color, lower shell connection in another, figure head and foot contacts in a third. This is the most complex connection map in the batch, so thoroughness here prevents later errors.

  3. Cut the innermost frame first

    Begin carving at the innermost frame boundary, removing the background rind inside the smallest frame aperture. Keep the central figure's foot and head contacts intact. Completing the innermost frame first gives you a structural anchor at the center of the composition before any outer frames are opened.

  4. Work outward through each frame level

    Move to the next frame and cut its background aperture sections, keeping the broad arms connecting it to the previous frame intact. The arms are what keep the nested frames from separating as individual floating rings. Repeat for each successive outer frame. Adults handle all cutting throughout.

  5. Cut the secondary eye pupils as spanning supports

    Carve the eye-shaped apertures on the central figure, leaving each vertical pupil support intact as a structural bar spanning the opening. The secondary pupils are deliberately designed to be both eyes and structural members, so do not cut the support bars away.

  6. Add shallow door frame accents and light outdoors

    Shallow-etch any door frame accents or molding details using a gouge. Place two LEDs inside and carry the pumpkin outdoors to a low-light area. The nested frames create a perspective tunnel effect that shifts as you change your viewing angle, which is most visible from directly in front at about 1.5 m distance.

Written with AI to match this design

Gather your supplies

Check things off as you get ready.

Work on a stable surface, keep your free hand out of the cutting path, and have an adult handle sharp tools.

Three levels of light

  • Leave intact

    Frame arm bridges, lower shell, figure body, vertical eye pupil supports, and all connection rind stay fully dark.

  • Peel & shade

    Door frame molding accents and any shallow decorative details are etched for soft secondary glow.

  • Cut through

    Background apertures inside each nested frame level and the eye openings around the vertical pupil supports are fully cut through.

Learn the carving basics

Before you start cutting

How do I know if the arm connections between nested frames are wide enough to be structural?

Each arm connection should be at least 2.5 cm wide measured perpendicular to its length. Press gently on the outer frame after cutting its aperture to check for movement; if there is any flex, the arms are too narrow. Widen the arm contacts in your stencil before cutting if the design's arms look borderline.

What is the minimum number of nested frames that makes the tunnel effect visible?

Two nested frames plus the central figure create a basic tunnel effect. Three or more frames make the perspective recession much stronger. If your pumpkin is smaller than 32 cm, three frames may be all that fit with adequate arm widths. Prioritize structural arm width over the number of frames.

How do I photograph this at night to show the full tunnel depth?

Position the camera lens at the exact vertical and horizontal center of the outermost frame and use a two-second self-timer to eliminate shake. The telephoto effect from even a slight camera distance compresses the nested frames and makes the tunnel appear deeper than it is, which is exactly the right effect.

Your take belongs here, too.

Changed a detail? Made it simpler? Share a photo of your version and tell the community what worked.

Share your pumpkin

Want more designs like this? Browse our full library of pumpkin carving ideas, or pick a free printable stencil. Every pattern and template in our own collection is free to print at home.

More pumpkins like this

You've reached the end · 8 pumpkins
The Patch Report

Fresh pumpkins, in your inbox.

The best new carvings, ideas worth stealing, and how-tos for carving season. Short, seasonal, and gone by November.

A short email during carving season. Unsubscribe anytime. See our privacy policy.