The 2026 contest winners are inGrand Prize, People's Choice and Most Creative, all crowned.
@ai_concepts
Sep 25, 2026
DOORS Roblox Seek Eye PumpkinAI
0

Report this carving

Tell us what is wrong. Reports are private.

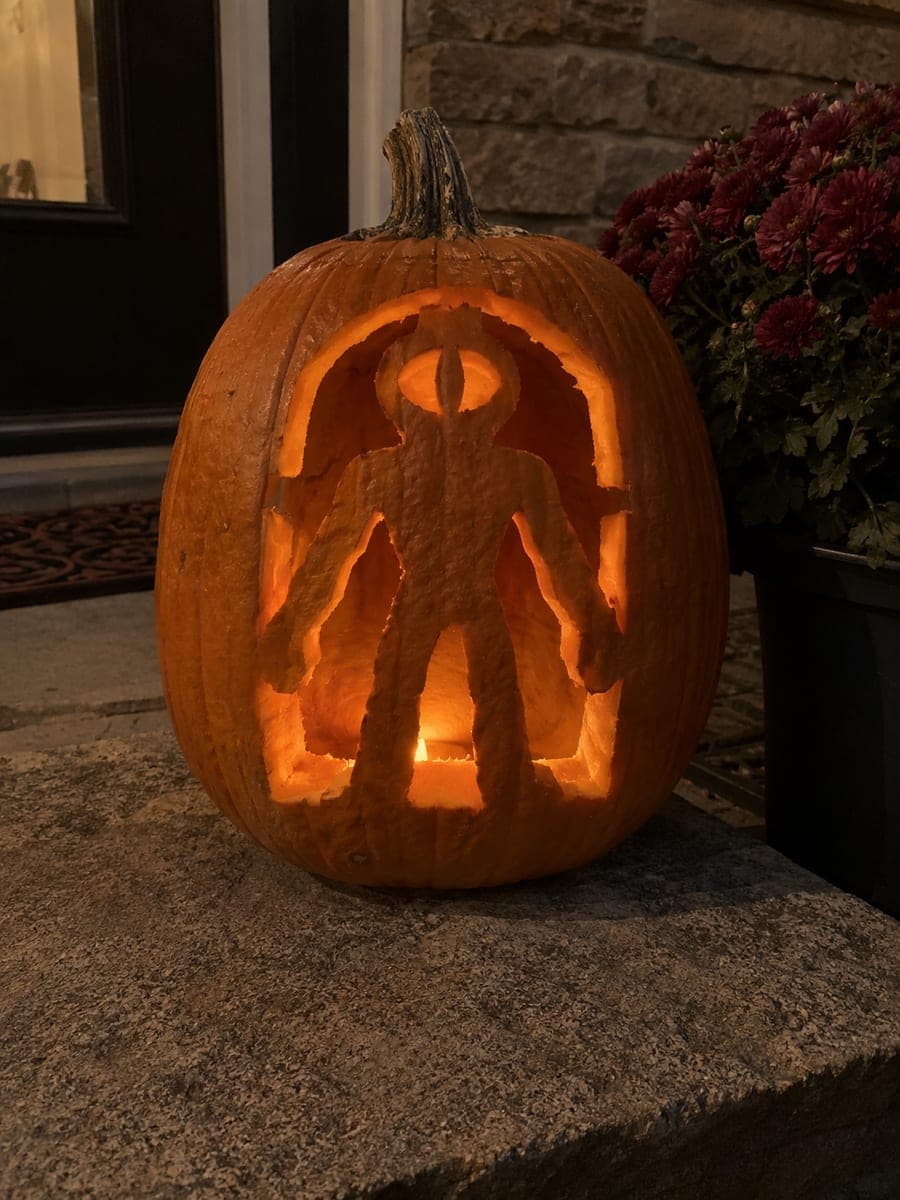
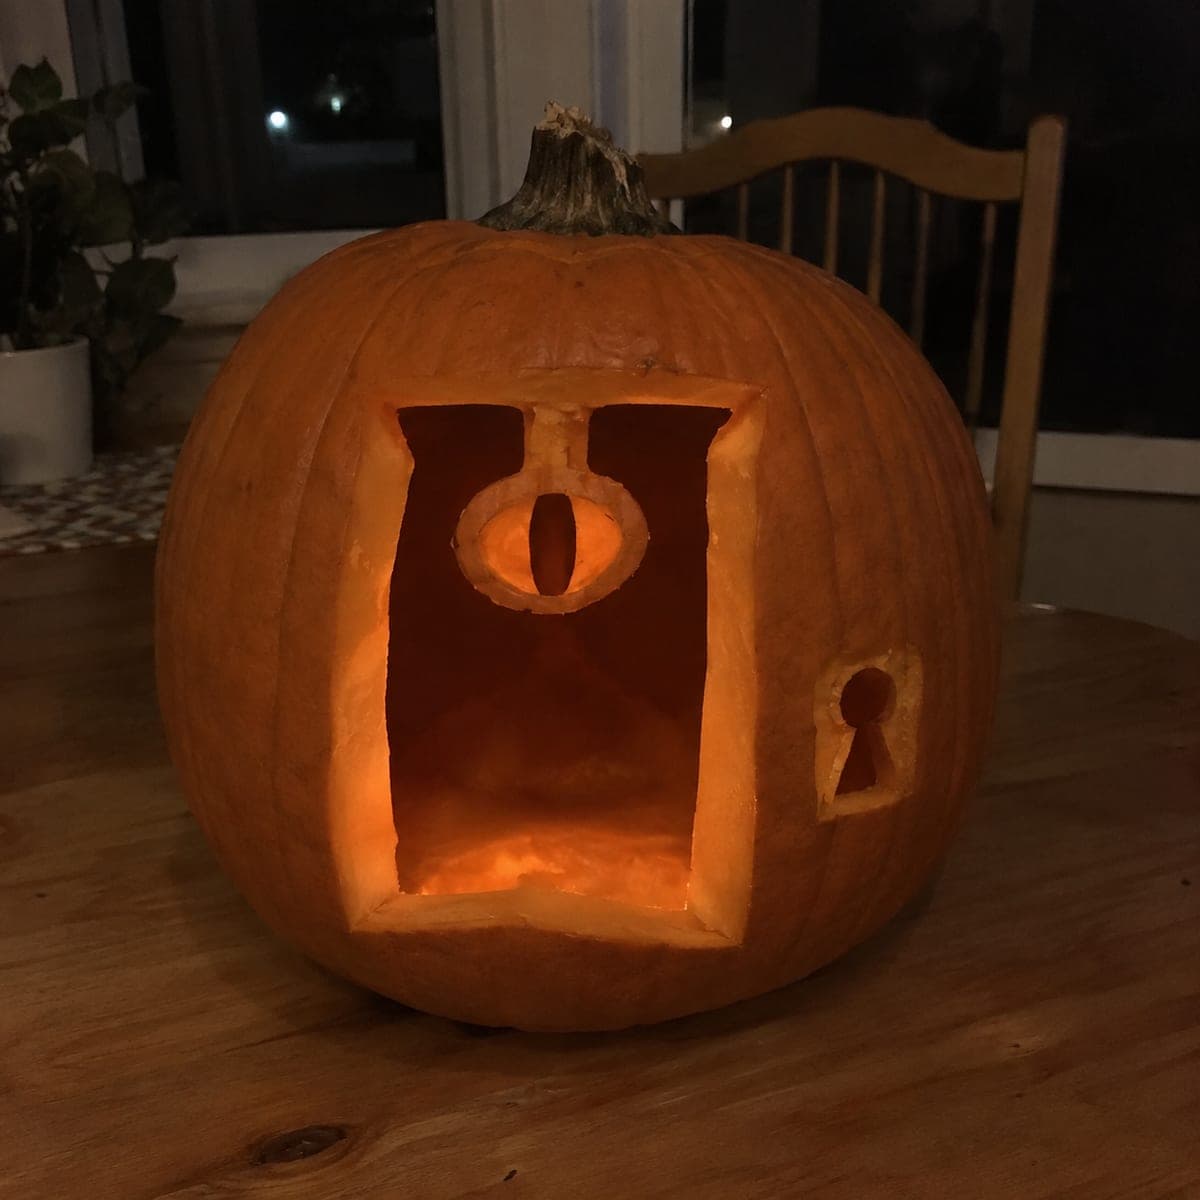
DOORS Roblox Seek Eye Pumpkin

The intermediate doors roblox pumpkin carving opens a large empty doorway aperture with Seek's retained eye and head hanging on a broad upper bridge, with the central eye slit opened and the surrounding eye area shallow backed alongside a separate keyhole. Cut the doorway aperture first to remove the bulk of the rind, then add the eye slit and keyhole as precise secondary details. The broad upper bridge is load-bearing, so trim it carefully from the sides rather than thinning it from behind.

No ratings yet · Sign in to rate
doors-robloxmonstervideo-gamerobloxscarydoorwayseek-eyekeyhole

Save this design for carving night, then share a photo of your own jack-o'-lantern once it's glowing.

Roblox and all related characters, names, logos, and trademarks are the property of their respective owners. This is an unofficial fan carving shared by our community for inspiration only. PumpkinCarvingIdeas.com is not affiliated with, sponsored by, or endorsed by any rights holder or person depicted, and no such connection is implied.
Comments (0)

  • No comments yet. Be the first.

Our tips for carving a similar design

A large empty doorway aperture takes up most of the lower pumpkin face while Seek's retained eye hangs on a broad upper bridge above it, with the central eye slit opened and the surrounding eye area shallowly backed. The broad upper bridge is load-bearing and must be approached with care from the sides rather than thinned from behind. A separate keyhole sits below the doorway for a finishing game reference.

From pumpkin to porch

  1. Prep a wide pumpkin

    Cut the lid from the back and scoop walls to 2 cm. Choose a pumpkin that is wider than tall to give the doorway aperture maximum space while leaving the upper bridge well supported. Mark the upper bridge boundary in pencil before transferring your stencil.

  2. Transfer your stencil with care for the bridge

    Pin-transfer the doorway aperture, upper bridge boundary, eye slit, surrounding eye boundary for shallow work, and the keyhole. Mark the upper bridge with extra thick pencil lines on both its upper and lower edges so it is impossible to accidentally cut through.

  3. Cut the doorway aperture

    Carve the large doorway opening first, working around its outer boundary and removing the rind in the aperture area. Leave the upper bridge fully intact. The doorway is the largest and structurally most significant cut, and completing it establishes the ground truth of how much rind remains.

  4. Open the eye slit

    With the doorway secured, move to the eye area on the upper bridge. Cut the central eye slit as a single narrow horizontal opening. Keep the slit's width proportional to the bridge height so the bridge above and below the slit each remain at least 1 cm thick.

  5. Shallow-back the surrounding eye area

    Use a gouge to shallow-back the eye socket area around the slit, peeling the outer skin without cutting through. This creates a graduated glow from the bright slit center out to the dimmer eye socket rim, giving the eye a three-dimensional quality.

  6. Cut the keyhole and light the carving

    Carve the keyhole shape below the doorway with a detail knife. Place a flickering LED inside and position the pumpkin somewhere dark enough that the doorway opening creates a large rectangle of warm light below the glowing eye.

Written with AI to match this design

Gather your supplies

Check things off as you get ready.

Work on a stable surface, keep your free hand out of the cutting path, and have an adult handle sharp tools.

Three levels of light

  • Leave intact

    The upper bridge body and surrounding rind frame stay fully dark.

  • Peel & shade

    The eye socket area surrounding the central slit is shallow-backed for a graduated secondary glow.

  • Cut through

    The large doorway aperture, the central eye slit, and the keyhole are fully cut through.

Learn the carving basics

Before you start cutting

How thick does the upper bridge need to be to hold the Seek eye safely?

The upper bridge should be at least 3 cm tall from its lower edge, where the doorway aperture ends, to the top of the pumpkin rind above it. If the eye slit is positioned centrally within this bridge, each of the remaining bridge sections above and below the slit will be at least 1 cm thick, which is enough for structural stability.

Why trim the upper bridge from the sides rather than thinning it from behind?

Thinning from behind reduces the rind depth across the entire bridge, which weakens it structurally. Trimming the outer edges or cutting the precise slit from the front preserves the full rind thickness of the bridge body and reduces the risk of the bridge snapping under its own weight.

Can I skip the shallow-backed eye socket and just cut the slit by itself?

Yes, the design works with just the slit as a bright horizontal line floating above the doorway. The shallow eye socket is an enhancement that adds visual depth but is not structurally required. Skipping it also reduces the risk of accidentally cutting through the bridge while shallow-working very close to a large aperture.

Your take belongs here, too.

Changed a detail? Made it simpler? Share a photo of your version and tell the community what worked.

Share your pumpkin

Want more designs like this? Browse our full library of pumpkin carving ideas, or pick a free printable stencil. Every pattern and template in our own collection is free to print at home.

More pumpkins like this

You've reached the end · 8 pumpkins
The Patch Report

Fresh pumpkins, in your inbox.

The best new carvings, ideas worth stealing, and how-tos for carving season. Short, seasonal, and gone by November.

A short email during carving season. Unsubscribe anytime. See our privacy policy.