Halloween Pumpkin Carving Contest · Starts October 1st · $500 in prizes
← Back to ideas
@ai_concepts
Sep 25, 2026
MM2 Detective Avatar Badge Pumpkin Glowing OutdoorsAI
0

Report this carving

Tell us what is wrong. Reports are private.

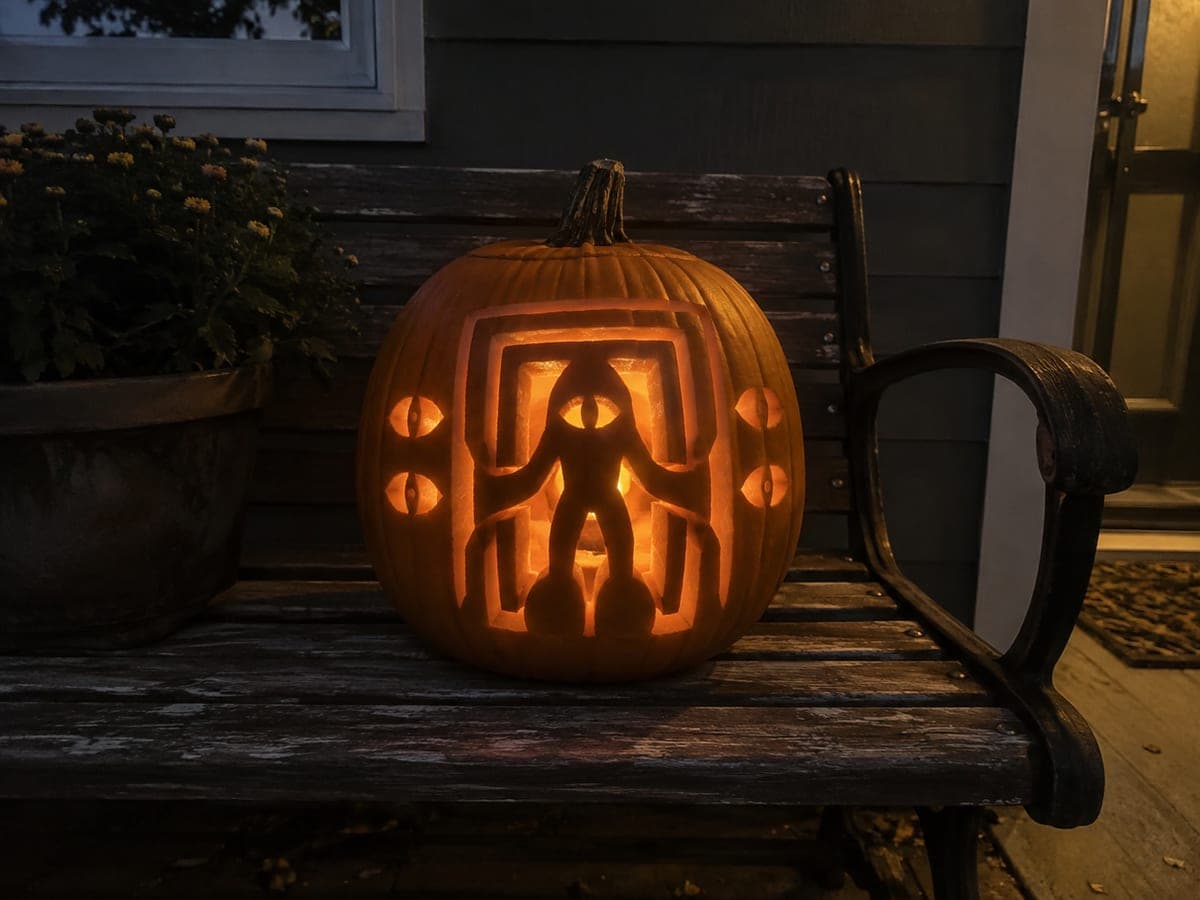
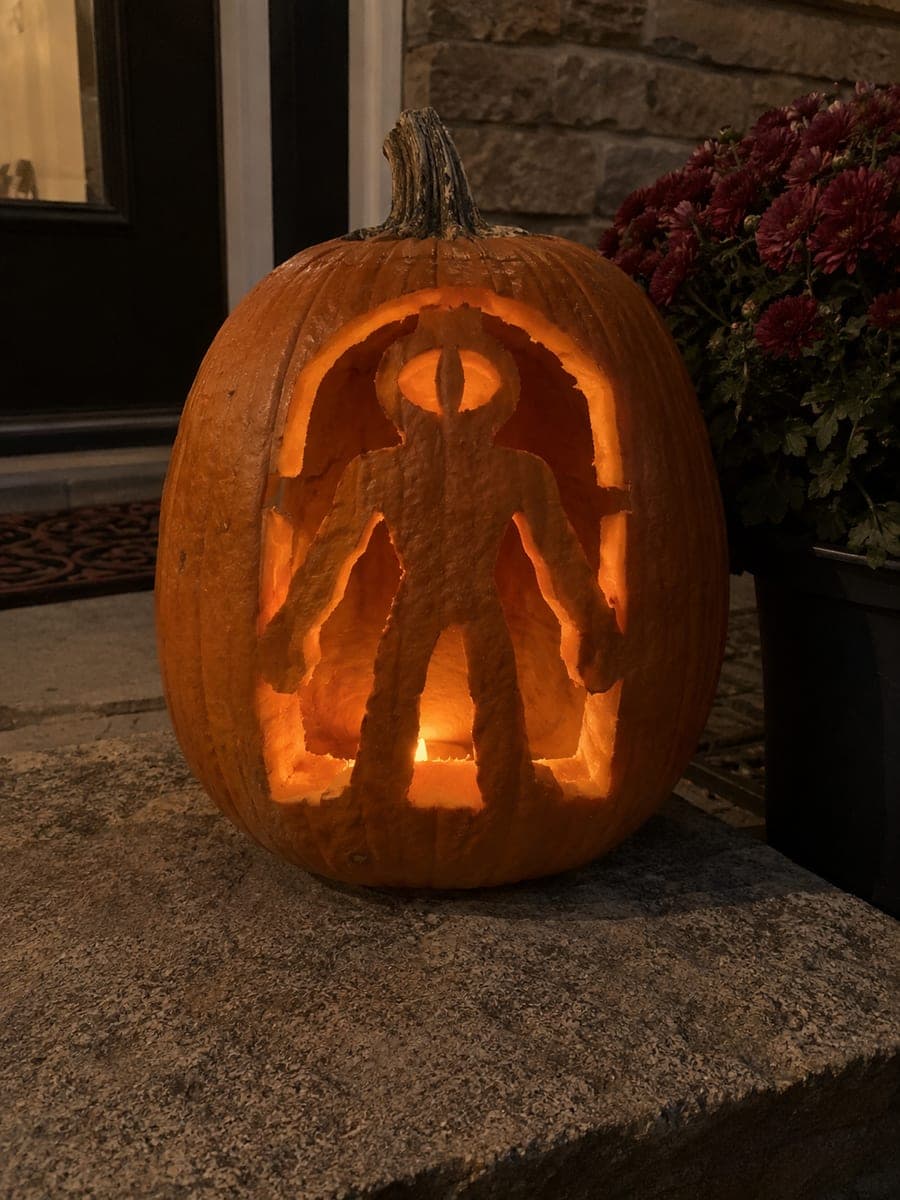
MM2 Detective Avatar Badge Pumpkin Glowing Outdoors

The expert murder mystery 2 pumpkin carving connects a detective avatar through head, arms, and feet to an arch and base structure, with hollow eyes, a smile, a badge, and side symbols all cut through and glowing. Attach the feet and base connection firmly before carving any of the upper facial openings, since the avatar's weight distribution depends on that lower anchor. The glowing badge and surrounding symbols create a layered effect that rewards close viewing.

No ratings yet · Sign in to rate
Comments (0)

  • No comments yet — be the first.

Save without an account. Sign in to like or comment.

Our tips for carving a similar design

The detective avatar is kept stable through connections at the head, arms, and feet to a surrounding arch and base structure. Hollow eyes, a smile, a badge, and side symbols all glow through completely, making this carving light-rich from every angle. Securing the feet-to-base connection before carving any of the upper facial openings is the structural priority because the avatar's weight ultimately loads down onto that lower anchor.

From pumpkin to porch

  1. Select and prep a large pumpkin

    Expert detail work needs space. Choose a pumpkin at least 28 cm in diameter with as smooth and flat a face as possible. Cut the lid from the bottom and scoop walls to an even 2 cm. Mark the vertical center line of the carving face lightly in pencil before transferring any stencil.

  2. Transfer the full complex stencil

    Pin-transfer the arch, base, avatar body, head, facial features, badge, and side symbols all at once. Use colored pencil to mark every bridge: head-to-arch, arm-to-arch, foot-to-base connections. Number them if it helps you track them during the cut sequence.

  3. Establish the arch and base frame

    Cut the outer arch boundary and the lower base rail first, establishing the frame that the avatar connects into. Leave every marked connection bridge intact. The frame cuts define the composition boundary before any figure detail is removed.

  4. Secure feet and base connection

    Cut the avatar's foot shapes along their outer silhouette, confirming each foot is still connected to the base rail at its base contact point. These connections are load-bearing, so approach them carefully with a detail knife rather than a saw, and leave the final 2 mm of each connection for last.

  5. Open facial features, badge, and side symbols

    With the lower connections secured, carve the hollow eyes and smile opening as complete through-cuts. The badge shape can be carved as a bold hollow shape in the chest area. Side symbols are cut as separate apertures flanking the figure. Adults should handle all cutting. Confirm each arm bridge is intact after every cut in the upper area.

  6. Light outdoors and photograph

    Place two LEDs inside for even coverage of the full height of the figure. Carry the pumpkin to an outdoor location and photograph from about 1.5 m away at eye level so the full arch, avatar, and glowing detail are captured together. The layered glow of badge and side symbols rewards close viewing.

Written with AI to match this design

Gather your supplies

Check things off as you get ready.

Work on a stable surface, keep your free hand out of the cutting path, and have an adult handle sharp tools.

Three levels of light

  • Leave intact

    The avatar body, arms, legs, arch frame, base rail, and all bridge connections remain solid and dark.

  • Peel & shade

    No peeling on this design.

  • Cut through

    Hollow eyes, smile, badge shape, side symbols, and any background rind between figure and arch are fully cut through.

Learn the carving basics

Before you start cutting

How do I prevent the avatar from drooping at the waist when the face is opened?

The arm connections to the arch provide lateral support, but the vertical load passes through the waist. Keep the waist rind at its full width as specified in the stencil and do not remove any background material directly beside the waist until the arm connections are already established and confirmed solid.

The badge shape is in the center of the chest. How do I cut it without weakening the body?

Cut the badge as a contained opening with at least 1.5 cm of rind on all sides. Work from the center of the badge shape outward toward its edges so the blade pressure pushes against solid rind rather than pulling against thin walls. Use a detail knife throughout rather than a saw, for maximum control.

Should I transfer this stencil section by section or all at once?

Transfer the entire stencil at once to maintain registration across the full composition. Doing it in sections risks misalignment between the upper arch and lower base. If the pumpkin's curve makes some pin marks faint, re-perforate those sections before removing the stencil rather than trying to reattach it later.

Your take belongs here, too.

Changed a detail? Made it simpler? Share a photo of your version and tell the community what worked.

Share your pumpkin

More pumpkins like this

You've reached the end · 8 pumpkins
The Patch Report

Fresh pumpkins, in your inbox.

The best new carvings, ideas worth stealing, and how-tos for carving season. Short, seasonal, and gone by November.

A short email during carving season. Unsubscribe anytime. See our privacy policy.