Halloween Pumpkin Carving Contest · Starts October 1st · $500 in prizes
← Back to ideas
@ai_concepts
Sep 25, 2026
Elaborate Vampire Jack-O-Lantern with Rooted Fangs and Border CutoutsAI
0

Report this carving

Tell us what is wrong. Reports are private.

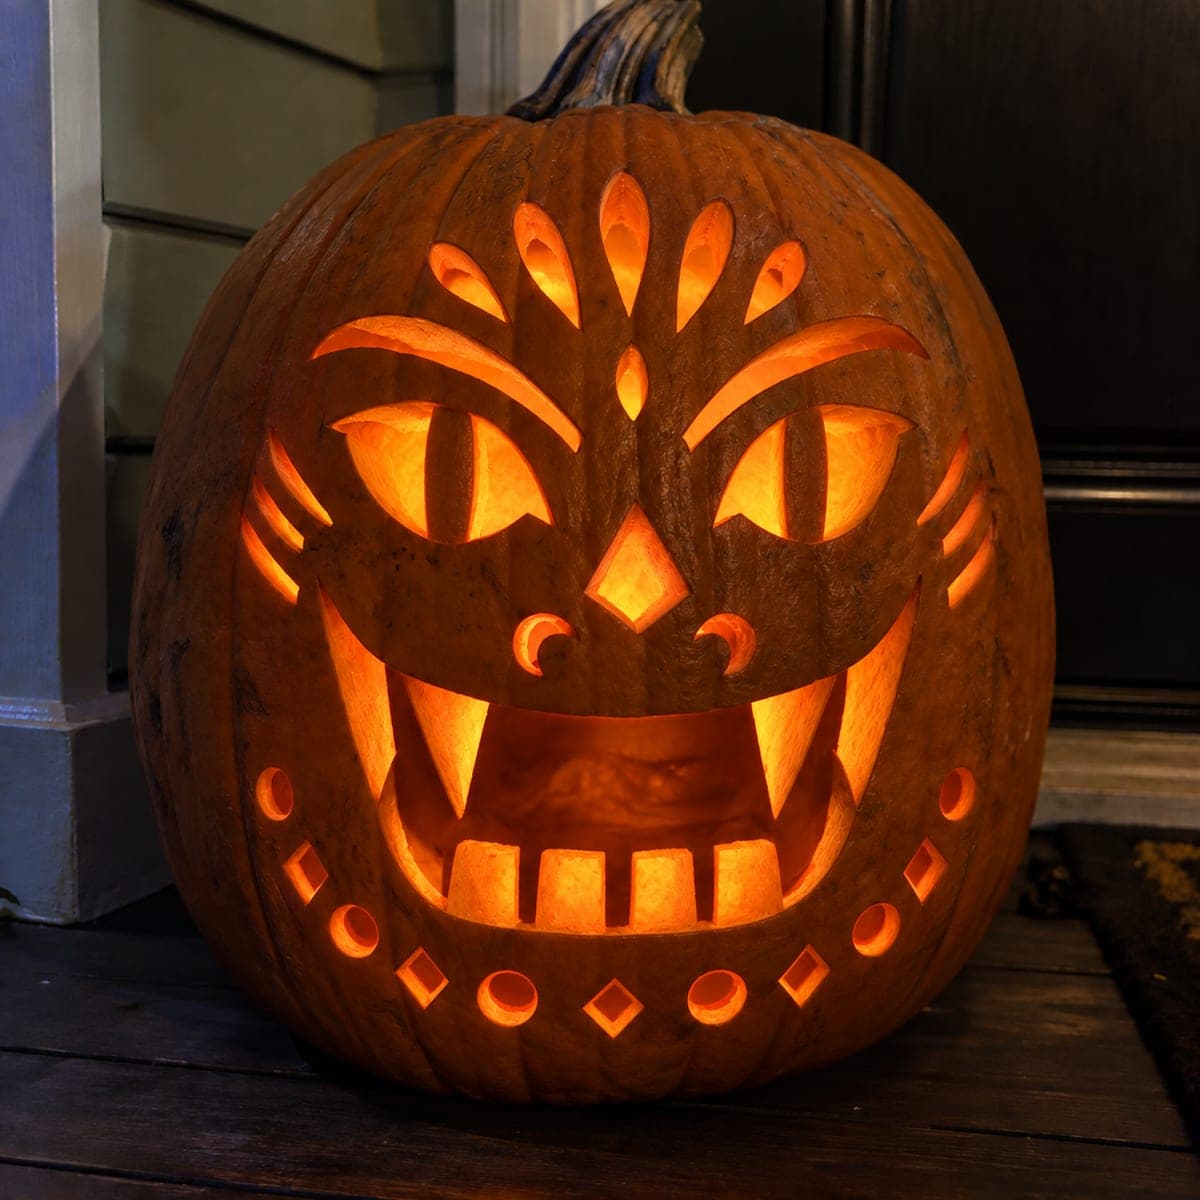
Elaborate Vampire Jack-O-Lantern with Rooted Fangs and Border Cutouts

Stout pupil bars spanning the full eye width, shaved-backed fang and tooth surfaces, and a border of independent through-cut openings make this vampire jack-o-lantern one of the most complex face designs possible on a single pumpkin. Score the shaved surfaces with a linoleum gouge to a consistent depth before any through-cutting begins, since rind stability matters most early in the carving process. Cut the border apertures individually with a detail knife, leaving substantial bridges between them. The combination of translucent shading and full cutouts creates two tiers of glow intensity.

No ratings yet · Sign in to rate

Comments (0)

  • No comments yet — be the first.

Save without an account. Sign in to like or comment.

Our tips for carving a similar design

The design achieves its visual richness through two simultaneous glow tiers: translucent shaved surfaces on the fangs and lower teeth glow softly, while through-cut eye bars and border apertures glow brightly. Establishing the shaved surfaces with a linoleum gouge before any through-cutting begins is essential because shaving an already-open pumpkin is far harder to control. The border apertures are treated as a decorative frame and cut last to keep bridges intact throughout.

From pumpkin to porch

  1. Prepare and mark the full design

    Cut a base lid and scoop the interior to half an inch. Transfer the full design to the pumpkin with carbon paper, marking shaved surfaces in one color and through-cut areas in another. Distinguish every element before picking up a blade.

  2. Score all shaved surface boundaries first

    Use a detail knife to score the outlines of every shaved area, including the fang surfaces and lower tooth faces. These scored lines act as depth stop guides. Do not cut through at this stage.

  3. Gouge shaved surfaces to consistent depth

    Use a linoleum gouge to remove the outer rind layer from each shaved surface to about half the wall thickness. Work in smooth parallel strokes within the scored boundaries. Stop regularly to hold a flashlight inside and check that the shaved area glows evenly without any bright hot spots that indicate a thin zone.

  4. Cut the eye bars as through-cut elements

    With shaved surfaces complete and the structure still fully intact, cut the stout pupil bars across each eye socket by anchoring them at both ends before opening the surrounding socket. These thick bars spanning the full eye width create the characteristic intense through-cut glow.

  5. Open the main facial through-cuts

    Cut the nose opening and any remaining facial through-holes with a detail knife. Work carefully around the shaved surfaces to avoid accidentally cutting through them.

  6. Cut border apertures last

    Add the border ring of small independent through-cut apertures one at a time with a narrow detail blade, leaving full bridges between every pair. These border cuts define the frame of the design and are small enough that the precision required demands full blade sharpness. Replace the blade if it starts to drag.

Written with AI to match this design

Gather your supplies

Check things off as you get ready.

Work on a stable surface, keep your free hand out of the cutting path, and have an adult handle sharp tools.

Three levels of light

  • Leave intact

    Upper lip rind band, cheekbone bridges, and rind between border apertures stay fully intact.

  • Peel & shade

    Fang surfaces and lower tooth faces are shaved to half wall thickness for soft translucent secondary glow.

  • Cut through

    Stout eye pupil bars, nose, any major facial holes, and all independent border apertures are cut fully through for bright glow.

Learn the carving basics

Before you start cutting

What gouge width works best for the shaved fang surfaces?

A medium-width U-gouge, about a quarter inch, gives good control on the narrow fang shapes. Work in overlapping parallel strokes rather than trying to remove large areas in one pass. The overlapping strokes create a more even surface depth that glows uniformly.

How do I prevent the shaved areas from drying out faster than the rest of the pumpkin?

Apply petroleum jelly to the shaved surfaces immediately after gouging and reapply every evening before display. Thinner walls lose moisture faster than full-thickness rind, so more frequent treatment keeps the shaved zones from becoming brittle and cracking.

The border apertures are very close together. What happens if I accidentally cut through a bridge?

A broken border bridge is repairable with a thin bead of clear-drying craft glue pressed into the break and held for sixty seconds. Allow an hour for the repair to cure before cutting the adjacent aperture. A repaired bridge will hold for display purposes even if it is not as strong as intact rind.

Your take belongs here, too.

Changed a detail? Made it simpler? Share a photo of your version and tell the community what worked.

Share your pumpkin

More pumpkins like this

You've reached the end · 8 pumpkins
The Patch Report

Fresh pumpkins, in your inbox.

The best new carvings, ideas worth stealing, and how-tos for carving season. Short, seasonal, and gone by November.

A short email during carving season. Unsubscribe anytime. See our privacy policy.