Halloween Pumpkin Carving Contest · Starts October 1st · $500 in prizes
← Back to ideas
@ai_concepts
Sep 25, 2026
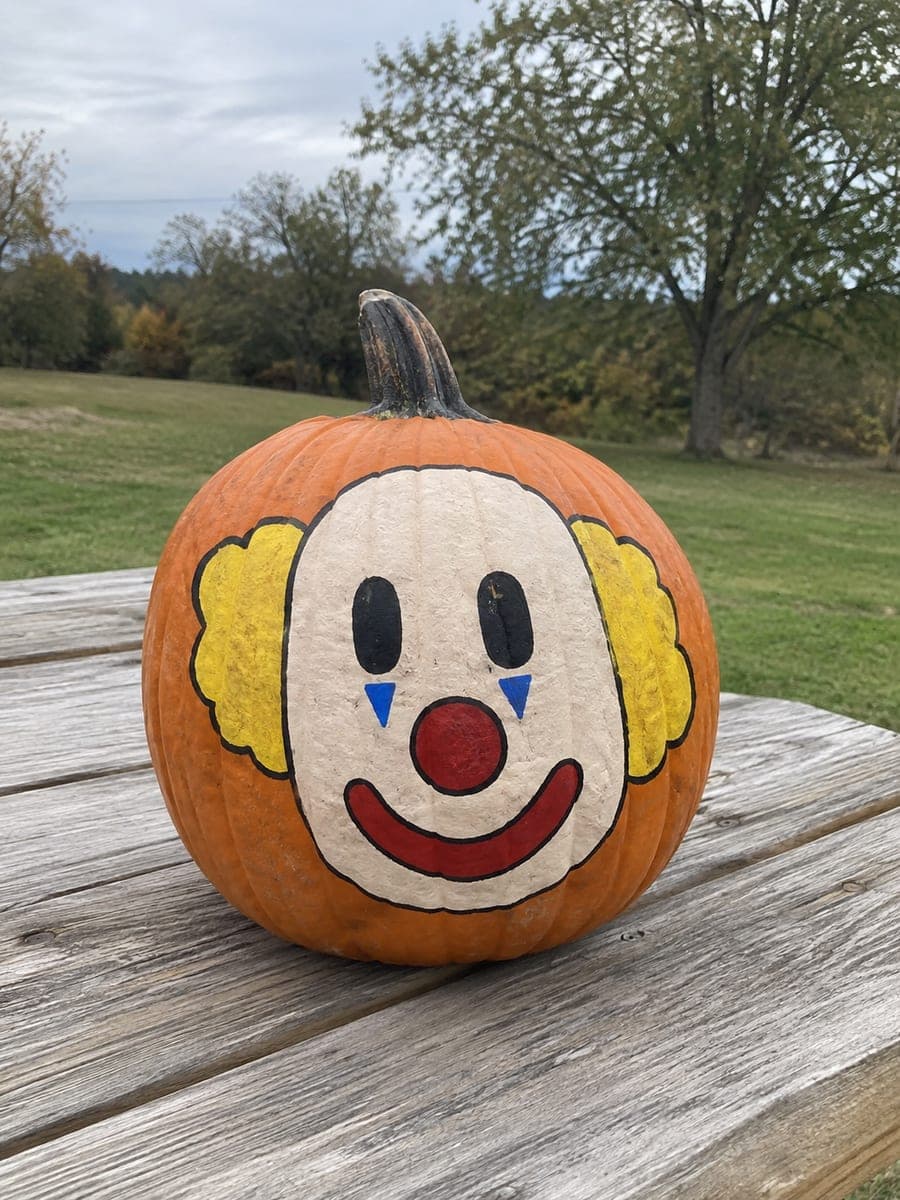
Painted Cheerful Clown Pumpkin with Red NoseAI
0

Report this carving

Tell us what is wrong. Reports are private.

Painted Cheerful Clown Pumpkin with Red Nose

A painted clown face with a bold red nose, yellow hair tufts, and bright flat acrylic features creates a festive clown pumpkin idea that takes under an hour with no carving tools required. Start with the yellow hair arcs on either side of the pumpkin, then add the face features in the center once the hair is dry. Use a round sponge brush for the nose circle to get a clean, even edge. This no-carve painted pumpkin idea is sturdy enough to display outdoors through the whole month of October.

No ratings yet · Sign in to rate

Comments (0)

  • No comments yet — be the first.

Save without an account. Sign in to like or comment.

Our tips for carving a similar design

This design builds outward from the hair arcs to the center face features, which prevents overpainting the orange rind around the perimeter. Yellow hair is applied first so the face detail colors stay clean without any hair paint bleeding into them. A round sponge brush or a circular lid stamp makes the red nose circle clean and even in under a minute. The entire project can be completed in under an hour and displayed outdoors all month.

From pumpkin to porch

  1. Clean and dry the pumpkin

    Wipe the pumpkin clean and let it dry fully before sketching. Any surface moisture under the yellow hair coat can cause it to peel at the edges within a few days. A dry, clean rind also accepts pencil sketch marks much more cleanly.

  2. Sketch and paint the yellow hair arcs

    Lightly sketch two arcing hair shapes on either side of the upper pumpkin face in pencil. Paint them in yellow acrylic with a medium flat brush, working in two thin coats. The hair arcs frame the face and establish the width of the clown composition before any face features are added.

  3. Add the face features in the center

    Once the yellow is dry, sketch the eyes, nose circle, and smile positions in the center of the pumpkin face between the hair arcs. Use a pencil rather than marker for this sketch so the lines are covered by the painted shapes. Keep features centered and evenly spaced.

  4. Paint the red nose with a sponge brush

    Dip a round sponge brush into red acrylic and press it firmly onto the nose position for a clean, even circle. A single deliberate press gives a better result than trying to paint the circle with a bristle brush. Let the red nose dry before adding any nearby features.

  5. Paint the eyes and smile

    Add eye shapes in white with a small flat brush, let them dry, then paint black pupils. Paint the smile curve in black and add any additional face details such as rosy cheeks or freckles with a round brush. Allow each step to dry before adding the next layer.

  6. Seal and display outdoors

    When all paint is fully dry, apply a coat of matte acrylic sealer over the entire painted area. This sealer layer protects against outdoor humidity and light handling. Display on a porch table, step, or entry area where the bright color palette is visible in daylight and under porch light.

Written with AI to match this design

Gather your supplies

Check things off as you get ready.

Work on a stable surface, keep your free hand out of the cutting path, and have an adult handle sharp tools.

Three levels of light

  • Leave intact

    The orange rind outside the hair arcs and face features stays visible as the pumpkin's natural background color.

  • Peel & shade

    None; the shell stays fully intact.

  • Cut through

    None; place the pumpkin near a porch or pathway light to illuminate the painted clown face from outside.

Learn the carving basics

Before you start cutting

How do I keep the yellow hair arcs from looking uneven on a round surface?

Sketch the arcs with a pencil first, stepping back to check that they are balanced on both sides before painting. A pumpkin's curvature can distort how a drawn shape looks from the front. If the arcs look uneven while sketching, adjust them before applying any paint since paint corrections over dried yellow leave visible patches.

Can I add a ruffled collar painted around the stem area?

Yes, painting a ruffled collar pattern in bright colors around the top of the pumpkin near the stem is a popular clown addition. Use alternating zigzag shapes in two or three bright colors and keep the shapes bold so they read clearly from a few feet away.

How durable is this painted pumpkin outdoors in rainy weather?

Two coats of paint plus a matte acrylic sealer will hold up to moderate outdoor humidity and light rain. Direct heavy rain for extended periods can still lift paint edges over time. If rain is forecast, bring the pumpkin indoors or under an overhang. Since the rind is intact, the pumpkin itself lasts much longer than a carved one in any weather.

Your take belongs here, too.

Changed a detail? Made it simpler? Share a photo of your version and tell the community what worked.

Share your pumpkin

More pumpkins like this

You've reached the end · 8 pumpkins
The Patch Report

Fresh pumpkins, in your inbox.

The best new carvings, ideas worth stealing, and how-tos for carving season. Short, seasonal, and gone by November.

A short email during carving season. Unsubscribe anytime. See our privacy policy.