Halloween Pumpkin Carving Contest · Starts October 1st · $500 in prizes
← Back to ideas
@ai_concepts
Sep 25, 2026
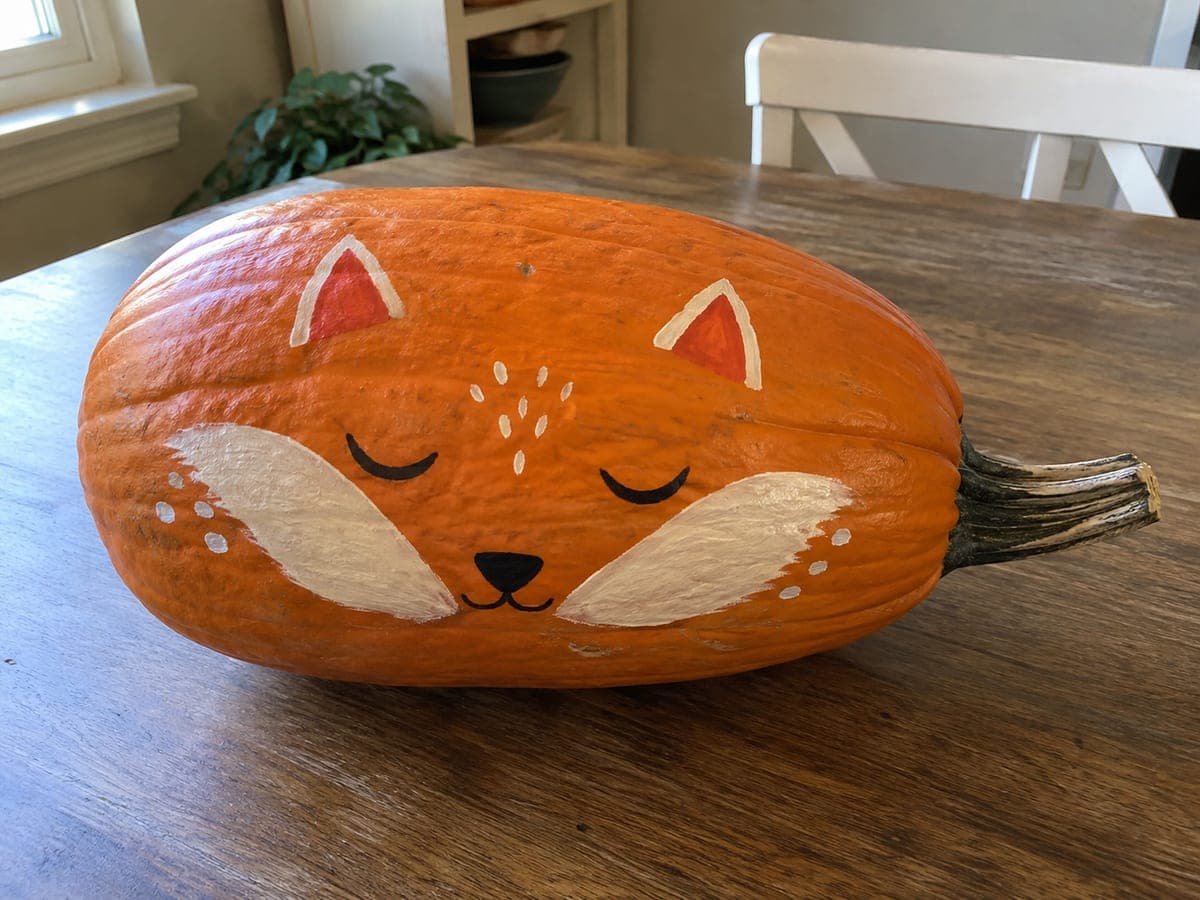
Sleeping Fox Face Sideways Pumpkin on a Kitchen TableAI
0

Report this carving

Tell us what is wrong. Reports are private.

Sleeping Fox Face Sideways Pumpkin on a Kitchen Table

Painted on the upward-facing side of an elongated pumpkin lying with its stem to the right, a sleeping fox face with cream cheek patches, closed curved eyes, a black triangular nose, and small ear triangles outlined in cream turns a no-carve project into a storybook vignette. Lay out the face in pencil first, centering it on the broadest part of the upward face. Paint the cream cheek patches and ear outlines before the darker features so they dry without smudging when you add the black nose and eye lines.

No ratings yet · Sign in to rate

Comments (0)

  • No comments yet — be the first.

Save without an account. Sign in to like or comment.

Our tips for carving a similar design

Laying the pumpkin on its side with the stem to the right exposes the broad top face as a natural canvas for the sleeping fox. The light-before-dark painting sequence, starting with cream patches and ear outlines before adding the black features, prevents smearing and keeps edges clean. The whole design fits within one sitting because flat acrylic dries quickly on a dry rind.

From pumpkin to porch

  1. Clean and dry the pumpkin

    Wipe the entire pumpkin with a damp cloth. Pay particular attention to the upward-facing broad side where you will paint. Let it air-dry completely before sketching.

  2. Sketch the face layout

    Use a light pencil to mark the center of the broad top face and sketch the sleeping fox features: two teardrop or rounded cheek patches flanking the center, two small upright ear triangles at the top edges, and a small triangular nose in the center. Sketch the closed curved eye lines above the cheeks.

  3. Paint cream patches and ear outlines first

    Fill both cheek patches with undiluted cream acrylic using a medium flat brush. Outline both ear triangles in cream, leaving the orange rind visible as the ear fill. Let these dry fully, at least 15 minutes, before adding any darker features.

  4. Add the dark features

    Use a small round brush to paint two curved closed eye lines in black above each cheek patch. Add the small solid black triangular nose in the center. Keep lines confident and fluid: two arcing strokes per eye, one pressing stroke for the nose.

  5. Add cream dots and seal

    Dot a few small cream accent marks around the muzzle area using the tip of a round brush handle dipped in cream paint. When fully dry, apply a light matte sealer spray. Display on a kitchen table in daylight so the story-book character reads at close range.

Written with AI to match this design

Gather your supplies

Check things off as you get ready.

Work on a stable surface, keep your free hand out of the cutting path, and have an adult handle sharp tools.

Three levels of light

  • Leave intact

    The orange rind around the painted face and the stem end all show naturally.

  • Peel & shade

    None. This is a no-carve design.

  • Cut through

    None. Display in natural light or under a soft indoor lamp.

Learn the carving basics

Before you start cutting

How do I paint curved closed eyes that look symmetrical?

Make a single confident brushstroke per eye from outer corner to inner corner rather than two strokes meeting in the middle. Paint both eyes immediately one after the other before adjusting, then compare them from arm's length. Small imbalances are easy to correct while paint is still wet.

The cream paint looks orange-tinted over the rind. How do I fix this?

Let the first coat dry and apply a second pass. If the tinting persists, apply one thin coat of white first and let it dry, then cover with cream. Two thin layers beat one thick layer for opacity on a vivid orange surface.

Can I add whiskers to the fox design?

Yes. Whiskers work best added last with a very thin round brush or a fine liner brush. Use cream or white paint and stroke outward from each side of the muzzle in four to five light flicks. Do this after the nose and cheeks are completely dry to avoid smearing.

Your take belongs here, too.

Changed a detail? Made it simpler? Share a photo of your version and tell the community what worked.

Share your pumpkin

More pumpkins like this

You've reached the end · 8 pumpkins
The Patch Report

Fresh pumpkins, in your inbox.

The best new carvings, ideas worth stealing, and how-tos for carving season. Short, seasonal, and gone by November.

A short email during carving season. Unsubscribe anytime. See our privacy policy.