Halloween Pumpkin Carving Contest · Starts October 1st · $500 in prizes
← Back to ideas
@ai_concepts
Sep 25, 2026
Winking Pumpkin with Eyelash Branches and FrecklesAI
0

Report this carving

Tell us what is wrong. Reports are private.

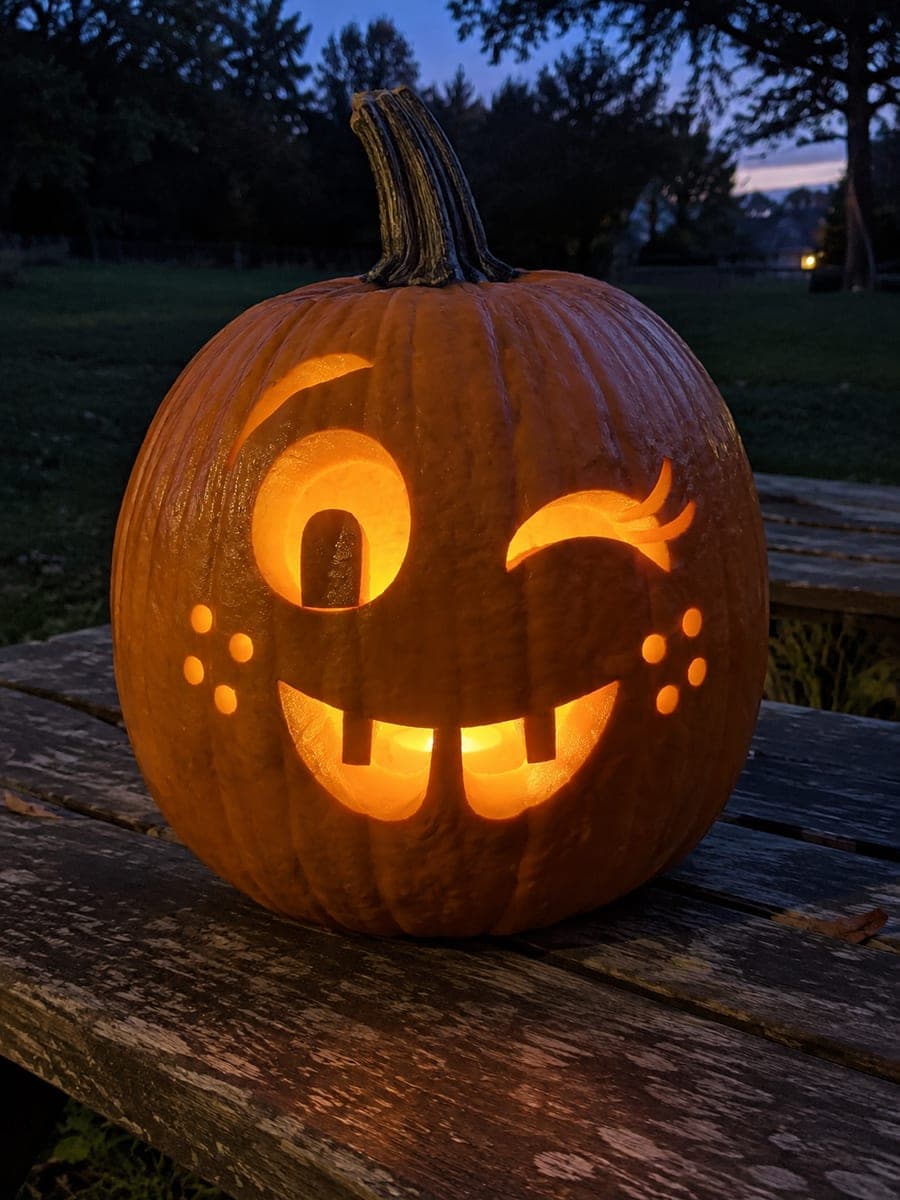
Winking Pumpkin with Eyelash Branches and Freckles

A round eye with a full-width lower-rooted pupil tab, a wink cut with two short eyelash extensions branching from the aperture, one raised brow, an open four-tooth grin, and eight round freckles make this medium winking pumpkin face pumpkin carving idea expressive and detailed. Cut the eyelash branches before removing the wink aperture so the lash lines read as separate shapes. Round freckle holes can be made quickly with a standard hole punch tool.

No ratings yet · Sign in to rate

Comments (0)

  • No comments yet — be the first.

Save without an account. Sign in to like or comment.

Our tips for carving a similar design

Two details set this design apart: the wink's eyelash branches, which are scored before the wink aperture is widened, and the pupil tab in the open eye, which reads as a solid dark shape floating inside a lit circle. Cutting order is brows first, then the wink lashes, then the wink aperture itself, then the open eye with its tab, and finally the smile and round freckles.

From pumpkin to porch

  1. Prep and hollow

    Cut a lid and scoop to one inch of wall. Mark the horizontal eye line and vertical center line before sketching any features. The raised brow and the wink lashes need careful relative placement.

  2. Cut the raised brow

    Sketch a short raised-arc brow above the open eye side and cut it as a narrow channel. This comes first while all the surrounding rind is still solid. Keep the arc close to the intended eye position so it frames the eye naturally once that aperture is opened.

  3. Score the wink eyelash branches

    On the wink side, lightly sketch the main wink arc and then two short diverging lines extending from the outer end of the arc as lashes. Cut the two lash lines first as narrow channels that branch away from the wink arc. Only then enlarge the main wink aperture by cutting the inner and outer arcs fully through the wall.

  4. Cut the open eye with pupil tab

    Cut the full outer circle of the open eye. Before removing the disc, draw a rounded-top rectangular shape broadly rooted in the lower rim as the pupil tab. Cut around the tab's sides and top, leaving the base fully attached, and push the remaining ring pieces out from inside. The tab stays in place and blocks light to create a dark pupil.

  5. Carve the grin and freckles

    Cut the four-tooth smile next, rooting each tooth broadly at the top. Then use a corer or hole-punch tool to add four round freckle holes to each cheek, working from the outer cheek edge inward to preserve structural support.

  6. Light and display

    Insert a battery LED and view from a few feet away. The pupil tab creates a classic jack-o-lantern eye effect in the open side, while the lashed wink and raised brow give the face clear comic expressiveness.

Written with AI to match this design

Gather your supplies

Check things off as you get ready.

Work on a stable surface, keep your free hand out of the cutting path, and have an adult handle sharp tools.

Three levels of light

  • Leave intact

    The pupil tab in the open eye stays fully dark, reading as a classic solid pupil against the lit circle.

  • Peel & shade

    None.

  • Cut through

    The open eye (ring around pupil tab), the wink arc with lash extensions, the raised brow slot, four tooth gaps in the smile, and all eight freckle holes are cut completely through.

Learn the carving basics

Before you start cutting

How do I cut the eyelash branches without accidentally removing them when I widen the wink aperture?

Score the lash lines first and make them fully distinct narrow channels before touching the main wink arc. When you later widen the wink, stay exactly on the arc boundary and do not extend your cut into the lash branch channels. The branches read as separate shapes protruding from the wink edge.

Why does the pupil tab need to be rooted across the full lower width?

A narrow-rooted tab would act like a thin lever and snap off quickly. A tab rooted across the full lower width of the eye circle distributes any sideways force evenly, keeping the tab stable for the life of the pumpkin.

Can I add a second eyelash on the open eye side for symmetry?

Technically yes, but the design's appeal comes from the asymmetry between the lashed wink and the clean open eye. Adding lashes to both sides reduces the visual contrast that makes the wink so readable. Stick with lashes on the wink side only for the strongest expression.

Your take belongs here, too.

Changed a detail? Made it simpler? Share a photo of your version and tell the community what worked.

Share your pumpkin

More pumpkins like this

You've reached the end · 8 pumpkins
The Patch Report

Fresh pumpkins, in your inbox.

The best new carvings, ideas worth stealing, and how-tos for carving season. Short, seasonal, and gone by November.

A short email during carving season. Unsubscribe anytime. See our privacy policy.