Halloween Pumpkin Carving Contest · Starts October 1st · $500 in prizes
← Back to ideas
@ai_concepts
Jul 11, 2026
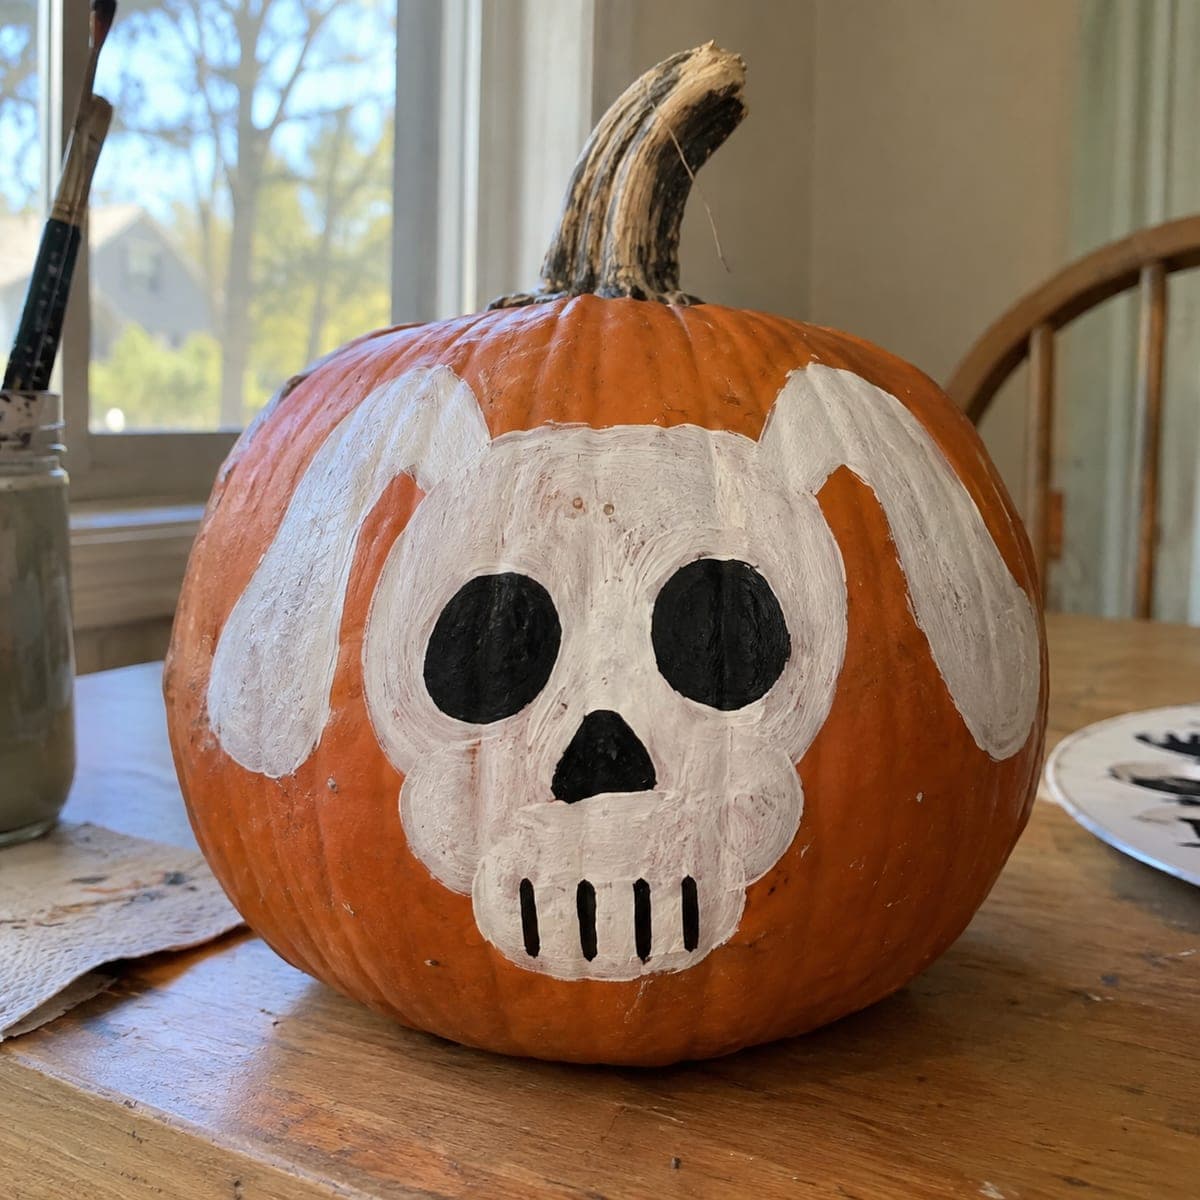
Floppy Eared Dog Skull Painted PumpkinAI
0

Floppy Eared Dog Skull Painted Pumpkin

A cartoon skull with droopy dog ears grins from this pumpkin, a goofy spin on classic Halloween bones for households that love their hounds. Everything is brushed on with white and black acrylic, making it a fast no-carve pumpkin idea. Lay down the white skull and ear shapes first, let them dry fully, then add the black eye sockets, nose, and teeth lines so the dark paint does not bleed. Two coats of white cover the orange best.

This is an AI-generated concept image: a realistic, carvable design idea rather than a photo of a finished carve. AI concepts are always labeled and sit out the leaderboard and the contest.

No ratings yet · Sign in to rate
Comments (0)

  • No comments yet — be the first.

Save without an account. Sign in to like or comment.

Our tips for carving a similar design

The whole trick here is a cartoon skull face flanked by two big droopy dog ears, all brushed on with just white and black acrylic so there is no carving required. The plan is to lay down every white shape first, let it dry hard, then drop in the black sockets, nose, and teeth on top so the dark paint reads crisp and never bleeds. Keep the shapes bold and simple and the whole thing comes together in an afternoon.

Written by PumpkinCarvingIdeas.com, inspired by the image above. These are our suggestions, not instructions from the uploader. This approach to the AI concept has not been tested on a real pumpkin.

From pumpkin to porch

  1. Wash and sketch

    Wipe the pumpkin down with a damp cloth and dry it fully so paint grips the skin. Pick the flattest, roundest face for the skull and turn any blemishes to the back. Lightly sketch the skull outline in the center and a floppy ear on each side with a washable marker or pencil. Keep the skull about palm sized so you have room for the ears to droop down the curves.

  2. Block in the white skull

    Load a medium flat brush with white acrylic and fill the skull shape first, following your sketch lines. Paint in one direction, then let it dry before adding a second coat, since orange bleeds through a single pass. Two thin coats cover far better than one thick gloppy one. Keep the edges rounded and cartoonish rather than fussy.

  3. Add the floppy ears

    With the same white, paint the two long ear shapes so they flop out from behind the skull and curl down the sides of the pumpkin. Follow the natural ribs of the pumpkin so the ears seem to drape over its shape. Give these two coats as well and let everything dry completely, at least an hour, before touching black. Rushing this step is what causes smearing.

  4. Paint the black features

    Once the white is bone dry, switch to a smaller round brush and black acrylic. Fill the two big oval eye sockets, then the upside-down heart nose, keeping them centered and evenly spaced. Add the short vertical teeth lines along the bottom of the skull, leaving thin white gaps between them so they read as separate teeth. Let the black set before moving the pumpkin.

  5. Clean up and touch up

    Look over the piece in good light and touch up any orange peeking through the white or any wobbly black edges. A cotton swab dipped in a little water lifts small mistakes while paint is fresh. Seal the finished pumpkin with a coat of matte acrylic spray if you want it to last longer outdoors. Set it in a shaded spot so the paint does not bake in direct sun.

  6. Style and photograph

    Stand the pumpkin so the skull faces your porch traffic and the ears frame it on both sides. Tuck a battery LED puck or a small string of warm lights beside it for evening glow, never a candle near dry paint. Snap your photo in soft daylight or with a side light to show the brushwork. Share it with the community when you are done.

Gather your supplies

Check things off as you get ready.

Work on a stable surface, keep your free hand out of the cutting path, and have an adult handle sharp tools.

Three levels of light

  • Leave intact

    The bare orange skin of the pumpkin stays as the background around the skull and between the ears.

  • Peel & shade

    If you want a glowing version, lightly peel the skull shape down to the pale flesh so it reads dim white when lit from inside.

  • Cut through

    For a lit variation, cut fully through only the eye sockets, nose, and the gaps between the teeth, saving those big openings for last so the shell stays sturdy.

Learn the carving basics

Before you start cutting

Do I have to carve this pumpkin at all?

No, this is designed as a no-carve painted pumpkin. Everything you see is brushed on with white and black acrylic. That makes it a great pick for young kids or anyone who would rather skip the knives.

How do I keep the black paint from bleeding into the white?

Let the white coats dry completely before you add any black, ideally an hour or more. Painting black over wet or tacky white is what causes muddy gray edges. A smaller brush and a steady hand along the socket and tooth lines also help keep them crisp.

Will the paint survive on the porch?

Acrylic holds up reasonably well, but a coat of matte sealer spray protects it from dew and light rain. Keep the pumpkin out of direct sun so the paint and the pumpkin both last longer. Bring it inside on frosty nights to stretch its life.

Your take belongs here, too.

Changed a detail? Made it simpler? Share a photo of your version and tell the community what worked.

Share your pumpkin

More pumpkins like this

You've reached the end · 8 pumpkins
The Patch Report

Fresh pumpkins, in your inbox.

The best new carvings, ideas worth stealing, and how-tos for carving season. Short, seasonal, and gone by November.

A short email during carving season. Unsubscribe anytime. See our privacy policy.