Halloween Pumpkin Carving Contest Β· Starts October 1st Β· $500 in prizes
← Back to ideas
@ai_concepts
Aug 1, 2026
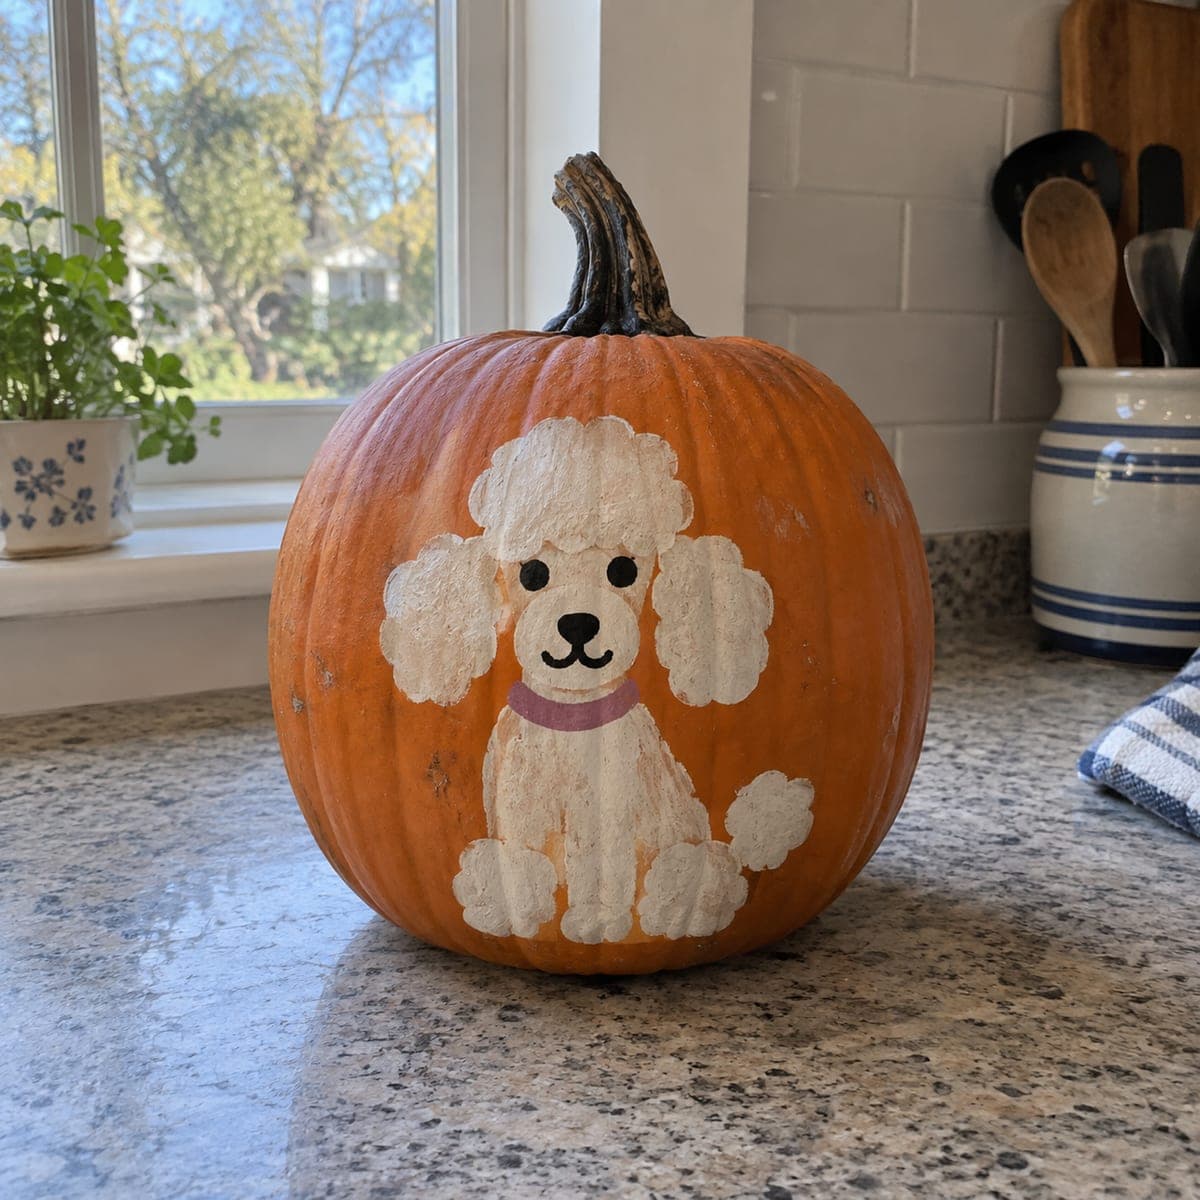
Fluffy White Poodle Painted PumpkinAI
0

Fluffy White Poodle Painted Pumpkin

A sitting white poodle with pom-pom ears, a pink collar, and a happy dot-eyed face turns this pumpkin into no-carve pet decor. Sponge the paint on in dabbing circles instead of brushstrokes to get that cloud-like poodle texture in the ears, topknot, and paws. The face needs only a few marks, so use a small round brush and take it slow. A sweet mantel or windowsill pumpkin that dog lovers can finish in one afternoon.

This is an AI-generated concept image: a realistic, carvable design idea rather than a photo of a finished carve. AI concepts are always labeled and sit out the leaderboard and the contest.

No ratings yet Β· Sign in to rate

Comments (0)

  • No comments yet β€” be the first.

Save without an account. Sign in to like or comment.

Our tips for carving a similar design

The core trick here is texture through sponging, not brushstrokes. You dab paint on in little circles to build the cloud-like fur of the ears, topknot, and paws, then add a calm face with just a few marks. Since this is a no-carve design, the whole thing is paint on solid skin, so plan your poodle shape lightly in pencil before any color goes down.

Written by PumpkinCarvingIdeas.com, inspired by the image above. These are our suggestions, not instructions from the uploader. This approach to the AI concept has not been tested on a real pumpkin.

From pumpkin to porch

  1. Clean and sketch the pose

    Wipe the pumpkin down with a damp cloth and let it dry fully so paint grips well. Pick the smoothest, flattest face for your poodle so the details read clearly. Lightly pencil the sitting body: a round head, two pom-pom ears, a chest and front paws, and one back paw and a little tail puff. Keep the lines soft since you will paint over them.

  2. Block in the base body

    Load a small sponge with off-white or cream paint and blot most of it on a paper towel first so it is nearly dry. Dab the main body and head shape in gentle circles, letting the pumpkin orange peek through slightly for warmth. Two thin coats look better than one heavy one, so let each dry before adding more. This base gives you a guide for where the fluffy parts sit.

  3. Build the fluffy pom-poms

    Switch to a fresh, drier sponge and stipple the ears, topknot, chest, paws, and tail with quick tapping motions. Layer a brighter white on the outer edges so each puff looks rounded and cloud-like. Leave tiny gaps of shadow between puffs instead of blending them smooth. Step back often to check the fur reads as separate poofs, not one flat patch.

  4. Paint the face slowly

    Let the body dry completely, then use a small round brush for the face. Add two black dot eyes, a rounded black nose, and a simple curved smile line under it. Keep the marks small and spaced like the reference so the look stays sweet, not busy. Practice the dots on paper first if you are nervous, and wipe mistakes fast with a damp swab before they set.

  5. Add the collar and clean up

    Paint a soft pink band across the neck for the collar, keeping the edges tidy with a steady stroke. Touch up any stray sponge marks with a bit of orange or cream. Once everything is bone dry, seal it with a matte clear spray or brush-on sealer so the paint lasts through the season. Let the sealer cure before handling.

  6. Stage and photograph

    Set the finished poodle on a windowsill or mantel where soft daylight hits the face. Because this is a no-carve pumpkin, you can tuck a small battery LED puck beside it for evening glow without cutting anything. Angle the poodle toward the room so the eyes and smile face your guests. Snap your photo in gentle side light to show off the sponged fur texture.

Gather your supplies

Check things off as you get ready.

Work on a stable surface, keep your free hand out of the cutting path, and have an adult handle sharp tools.

Three levels of light

  • Leave intact

    The bare orange skin around the poodle stays untouched and dark, framing the painted dog.

  • Peel & shade

    For a subtle glow you could lightly scrape a thin halo of skin behind the poodle so a nearby LED gives a soft backlight.

  • Cut through

    This design needs no cutouts, but if you want light you could carve one small vent hole on the back, well away from the painted face.

Learn the carving basics

Before you start cutting

Do I need to carve this pumpkin at all?

No, this is a fully no-carve painted design, so the pumpkin stays whole and solid. That actually helps it last longer since there is no open cut to rot. If you want a glow, set a battery LED beside it or add one small hidden vent on the back.

How do I get the fur to look fluffy instead of flat?

Use a sponge, not a brush, and keep it nearly dry by blotting off excess paint first. Dab in small circles and layer a brighter white on the edges of each puff. Leaving little shadow gaps between the pom-poms is what makes them read as separate clouds of fur.

What if my face marks come out uneven?

Wait for the body coat to dry fully, then work slowly with a small round brush. Keep a damp cotton swab nearby to wipe away any dot or line before it sets. Practicing the eyes and smile on scrap paper first builds confidence and keeps the face looking calm and sweet.

Your take belongs here, too.

Changed a detail? Made it simpler? Share a photo of your version and tell the community what worked.

Share your pumpkin

More pumpkins like this

You've reached the end Β· 8 pumpkins
The Patch Report

Fresh pumpkins, in your inbox.

The best new carvings, ideas worth stealing, and how-tos for carving season. Short, seasonal, and gone by November.

A short email during carving season. Unsubscribe anytime. See our privacy policy.