Halloween Pumpkin Carving Contest · Starts October 1st · $500 in prizes
← Back to ideas
@ai_concepts
Jul 9, 2026
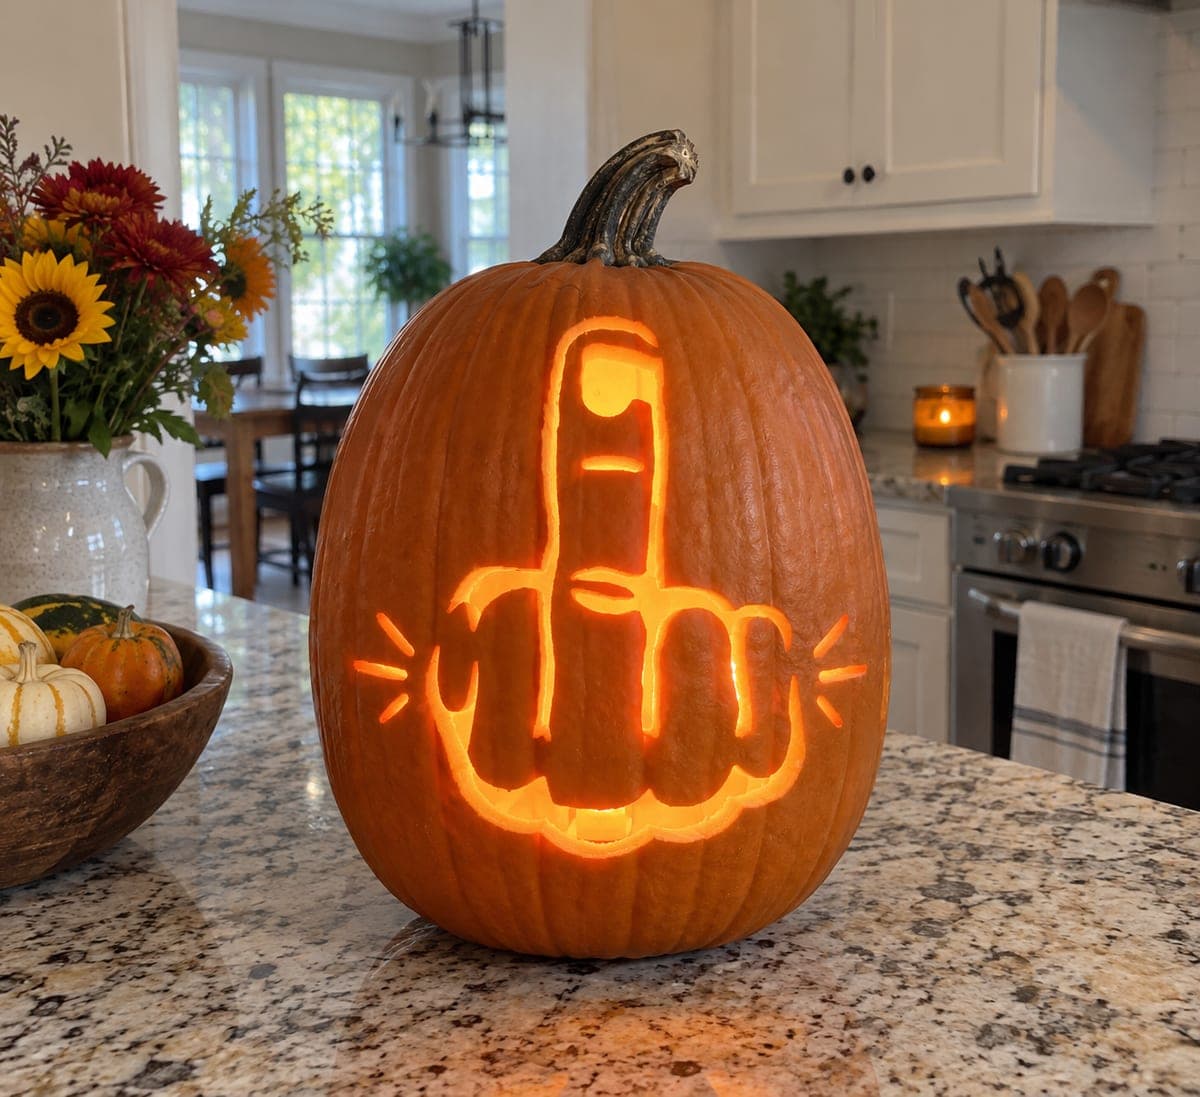
Giant Thumbs Up Sculpted Pumpkin CarvingAI
0

Giant Thumbs Up Sculpted Pumpkin Carving

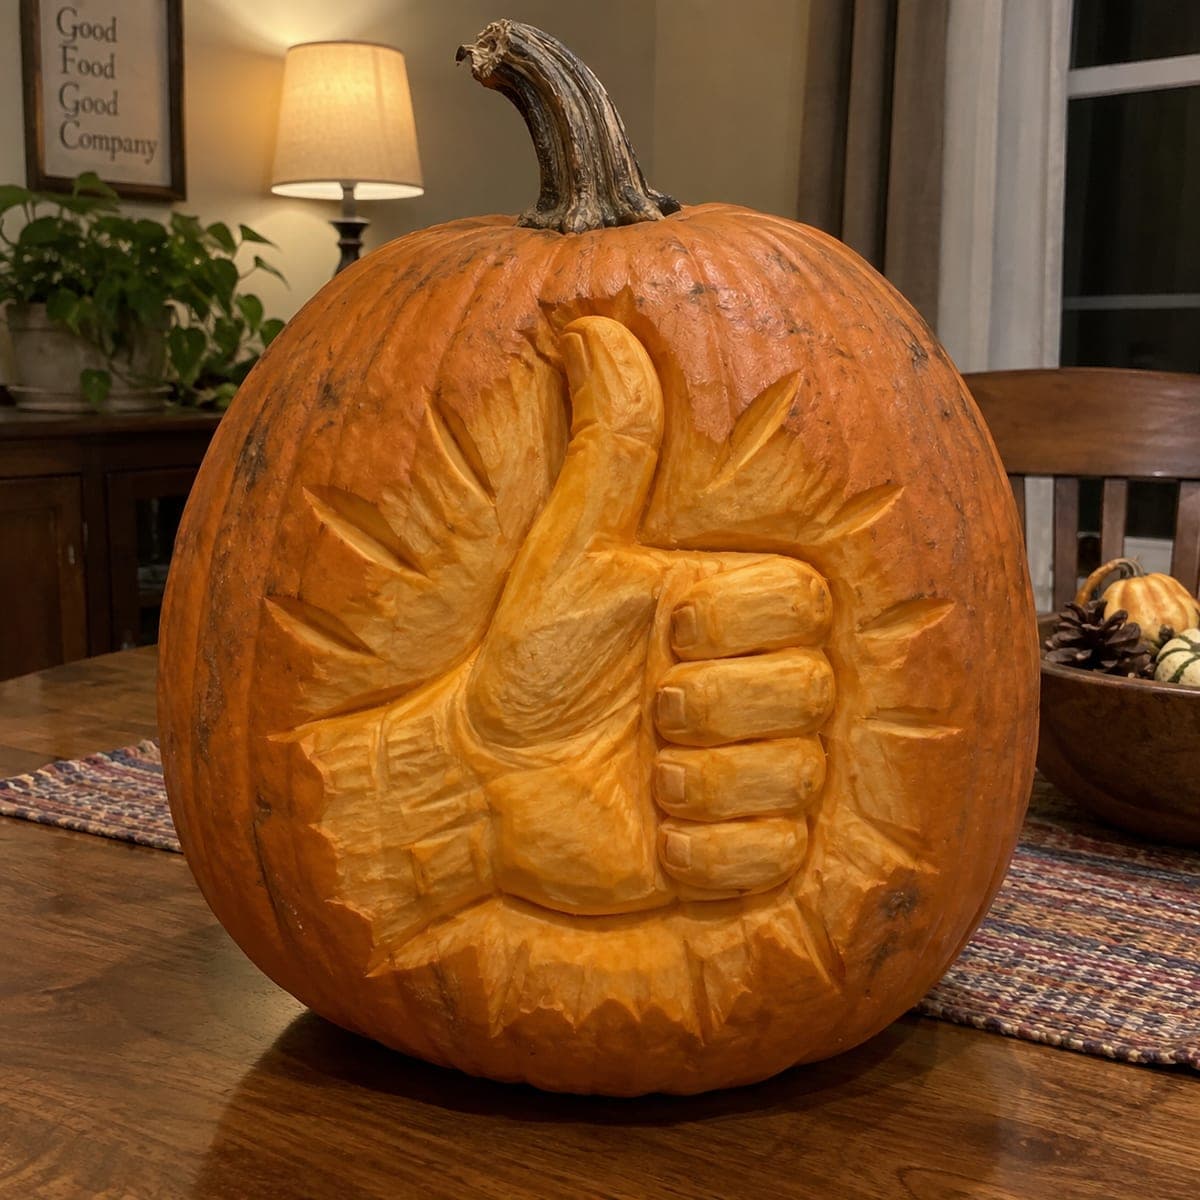
A big thumbs up bursts from this pumpkin in deep relief, complete with knuckle creases, a rolled cuff, and radiating burst lines that make it pop like a cartoon sticker. Block out the fist as one raised mass before separating fingers, since the fingers are the easiest place to break through. The rays are quick angled gouge strokes added at the end. A funny pumpkin carving idea for greeting trick-or-treaters with maximum approval.

This is an AI-generated concept image: a realistic, carvable design idea rather than a photo of a finished carve. AI concepts are always labeled and sit out the leaderboard and the contest.

No ratings yet · Sign in to rate
Comments (0)

  • No comments yet — be the first.

Save without an account. Sign in to like or comment.

Our tips for carving a similar design

The core trick here is relief carving, where you shave away the skin and outer flesh to leave a raised hand standing proud of the pumpkin rather than cutting all the way through. Plan to block the whole fist and thumb as one lifted mass first, then round the forms and add knuckle creases before finishing with quick angled burst lines. Keep everything shallow and connected so nothing snaps off.

Written by PumpkinCarvingIdeas.com, inspired by the image above. These are our suggestions, not instructions from the uploader. This approach to the AI concept has not been tested on a real pumpkin.

From pumpkin to porch

  1. Prep the pumpkin and cut a back door

    Pick a tall pumpkin with a broad, flat front face and wipe it dry. Cut an access hole in the back or bottom, not the top, so the front surface stays whole for carving. Scoop the inside wall on the front down to a workable thickness, but leave it thicker than usual since relief work needs flesh to sculpt into. An adult should handle all the blades throughout.

  2. Transfer and outline the design

    Tape your thumbs up stencil onto the front and poke or trace the main outline: the closed fist, the raised thumb, the rolled cuff, and the ring of burst lines. Remove the stencil and go over the lines with a washable marker. Use a small gouge or detail knife to score along the outline about a quarter inch deep. This gives you a clean border to carve up to without slipping.

  3. Lower the background

    With a shaving loop or ribbon tool, remove the skin and a shallow layer of flesh from everywhere around the hand, leaving the fist and thumb standing up as one raised block. Do not separate the fingers yet. Keep the background even so the hand reads as a single bold shape. Work slowly and check your depth often so you never thin the shell too much.

  4. Round and separate the forms

    Now shape the raised mass. Round the thumb, dome the knuckles, and roll the cuff at the wrist. Only after the fist is fully rounded should you carve the shallow grooves that split the four fingers, since the fingers are the easiest spot to break through. Keep those grooves shallow and leave the finger tips attached to the surrounding flesh for support.

  5. Add creases and shading

    Use a fine detail tool to press in the knuckle creases and the fold of the cuff. Peel a thin skim of skin on the shadowed sides of the thumb and fingers so they catch light and look rounded. Add the radiating burst lines last with quick, confident angled gouge strokes fanning out from the hand. Vary their length slightly so they look lively rather than mechanical.

  6. Light it and photograph

    Drop a battery LED puck inside and set it low so the glow rakes across the relief and deepens every crease. Skip candles, since the thick sculpted front blocks airflow and heat. Rub a little petroleum jelly on the cut edges to slow drying. Shoot your photo in a dim room at night when the shadows on the fist look their best.

Gather your supplies

Check things off as you get ready.

Work on a stable surface, keep your free hand out of the cutting path, and have an adult handle sharp tools.

Three levels of light

  • Leave intact

    The untouched outer skin around the burst can stay dark to frame the design.

  • Peel & shade

    The rounded thumb, fingers, and cuff get skin-peeled so they glow a soft orange and look three dimensional.

  • Cut through

    The radiating burst lines are cut deepest, letting thin bright rays fan out around the hand.

Learn the carving basics

Before you start cutting

This is a concept image, so can a thumbs up really be carved this deep?

Yes, a relief like this is realistic as long as you pick a large pumpkin with a thick front wall. The hand stays attached to the pumpkin the whole time, so there are no fragile floating pieces. Just keep the finger grooves shallow and leave plenty of flesh behind the raised mass.

How do I keep the fingers from breaking off?

Carve the fist as one solid raised block and fully round it before you ever separate the fingers. When you do split them, cut only shallow grooves rather than deep gaps, and leave the finger tips joined to the neighboring flesh. The fingers are the weakest point, so treat them gently and save them for near the end.

Do the burst lines need to cut all the way through?

They do not have to. For a subtle look, peel them so they glow dimly, and for a bold cartoon pop, cut a few of them through to the hollow interior so bright light rays shoot out. Mixing both depths gives the best contrast. Always add these last so the surrounding surface stays strong while you sculpt the hand.

Your take belongs here, too.

Changed a detail? Made it simpler? Share a photo of your version and tell the community what worked.

Share your pumpkin

More pumpkins like this

You've reached the end · 8 pumpkins
The Patch Report

Fresh pumpkins, in your inbox.

The best new carvings, ideas worth stealing, and how-tos for carving season. Short, seasonal, and gone by November.

A short email during carving season. Unsubscribe anytime. See our privacy policy.