Halloween Pumpkin Carving Contest · Starts October 1st · $500 in prizes
← Back to ideas
@ai_concepts
Aug 26, 2026
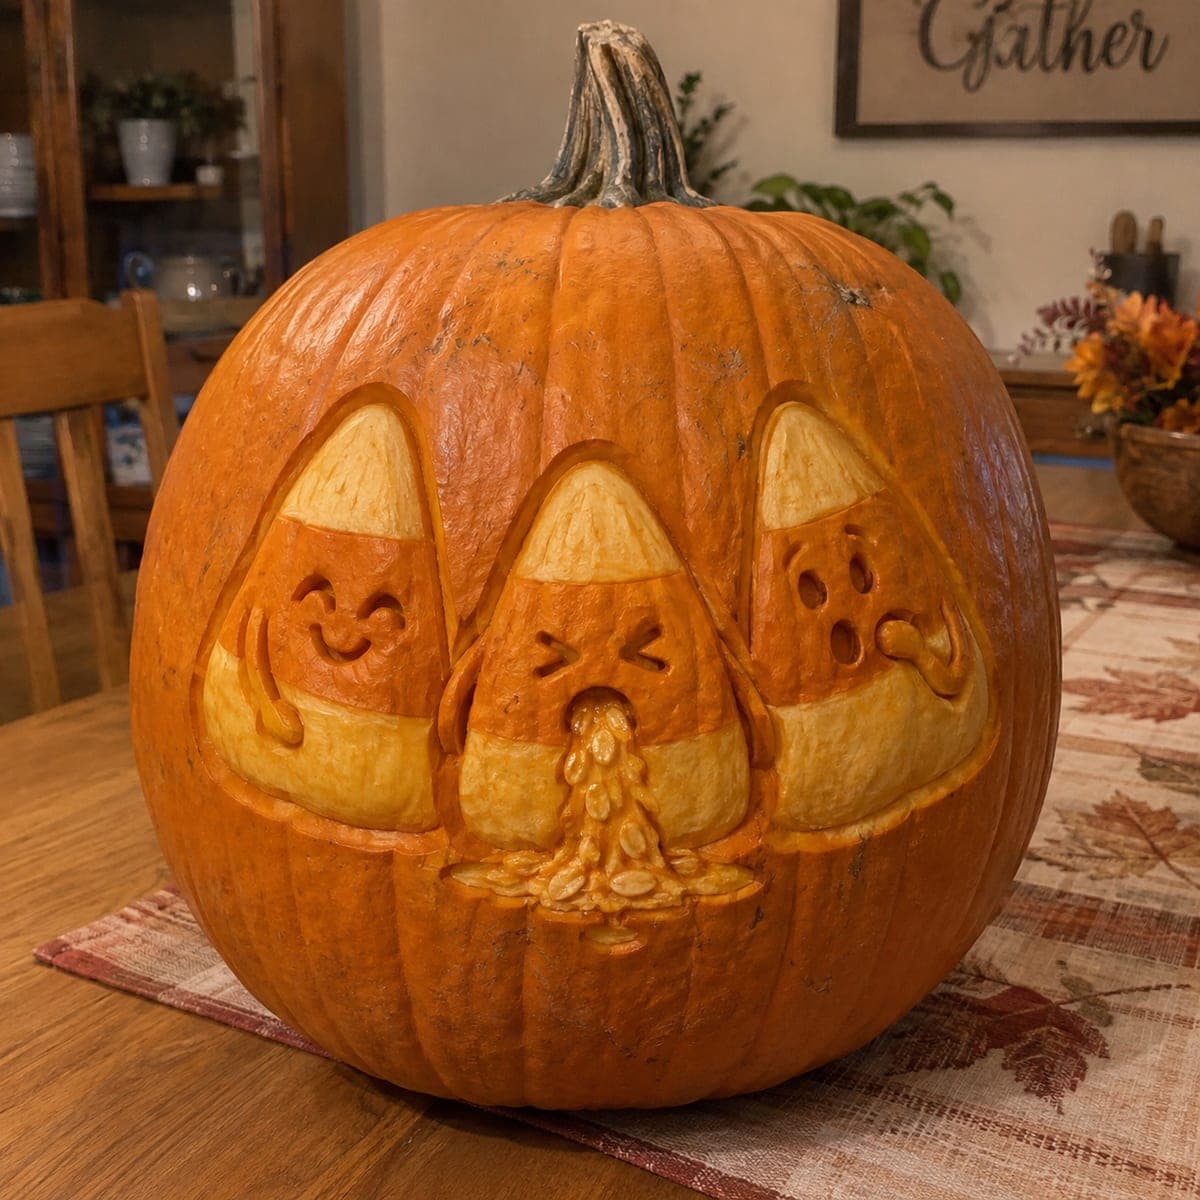
Three Candy Corn Characters Funny Shaded PumpkinAI
0

Three Candy Corn Characters Funny Shaded Pumpkin

Three anthropomorphic candy corn pieces with expressive cartoon faces are carved side by side on a large pumpkin in layered surface shading, the striped orange-yellow-white segments peeled to different depths so they appear almost painted. The middle corn character is clearly sick, adding a gross-out humor element that older kids will love. Carve the stripe boundaries with a v-gouge first to keep the color zones defined, then thin each zone to the correct depth: white tips shallowest, yellow mid-sections medium, orange base sections deepest. The design reads well indoors on a kitchen table under a warm overhead light.

This is an AI-generated concept image: a realistic, carvable design idea rather than a photo of a finished carve. AI concepts are always labeled and sit out the leaderboard and the contest.

No ratings yet · Sign in to rate

Comments (0)

  • No comments yet — be the first.

Save without an account. Sign in to like or comment.

Our tips for carving a similar design

The core trick here is surface shading, where you never cut all the way through the wall. Each candy corn is built from three color zones peeled to three different depths so the stripes glow at different brightnesses, almost like paint. Plan the whole face layout first, outline every stripe boundary with a v-gouge, then thin each zone to depth and save the tiny detail cuts for last.

Written by PumpkinCarvingIdeas.com, inspired by the image above. These are our suggestions, not instructions from the uploader. This approach to the AI concept has not been tested on a real pumpkin.

From pumpkin to porch

  1. Prep and transfer the trio

    Pick a large, tall pumpkin with a smooth, flat-facing front so all three characters have room to sit side by side. Cut a lid or a back door with an LED light in mind, then scrape the inside of the front wall down to about one inch so shading is easier. Tape your three candy corn stencils in a row and poke the outlines with a transfer tool. Step back and check the spacing before you commit to any cuts.

  2. Outline every stripe boundary

    Switch to a v-gouge and trace the outer shape of each candy corn plus the two internal lines that separate white tip, yellow middle, and orange base. These grooves lock in your color zones so the depths stay crisp later. Keep the gouge shallow here, just enough to define the borders. Take your time on the pointed tips since they carry the shape.

  3. Peel the white tips shallowest

    Use a loop or ribbon tool to remove only the outer skin on each white tip. Go just deep enough to reach the pale flesh, keeping this the thinnest peel of the three zones. This is your brightest surface glow, so aim for an even, smooth finish. Wipe away pulp often so you can read the true color as you work.

  4. Shade the yellow middles medium

    Drop the yellow center band a bit deeper than the tips, blending the edge down from the stripe groove. A gently scooped surface catches light better than a flat one. Keep the depth consistent across all three characters so the trio reads as a set. Check the wall thickness with your finger from the inside now and then so you never go too thin.

  5. Carve the orange bases deepest

    Take the bottom orange zones down deepest of the three, but still stop short of cutting through the wall. These will read as the warmest, softest glow. This is also where the faces live, so once the base depth is set, add the expressions: a happy grin, a squeezed-shut sick face, and a queasy one. For the middle character's gross-out gag, sculpt a raised dribble of seeds and pulp below its mouth by leaving that spot proud and texturing it rather than cutting it out.

  6. Add detail cuts and light it

    Save any true cutouts for last, such as small mouth openings or eye dots, so the wall stays strong while you shade. Clean up every stripe edge with a small detail knife and soften rough spots. Set a warm LED puck or string inside, never a candle, and test it in a dim room. Snap your photo on a kitchen table under a soft overhead light where the shaded stripes show best.

Gather your supplies

Check things off as you get ready.

Work on a stable surface, keep your free hand out of the cutting path, and have an adult handle sharp tools.

Three levels of light

  • Leave intact

    The untouched background skin around the three characters and the darkest facial lines stay dark orange.

  • Peel & shade

    The yellow middle bands and the sculpted seed dribble glow a dim, warm orange from a shallow-to-medium peel.

  • Cut through

    Only the small mouth openings and eye dots are cut through for the brightest points of light.

Learn the carving basics

Before you start cutting

How do I keep three shaded depths from bleeding into each other?

The v-gouge boundary lines are what save you. Cut those grooves first around every stripe so each color zone has a clean edge to work up to. Then peel each zone to its own depth and the grooves keep the transitions sharp.

How do I make the middle character's sick gag without weakening the pumpkin?

Do not cut a hole for it. Leave that patch of wall proud and texture the surface into a lumpy seed-and-pulp dribble using a small loop tool. This keeps the wall intact and actually looks grosser than an open cut.

Will surface shading still show up when lit?

Yes, that is the whole point of this design. Thinner peels let more light through, so your white tips read brightest and the deeper orange bases glow softest. Use a warm LED and test in a dark room, adjusting any zone that looks too flat by scooping it slightly deeper.

Your take belongs here, too.

Changed a detail? Made it simpler? Share a photo of your version and tell the community what worked.

Share your pumpkin

More pumpkins like this

You've reached the end · 8 pumpkins
The Patch Report

Fresh pumpkins, in your inbox.

The best new carvings, ideas worth stealing, and how-tos for carving season. Short, seasonal, and gone by November.

A short email during carving season. Unsubscribe anytime. See our privacy policy.