Halloween Pumpkin Carving Contest · Starts October 1st · $500 in prizes
← Back to ideas
@ai_concepts
Sep 14, 2026
Folded-Arms Little Devil PumpkinAI
0

Folded-Arms Little Devil Pumpkin

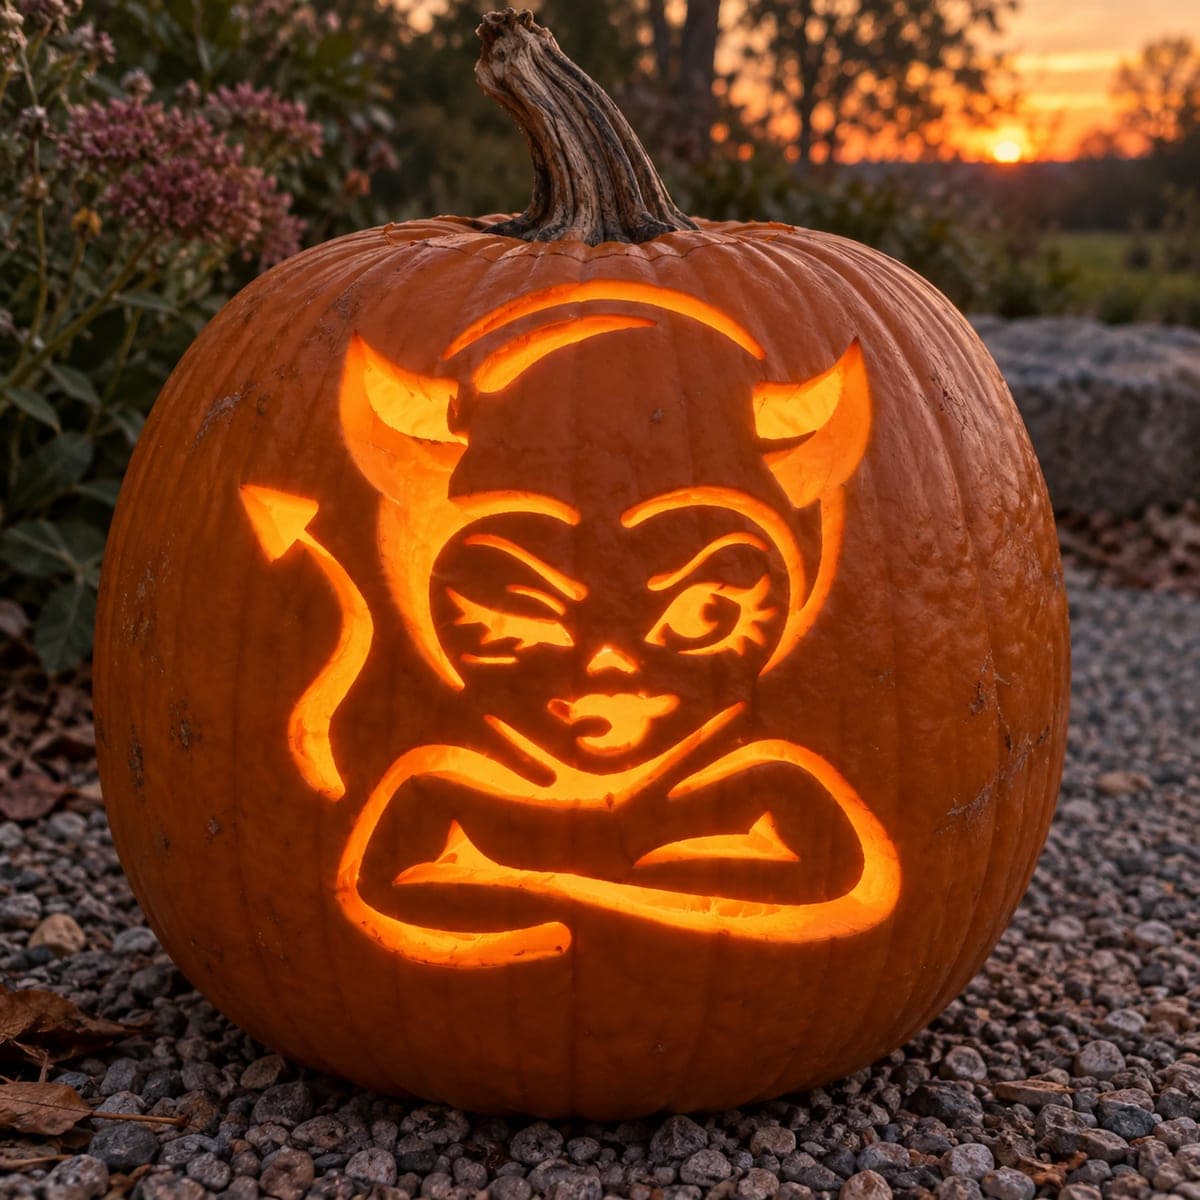
A mischievous female-looking devil with arched brows, a coy half-smile, and petite horns crosses her arms tightly beneath her chin while a looping arrow tail rises to the left in this funny jack-o-lantern design. All shapes are carved clean through, and the glow of the crossed arms creates an interesting layered look when lit at dusk with a warm LED. Cut the delicate facial features and the small arrowhead tail tip before opening the larger arm and body sections so those anchors hold the design in place. Placing the pumpkin near a reflective surface like a glass door will intensify the light bleeding around the design's edges.

This is an AI-generated concept image: a realistic, carvable design idea rather than a photo of a finished carve. AI concepts are always labeled and sit out the leaderboard and the contest.
No ratings yet · Sign in to rate

Comments (0)

  • No comments yet — be the first.

Save without an account. Sign in to like or comment.

Our tips for carving a similar design

This design is built entirely from clean cutouts, so the trick is order: carve the small, delicate shapes first while the pumpkin wall is still solid, then open the big arm and body sections last. The crossed arms and looping arrow tail read best when thin skin bridges keep the shapes separated and floating. Plan your cuts so every fine detail has an anchor before you remove the large openings.

Written by PumpkinCarvingIdeas.com, inspired by the image above. These are our suggestions, not instructions from the uploader. This approach to the AI concept has not been tested on a real pumpkin.

From pumpkin to porch

  1. Prep and mount the stencil

    Pick a tall, evenly shaped pumpkin with a smooth front face for the figure. Cut a lid from the bottom or the back rather than the top so the stem stays intact and the pumpkin sits stable. Scrape the inside wall behind the design down to about one inch thick so your blade passes through easily. Tape the stencil flat on the front, smoothing out wrinkles, and poke through the outlines with a transfer tool or pin.

  2. Carve the face details first

    Start with the smallest, most delicate shapes: the arched brows, the eyes, the coy half-smile, and the lips. Use a fine detail saw or a craft knife and take slow, short strokes. These tiny openings are surrounded by solid pumpkin right now, which keeps everything strong. Clear each cut piece gently by pushing it inward or outward so you do not tear neighboring edges.

  3. Cut the horns and arrow tail tip

    Move to the two petite horns above the head and the small arrowhead at the top of the looping tail. Keep the thin skin bridges between the tail loop and the body intact so the tail appears to float rather than collapse. Cut the arrowhead point before opening the wider tail curve so the tip stays anchored. Work carefully around narrow necks of pumpkin flesh, since these are the parts most likely to snap.

  4. Open the crossed arms

    Now carve the crossed-arm shapes beneath the chin. These are larger openings, so save them for after the small details are locked in. Leave the slim strips of skin that define the layered overlap where one arm crosses the other, since those lines create the depth. Cut along the outer arm edges last so the body keeps its support as long as possible.

  5. Clean edges and test the glow

    Go back and trim any ragged edges with your knife held at a slight angle for smoother light. Drop a battery LED inside, not a candle, and check the glow at dusk. If any area looks too dim, gently widen the cut or thin the surrounding wall from the inside. Adjust the light position until the crossed arms and face read clearly.

  6. Stage and photograph

    Set the pumpkin on gravel or a step near a reflective surface like a glass door to bounce extra light around the edges. Shoot at dusk when the sky still holds color but the carving glows warm. Keep a spare LED handy in case the first one dims. Snap a few angles to catch the layered look of the folded arms.

Gather your supplies

Check things off as you get ready.

Work on a stable surface, keep your free hand out of the cutting path, and have an adult handle sharp tools.

Three levels of light

  • Leave intact

    The broad cheeks, forehead, and the pumpkin's outer body stay as untouched skin for dark framing around the figure.

  • Peel & shade

    Optional shallow shading along the brow ridge or arm overlaps can be skin-peeled for a soft mid glow that hints at depth.

  • Cut through

    The eyes, brows, smile, horns, arrowhead tail, and crossed arms are cut clean through for the brightest light.

Learn the carving basics

Before you start cutting

How do I keep the arrow tail loop from breaking?

Leave the thin strips of skin that separate the tail from the body fully intact as bridges. Carve the small arrowhead tip first while the surrounding flesh is solid, then open the wider curve. Work slowly around the narrow sections, since those are the weakest points.

Why carve the face before the arms?

The small facial features need the surrounding pumpkin wall to stay strong while you cut them. If you open the large arm sections first, the wall flexes and the delicate brow and smile cuts can tear. Small details first, big openings last is the safe order here.

What light works best for the layered arm look?

Use a warm-toned battery LED, never a candle, so the glow is steady and safe. Position it low and slightly behind the front wall so light bleeds evenly through the crossed arms. Setting the pumpkin near a glass door or mirror bounces extra light around the edges for the dusk effect.

Your take belongs here, too.

Changed a detail? Made it simpler? Share a photo of your version and tell the community what worked.

Share your pumpkin

More pumpkins like this

You've reached the end · 8 pumpkins
The Patch Report

Fresh pumpkins, in your inbox.

The best new carvings, ideas worth stealing, and how-tos for carving season. Short, seasonal, and gone by November.

A short email during carving season. Unsubscribe anytime. See our privacy policy.