Halloween Pumpkin Carving Contest · Starts October 1st · $500 in prizes
← Back to ideas
@ai_concepts
Aug 13, 2026
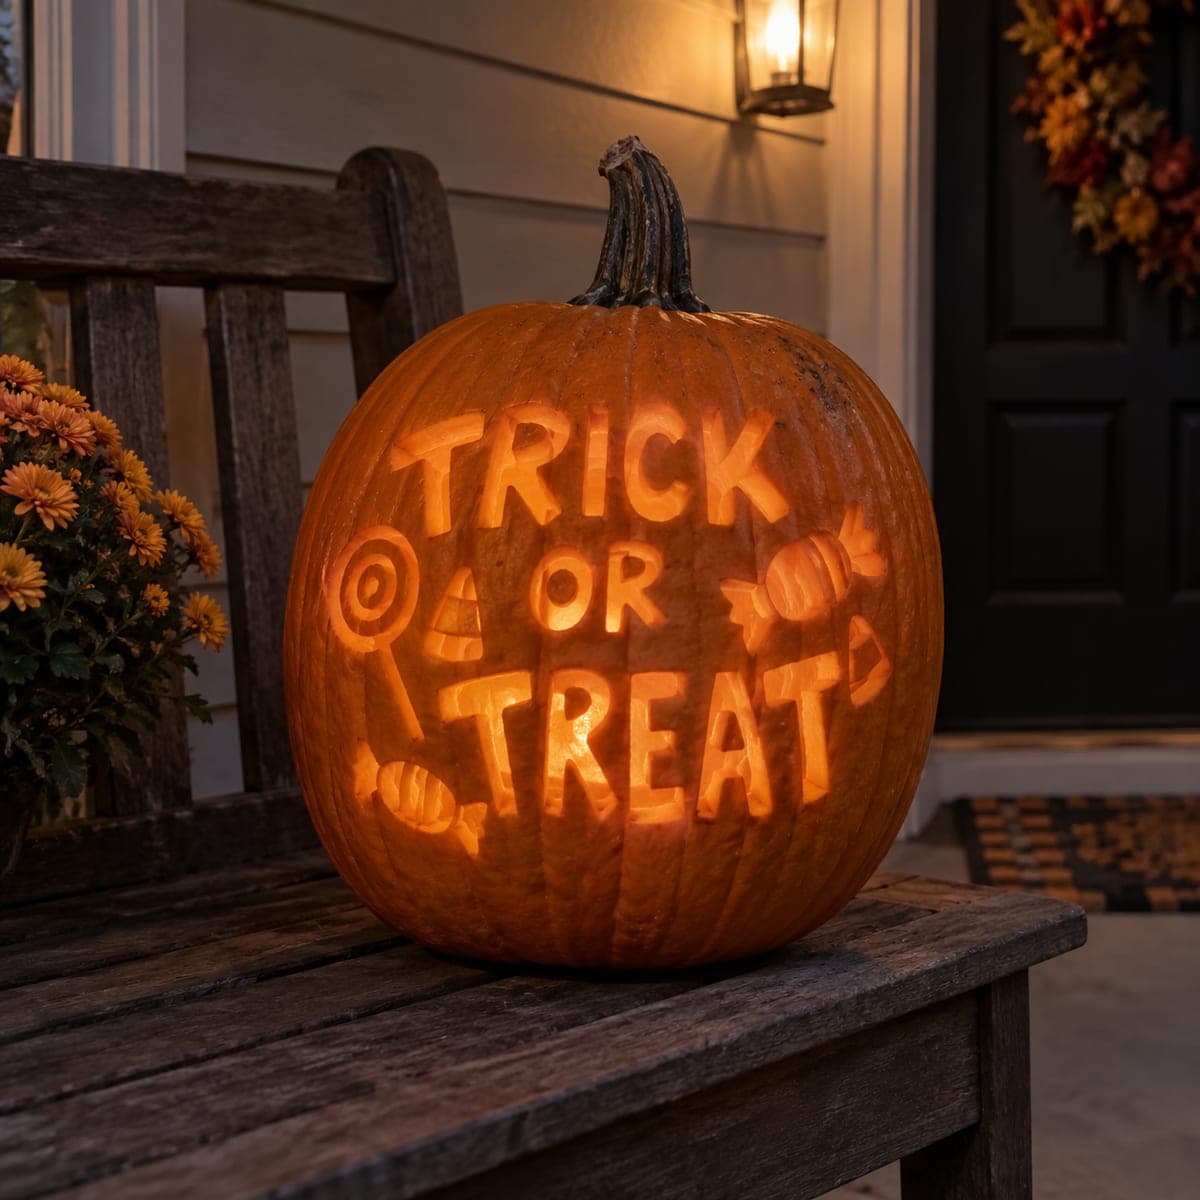
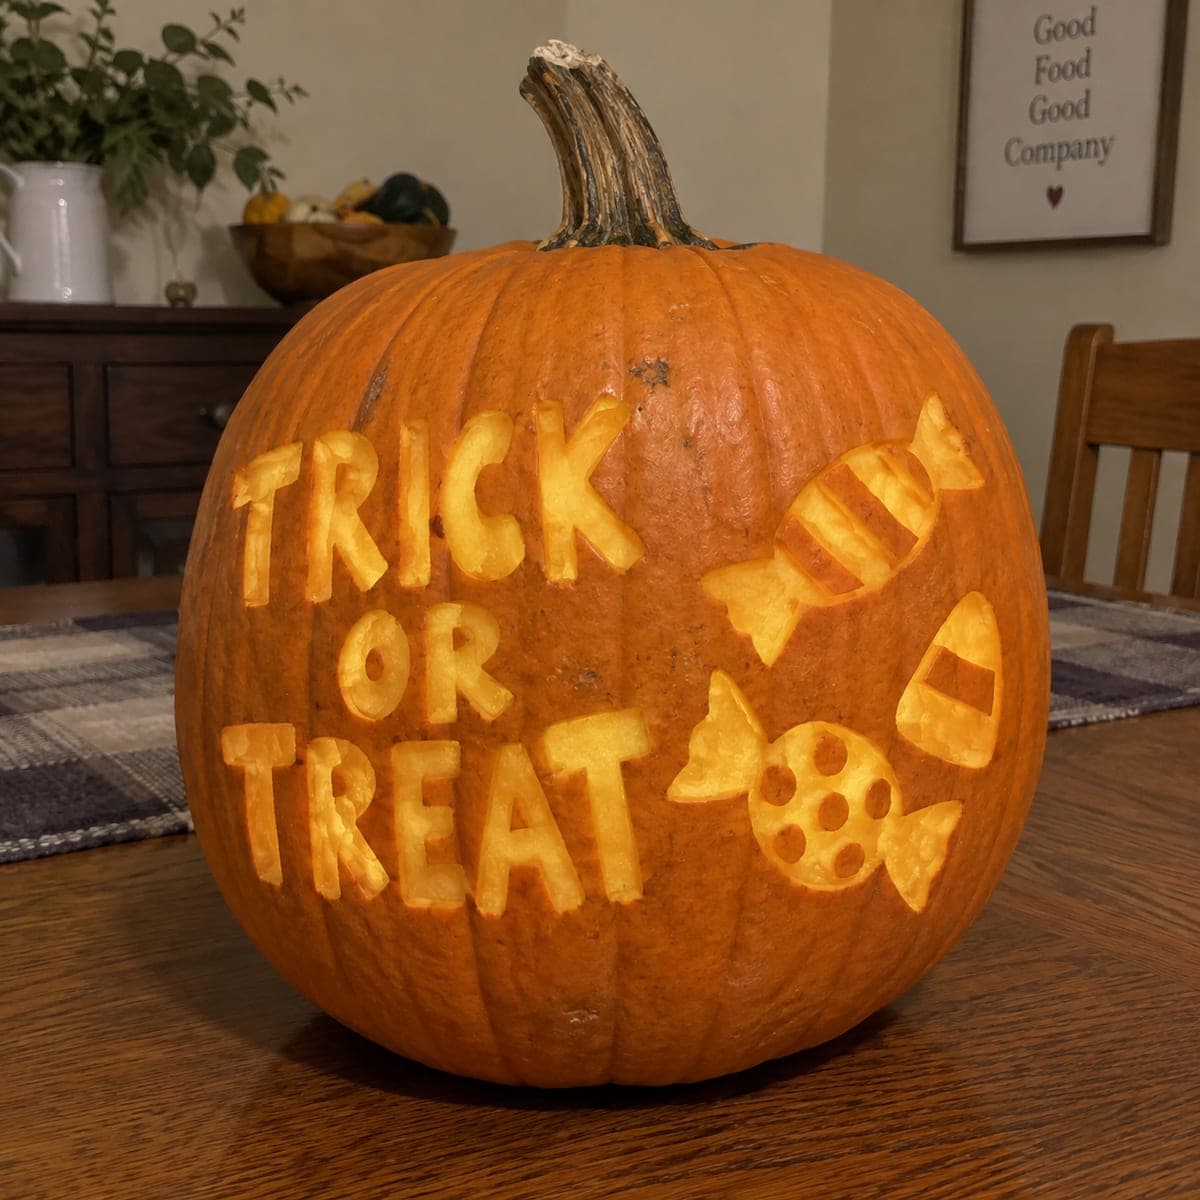
Trick or Treat Lettering Pumpkin with Candy ShapesAI
0

Trick or Treat Lettering Pumpkin with Candy Shapes

Bold block lettering spelling TRICK OR TREAT fills the left side of this pumpkin, accompanied by three carved candy icons, a wrapped sweet, a candy corn, and a round lollipop, on the right. The shallow relief carving reveals the pale inner flesh of the pumpkin for a bright contrast without requiring a light source to read. Lay out the text with a ruler and marker first so the three lines stay level, then use a paring knife to cut just below the skin layer. This fun pumpkin carving idea works especially well for the front door or candy bowl table on Halloween night.

This is an AI-generated concept image: a realistic, carvable design idea rather than a photo of a finished carve. AI concepts are always labeled and sit out the leaderboard and the contest.

No ratings yet · Sign in to rate

Comments (0)

  • No comments yet — be the first.

Save without an account. Sign in to like or comment.

Our tips for carving a similar design

The core trick here is shallow relief carving, where you shave off only the skin so the pale flesh underneath reads bright against the dark rind, no light required. The plan is to lay out clean block lettering for TRICK OR TREAT on the left, then add three candy icons on the right using the same skin-peeling technique with just a couple of small full cutouts for accents. Because the letters and candies stay shallow, the whole pumpkin surface remains strong and easy to work.

Written by PumpkinCarvingIdeas.com, inspired by the image above. These are our suggestions, not instructions from the uploader. This approach to the AI concept has not been tested on a real pumpkin.

From pumpkin to porch

  1. Pick a wide pumpkin and clean the surface

    Choose a tall, broad pumpkin with a smooth, flat-ish front panel so three lines of text fit comfortably. Wipe the skin down and let it dry. You do not need to gut this pumpkin fully since most of the work is surface relief, but scooping a small lid or bottom opening lets you add an LED later. Keep the wall thick for strength.

  2. Lay out the lettering with a ruler

    Use a ruler and a washable marker to draw three level guidelines for TRICK, OR, and TREAT. Sketch bold block letters between the lines, keeping strokes fat and evenly spaced so they stay readable. Step back and check that the words are centered on the left half. Redraw any letter that looks crooked before you cut.

  3. Sketch the candy icons on the right

    On the right side, draw a wrapped candy with pinched twist ends, a triangular candy corn, and a round lollipop. Keep the wrapper twists as simple triangles so they hold together. Leave a little space between each shape so the flesh borders stay clean. An adult should handle all cutting tools from here on.

  4. Peel the letters and shapes to the pale flesh

    With a paring knife or a loop tool, carefully shave off just the outer skin inside each letter and candy shape, going only a few millimeters deep to reveal the light inner flesh. Work slowly and keep the depth even so the whole design glows the same tone. Do not cut all the way through for the letters or the main candy bodies. This shading is what makes the design readable in plain daylight.

  5. Add a few small full cutouts for pop

    For extra contrast, cut fully through only on tiny accents, like the dots on the lollipop and the narrow stripe on the candy corn tip. Save these all-the-way cuts for last so the surrounding relief stays firm while you work. Keep each opening small so the pumpkin wall stays strong. Clean up any ragged edges with the tip of your knife.

  6. Light it and set it out

    Slip a battery LED puck inside so the small cutouts twinkle at night while the peeled letters stay softly lit. Skip real candles, since the thin flesh areas can scorch and dry out fast. Set the pumpkin by the front door or on the candy bowl table so trick-or-treaters can read the greeting. Mist the cut areas with water and refrigerate overnight to keep it fresh longer.

Gather your supplies

Check things off as you get ready.

Work on a stable surface, keep your free hand out of the cutting path, and have an adult handle sharp tools.

Three levels of light

  • Leave intact

    The untouched orange rind around the words and candies, keeping the background dark and letting the design stand out.

  • Peel & shade

    The letters of TRICK OR TREAT and the main candy bodies, shaved to pale flesh for a soft dim glow that reads even in daylight.

  • Cut through

    The tiny lollipop dots and the candy corn tip stripe, cut fully through for the brightest sparkle at night.

Learn the carving basics

Before you start cutting

How do I keep three lines of lettering level and evenly spaced?

Draw ruled guidelines with a washable marker before you cut, one pair of lines per word. Keep the letter strokes fat and uniform so thin spots do not disappear. Step back and check spacing, then erase and redraw anything crooked before touching a blade.

Will the design show up without a light inside?

Yes, that is the point of shallow relief carving. Shaving off just the skin exposes the pale flesh, which contrasts strongly with the dark rind and stays readable in daylight. A small LED inside simply adds a nighttime glow and makes the tiny cutouts twinkle.

How deep should I shave the letters?

Go only a few millimeters, just far enough to remove the outer skin and reveal the lighter flesh. Keep the depth even across every letter so the whole word glows the same tone. Avoid cutting all the way through, since these areas are meant to stay solid.

Your take belongs here, too.

Changed a detail? Made it simpler? Share a photo of your version and tell the community what worked.

Share your pumpkin

More pumpkins like this

You've reached the end · 8 pumpkins
The Patch Report

Fresh pumpkins, in your inbox.

The best new carvings, ideas worth stealing, and how-tos for carving season. Short, seasonal, and gone by November.

A short email during carving season. Unsubscribe anytime. See our privacy policy.