Halloween Pumpkin Carving Contest · Starts October 1st · $500 in prizes
← Back to ideas
@ai_concepts
Aug 14, 2026
Trick or Treat Candy Relief Pumpkin CarvingAI
0

Trick or Treat Candy Relief Pumpkin Carving

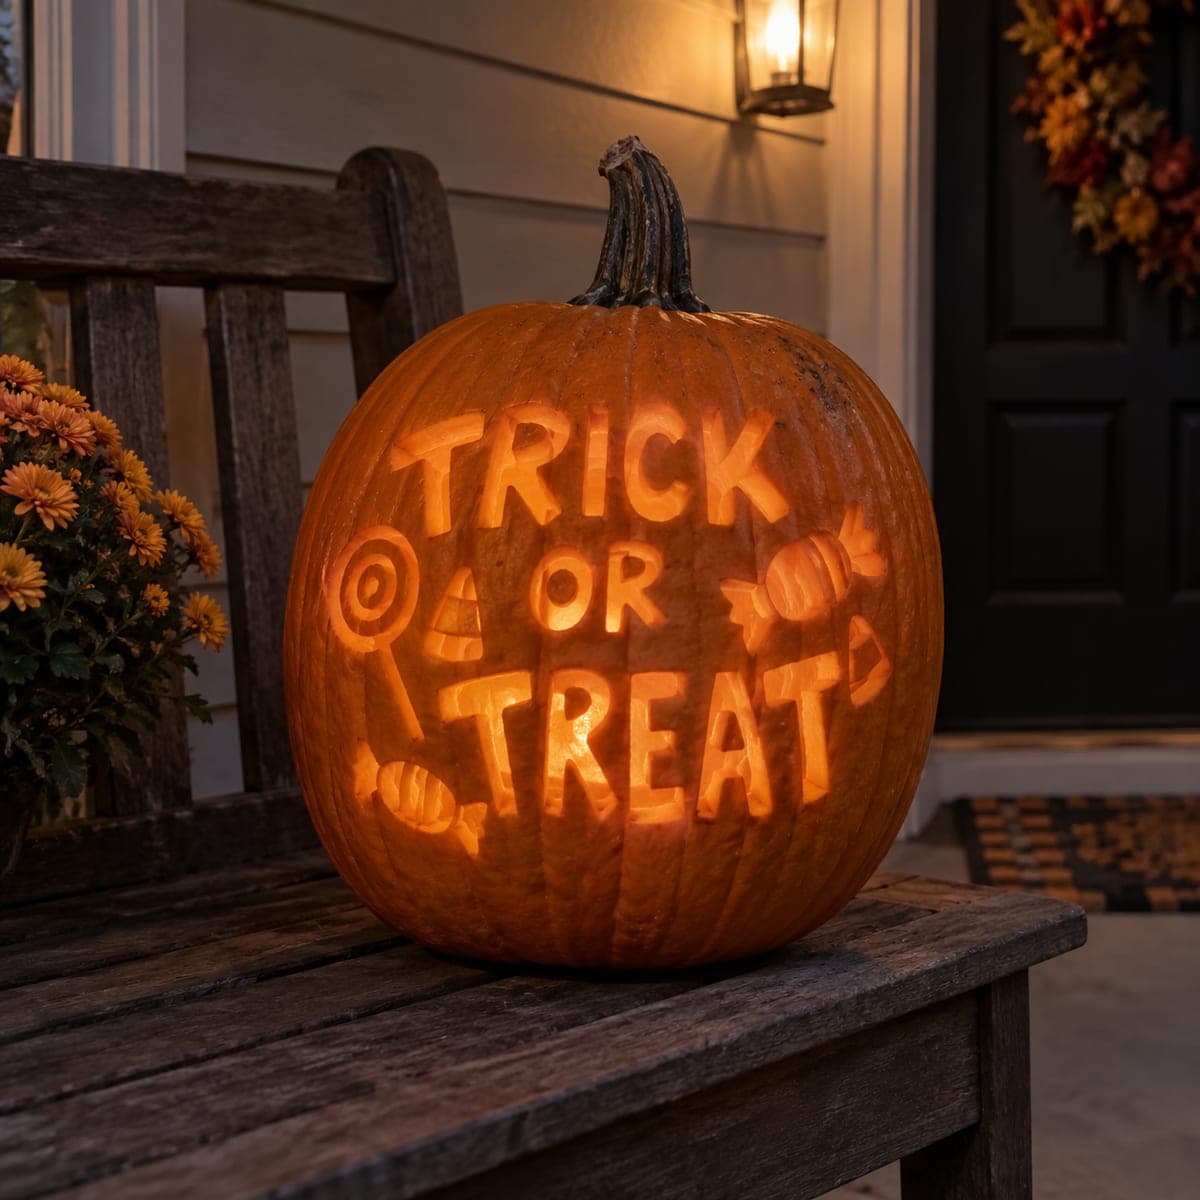
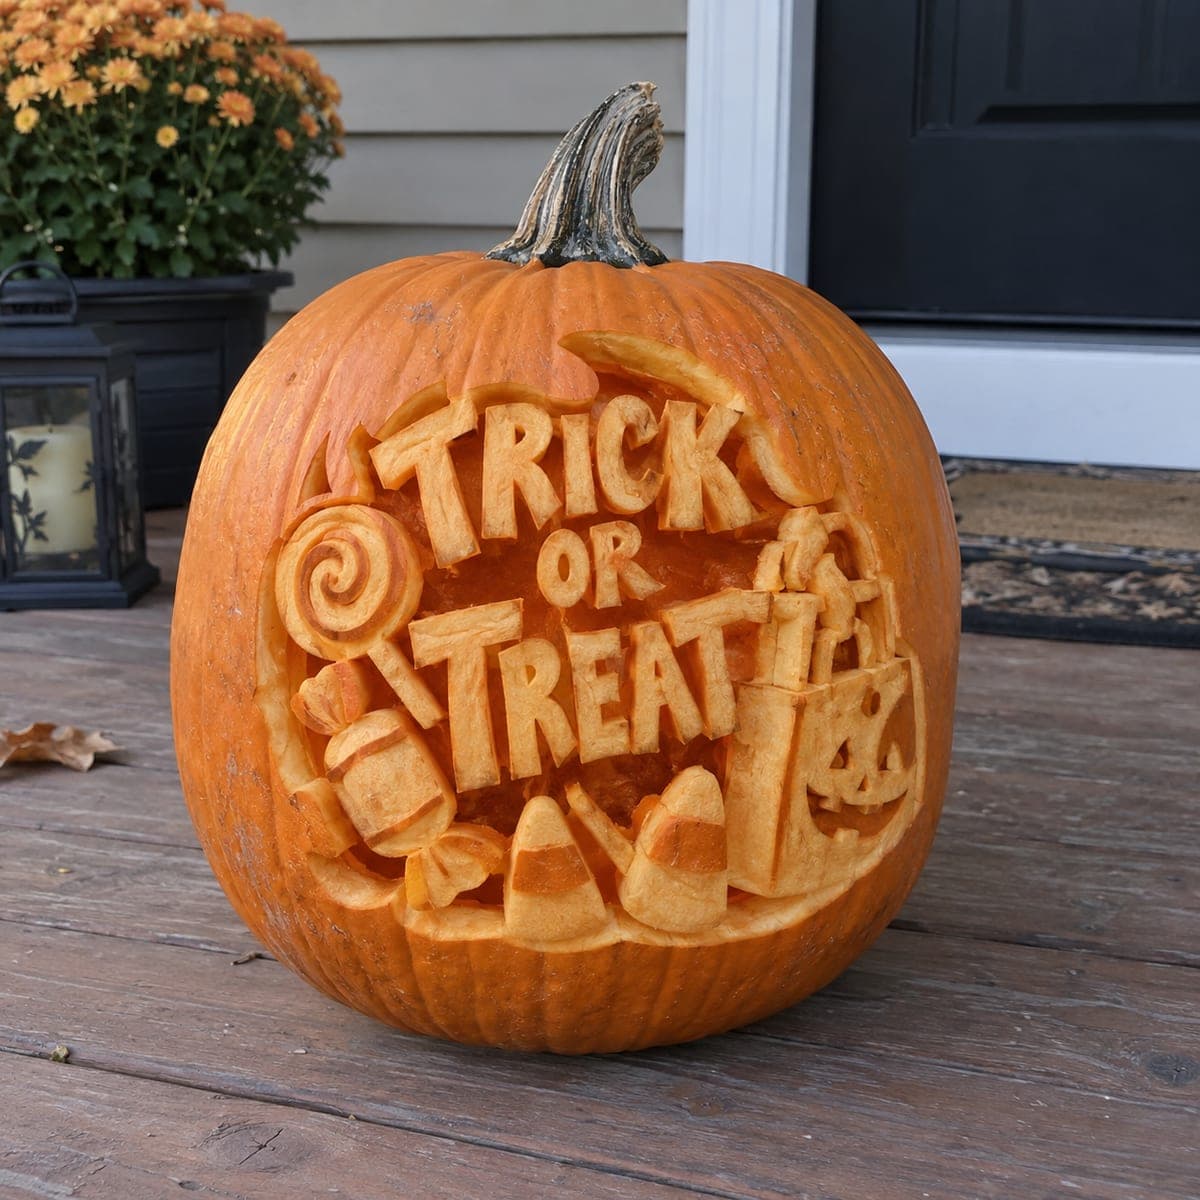
TRICK OR TREAT pops off this pumpkin in chunky raised letters surrounded by carved candy corn, a swirled lollipop, and a goody bag. It is deep relief work; the background is excavated well below the surface so the lettering and candy stand proud. Draw the words first and keep letter walls thick, since thin strokes collapse, then bevel the edges so light catches every rim.

This is an AI-generated concept image: a realistic, carvable design idea rather than a photo of a finished carve. AI concepts are always labeled and sit out the leaderboard and the contest.

No ratings yet · Sign in to rate
Comments (0)

  • No comments yet — be the first.

Save without an account. Sign in to like or comment.

Our tips for carving a similar design

The core trick here is relief carving, where you scoop away the background instead of cutting all the way through, so the words TRICK OR TREAT and the surrounding candy stand up proud of the surface. Since this is an AI concept and no real pumpkin exists, think of it as a plan you could follow on a large, thick-walled pumpkin. The whole effect depends on thick letter walls and beveled rims that catch the light, so patient shaving matters more than deep cutting.

Written by PumpkinCarvingIdeas.com, inspired by the image above. These are our suggestions, not instructions from the uploader. This approach to the AI concept has not been tested on a real pumpkin.

From pumpkin to porch

  1. Pick a big pumpkin and prep it

    Choose a large pumpkin with a smooth, flat-ish face and thick walls, since relief work needs meat to carve into. Cut a lid from the bottom or the back rather than the top so the stem stays intact and the front face is uninterrupted. Scoop the inside clean and thin only the back wall where your LED light will sit. Leave the front wall a full inch or more thick so you have room to carve down.

  2. Draw the words and candy first

    Sketch TRICK OR TREAT in chunky block letters across the middle, then add the lollipop, candy corn, and goody bag around them. Keep every letter stroke wide, at least a finger's width, because thin strokes crumble once the background drops away. Make sure enclosed shapes like the O and the R have their centers connected to the surrounding pumpkin so they do not fall out. Transfer the design with a poking tool or washable marker.

  3. Excavate the background

    Using a lino gouge or a loop tool, start shaving away all the space around the letters and candy. Work slowly and evenly so the whole background drops to the same depth, roughly a quarter to half an inch below the surface. Keep the walls of your letters vertical at first and check often that nothing is getting thin. An adult should handle the sharp gouges, and always push the blade away from your holding hand.

  4. Bevel and shade the rims

    Once the background is even, tilt your tool to bevel the edges of each letter and candy piece so light rolls over the rims. Peel a thin skin layer off the raised faces to warm them into a dim glow, and leave a few spots fully skinned dark for contrast. Add shallow detail lines on the lollipop swirl and the candy corn stripes. This shading step is what makes the scene read as candy rather than flat shapes.

  5. Add the brightest cutouts last

    If you want a few spots of full brightness, cut all the way through in small, safe places like the tiny jack-o-lantern face or a gap in the goody bag. Save these for last so the pumpkin stays sturdy while you do the heavy relief work. Keep cutouts small and surrounded by solid pumpkin so the face does not sag. Clear away crumbs with a soft brush.

  6. Light it and photograph

    Set a bright LED puck or string inside and aim it toward the carved face. Relief work glows softly rather than blasting light, so shoot in near-dark at dusk for the best contrast. Mist the cut edges with water and pop the pumpkin in a cool spot between showings to keep the beveled rims crisp. Take your photo the first night, since relief carvings dry and curl faster than simple cutouts.

Gather your supplies

Check things off as you get ready.

Work on a stable surface, keep your free hand out of the cutting path, and have an adult handle sharp tools.

Three levels of light

  • Leave intact

    The untouched skin on the raised letter faces and candy tops stays dark for contrast and definition.

  • Peel & shade

    The shaved skin on the letter fronts, lollipop swirl, and candy corn glows dim orange.

  • Cut through

    Only small full cutouts like the tiny jack-o-lantern face or a bag gap punch through for the brightest light.

Learn the carving basics

Before you start cutting

How do I keep the letters from breaking off?

Keep every stroke at least a finger's width wide and carve the background evenly rather than gouging deep in one spot. Make sure the centers of enclosed letters like O and R stay attached to surrounding pumpkin. Working shallow, around a quarter to half an inch deep, gives strong letters that still stand proud.

Do I need to cut all the way through anywhere?

Mostly no. This is relief work, so the glow comes from thinned skin, not big openings. You can add a few tiny cutouts like the little jack-o-lantern face for pops of bright light, but save those for last so the face stays sturdy.

What pumpkin works best for relief carving?

Pick the largest, thickest-walled pumpkin you can find with a broad flat face. Thin-walled pumpkins do not leave enough meat to carve down into. A smooth surface also makes the chunky lettering read clearly once you excavate the background.

Your take belongs here, too.

Changed a detail? Made it simpler? Share a photo of your version and tell the community what worked.

Share your pumpkin

More pumpkins like this

You've reached the end · 8 pumpkins
The Patch Report

Fresh pumpkins, in your inbox.

The best new carvings, ideas worth stealing, and how-tos for carving season. Short, seasonal, and gone by November.

A short email during carving season. Unsubscribe anytime. See our privacy policy.