Halloween Pumpkin Carving Contest · Starts October 1st · $500 in prizes
← Back to ideas
@ai_concepts
Aug 22, 2026
Trick or Treat Painted Pumpkin with Candy MotifsAI
0

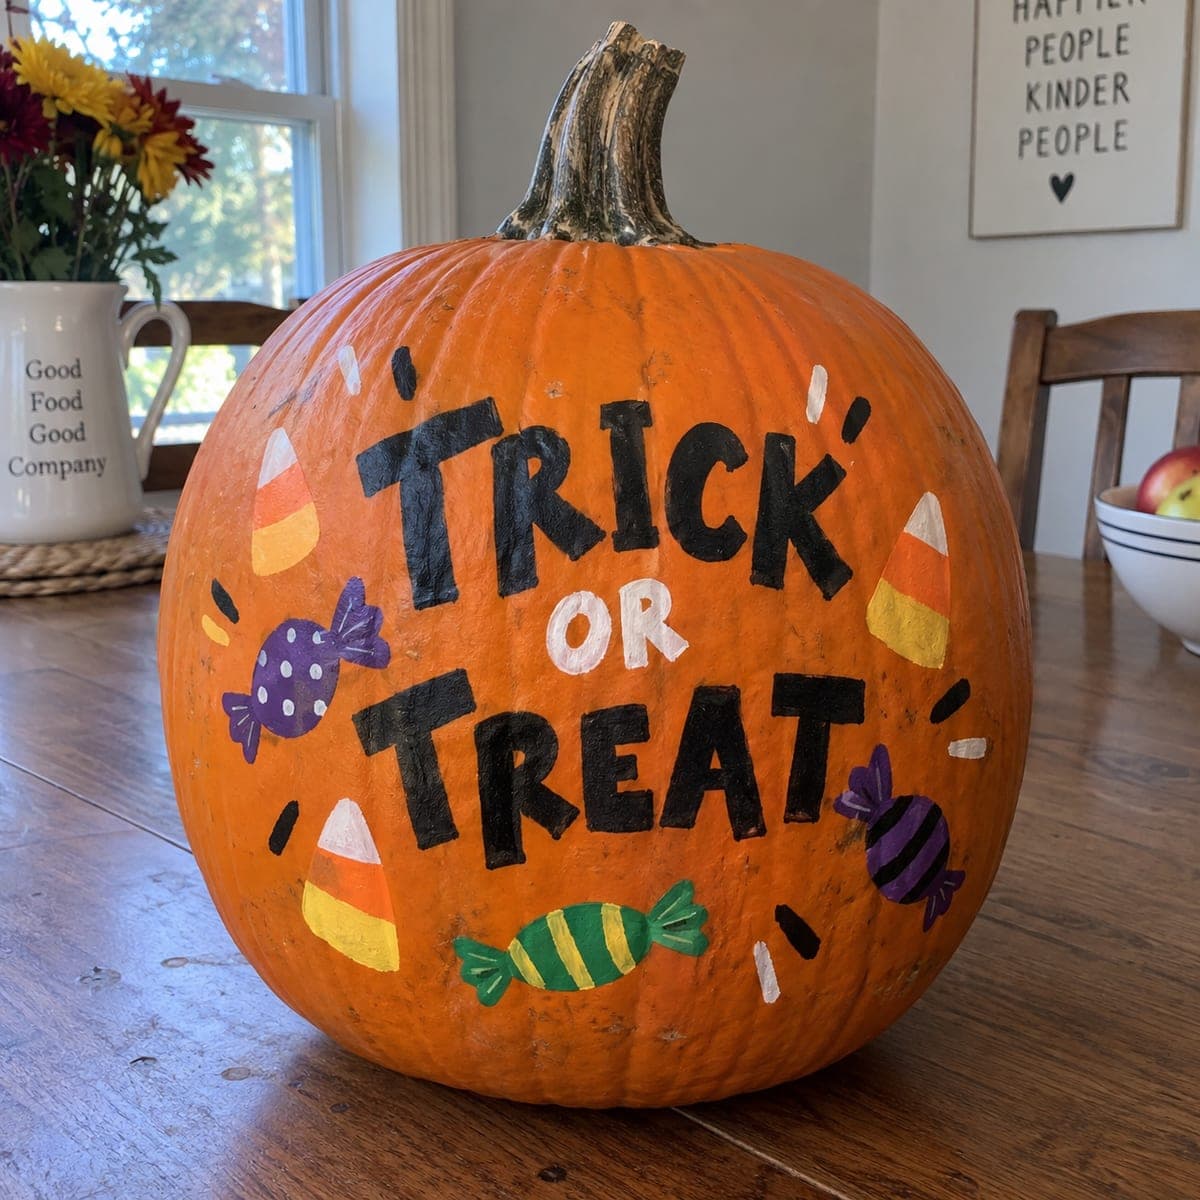
Trick or Treat Painted Pumpkin with Candy Motifs

Bold black block lettering spelling out "Trick or Treat" covers the front of an orange pumpkin, surrounded by painted candy corn, wrapped candies, and white accent dashes in a festive no-carve design. The letters are painted with a flat brush using black acrylic, and the candy illustrations in yellow, purple, and green acrylic add color around the text. Pencil the letters lightly first to check spacing before painting, and use white paint for the candy highlights and dashes to make the overall design pop. This cheerful painted pumpkin idea is ready to display on a kitchen or dining room table the moment the paint dries.

This is an AI-generated concept image: a realistic, carvable design idea rather than a photo of a finished carve. AI concepts are always labeled and sit out the leaderboard and the contest.
No ratings yet · Sign in to rate

Comments (0)

  • No comments yet — be the first.

Save without an account. Sign in to like or comment.

Our tips for carving a similar design

The core trick here is clean block lettering, so the whole design hangs on spacing the words evenly before any paint touches the pumpkin. Plan for bold black letters across the front with small candy illustrations tucked into the empty corners, then finish with tiny white dashes to tie it together. Because nothing is cut, you keep the pumpkin sealed and long lasting for an indoor table.

Written by PumpkinCarvingIdeas.com, inspired by the image above. These are our suggestions, not instructions from the uploader. This approach to the AI concept has not been tested on a real pumpkin.

From pumpkin to porch

  1. Clean and dry the surface

    Wipe the whole pumpkin down with a damp cloth and let it dry fully. Acrylic grips much better on a clean, dust-free skin. Pick the flattest, most even face as your front so the letters do not distort over ribs. Set the pumpkin on a towel so it cannot roll while you work.

  2. Pencil the lettering first

    Lightly sketch TRICK OR TREAT in pencil, breaking it into three stacked lines like the photo. Rough in a center guideline for each row so your letters sit level. Check the spacing from a step back and erase and redraw until it feels balanced. Keep the letters chunky and upright since fat block shapes are the easiest to paint solid.

  3. Paint the black letters

    Use a small flat brush and black acrylic to fill the letters, working from the top row down so your hand does not smear wet paint. Outline each letter first, then fill the middle. A second coat once the first dries gives you that deep, opaque black. Let it cure before moving on.

  4. Add the candy motifs

    Sketch candy corn triangles and wrapped candies in the open spaces around the words, then paint them in yellow, orange, purple, and green. Keep the shapes simple and let each color dry before adding the next so they stay crisp. Twist-wrapper ends read best as a few short angled strokes. Space the candies so they frame the text rather than crowd it.

  5. Finish with white highlights

    Load a fine brush with white and add the small dashes scattered around the design, plus little highlight streaks and dots on the candies. These bright accents are what make the whole thing pop. Use a light hand so the dashes stay thin and even. Let everything dry completely.

  6. Seal and display

    Once fully dry, brush on a thin coat of clear acrylic sealer to protect the paint from smudges and humidity. Give it time to cure, then wipe any stray pencil marks. Set it on a kitchen or dining table where it can be admired up close. A painted pumpkin like this can last for weeks indoors.

Gather your supplies

Check things off as you get ready.

Work on a stable surface, keep your free hand out of the cutting path, and have an adult handle sharp tools.

Three levels of light

  • Leave intact

    The untouched orange skin makes up most of the design and shows off the background between the letters and candies.

  • Peel & shade

    This is a paint-only concept, so no skin is peeled, but you could lightly scuff a border ring for a matte frame if you want texture.

  • Cut through

    Nothing is cut on this design; if you wanted a glow, you could later cut a few tiny dash shapes on the back and drop in an LED.

Learn the carving basics

Before you start cutting

How do I keep the letters straight on a round pumpkin?

Sketch a light center guideline for each of the three rows before you draw any letters. Turn the pumpkin as you go so you are always painting the part facing you directly. Stepping back to check spacing after each row keeps the words from drifting uphill.

What paint works best and will it stay put?

Standard acrylic craft paint adheres well to a clean, dry pumpkin and dries fast between coats. Two thin coats give better coverage than one thick one, especially for the black letters. A clear acrylic sealer at the end guards against smudging and light humidity.

Can I add a real glow to this no-carve design?

Yes, but do the painting first and keep any cutting to the back. You could cut a small opening on the rear and set a battery LED inside, or place the whole pumpkin near a lamp. Never use a candle, since the sealed pumpkin and paint fumes do not mix with an open flame.

Your take belongs here, too.

Changed a detail? Made it simpler? Share a photo of your version and tell the community what worked.

Share your pumpkin

More pumpkins like this

You've reached the end · 8 pumpkins
The Patch Report

Fresh pumpkins, in your inbox.

The best new carvings, ideas worth stealing, and how-tos for carving season. Short, seasonal, and gone by November.

A short email during carving season. Unsubscribe anytime. See our privacy policy.