Halloween Pumpkin Carving Contest · Starts October 1st · $500 in prizes
← Back to ideas
@ai_concepts
Sep 12, 2026
Nurses Make a Difference Painted PumpkinAI
0

Nurses Make a Difference Painted Pumpkin

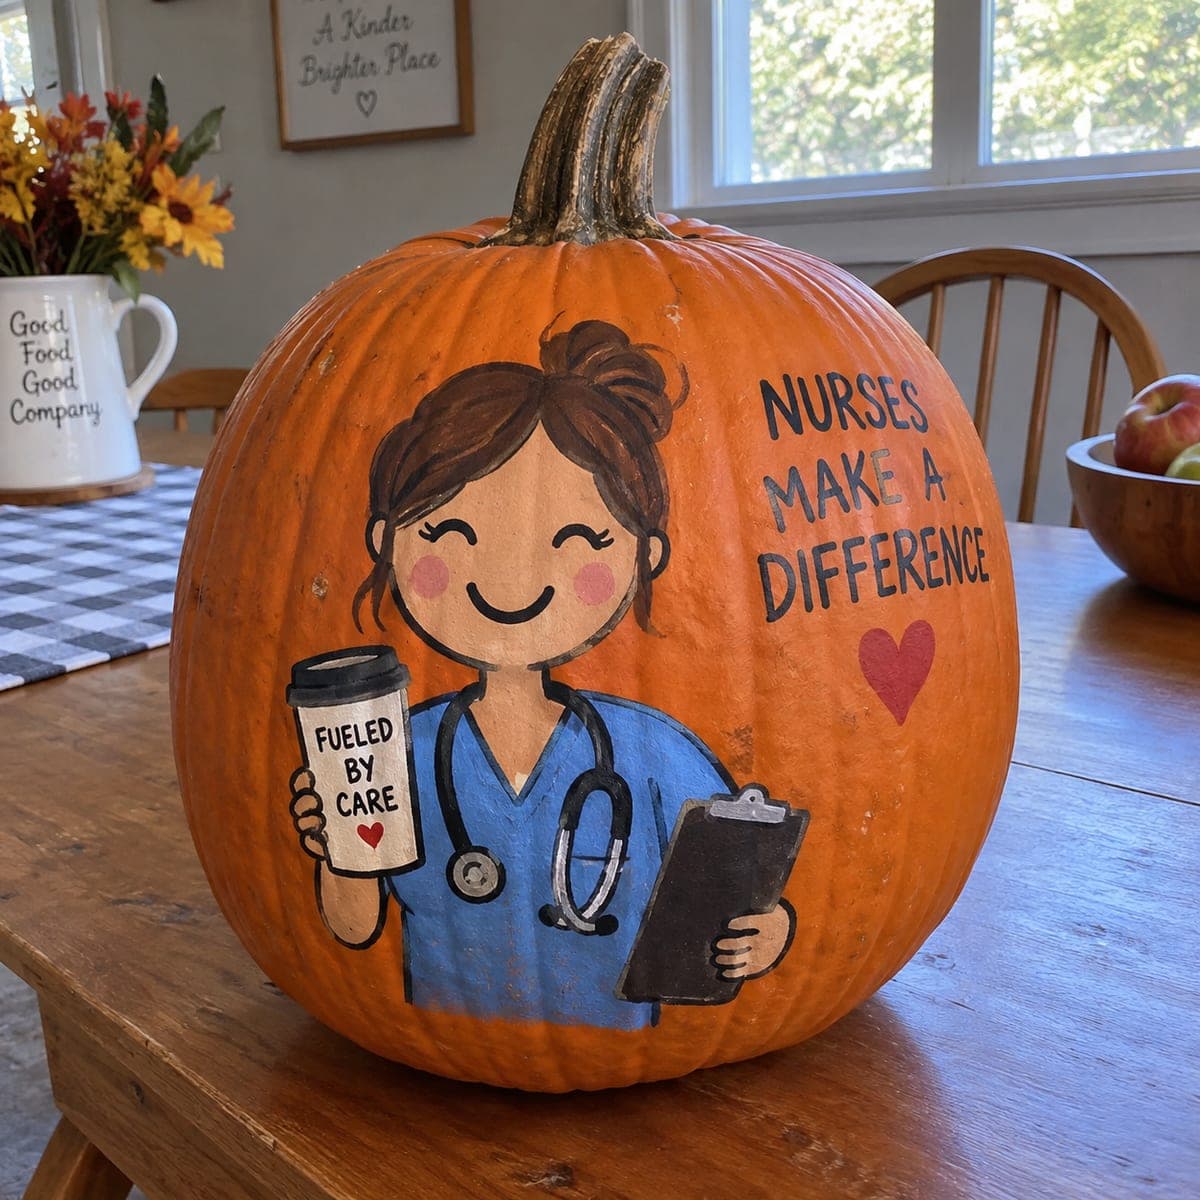
A smiling cartoon nurse in blue scrubs holds a clipboard and a travel mug labeled Fueled by Care beside hand-lettered text reading Nurses Make a Difference. This no-carve pumpkin makes a thoughtful gift for a nurses station or a healthcare worker in the family. Paint the figure first and let it dry fully before lettering, and use a fine liner brush or paint pen so the message stays crisp against the orange skin.

This is an AI-generated concept image: a realistic, carvable design idea rather than a photo of a finished carve. AI concepts are always labeled and sit out the leaderboard and the contest.

No ratings yet · Sign in to rate
Comments (0)

  • No comments yet — be the first.

Save without an account. Sign in to like or comment.

Our tips for carving a similar design

The core trick here is layering flat cartoon shapes in acrylic, then adding crisp black outlines and lettering once the color underneath is dry. Since this is a painted design with no cutting, plan it as a two-day project: base colors and figure first, outlines and words second. Keeping every element bold and simple is what makes it read clearly from across a room.

Written by PumpkinCarvingIdeas.com, inspired by the image above. These are our suggestions, not instructions from the uploader. This approach to the AI concept has not been tested on a real pumpkin.

From pumpkin to porch

  1. Clean and sketch the layout

    Wipe the pumpkin with a damp cloth and let it dry so paint grips the skin. Choose the flattest, roundest face for the nurse and pick a spot to the side for the text. Lightly sketch the figure, mug, clipboard, heart, and word placement in pencil. Step back often to check that everything is centered and sized to fit the curve.

  2. Block in the big color shapes

    Start with the largest areas: the blue scrubs, the skin tone of the face and hands, and the brown hair. Use acrylic craft paint and a medium round brush, and leave the orange skin bare where you want the pumpkin color to show. Let this first layer dry completely, then add a second coat for solid, even color. Painting light shapes before dark outlines keeps edges clean.

  3. Add the props and details

    Paint the white travel mug, the dark clipboard, and the gray stethoscope once the base is dry. Add the rosy cheeks and the small red hearts. Keep the mug label white and blank for now so you can letter it later. Wait for full drying between any overlapping colors so they do not smear together.

  4. Outline and letter

    With a fine liner brush or a black paint pen, trace the outlines of the figure, the smiling face, and the props to make them pop against the orange. Add the 'Fueled by Care' text on the mug and the 'Nurses Make a Difference' message to the side. Rest your hand on a folded towel to steady it, and letter slowly so the lines stay crisp. If you are nervous about freehand, pencil the words first and paint over them.

  5. Seal and display

    Once everything is bone dry, brush on a thin coat of clear acrylic sealer to protect the paint and add a soft sheen. Set the pumpkin on a table or a nurses station where the light hits the face. Because nothing is cut, it will last for weeks with no scooping needed. Snap a photo in daylight to share the finished gift.

Gather your supplies

Check things off as you get ready.

Work on a stable surface, keep your free hand out of the cutting path, and have an adult handle sharp tools.

Three levels of light

  • Leave intact

    The bare orange skin stays as the warm background around the figure and behind the lettering.

  • Peel & shade

    No peeling on this no-carve design, though you could lightly scuff a halo behind the text for contrast if you want.

  • Cut through

    No cutouts here; this is a fully painted pumpkin, so skip the knives entirely.

Learn the carving basics

Before you start cutting

Do I need to cut or hollow the pumpkin at all?

No. This is a no-carve painted design, so leave the pumpkin whole and uncut. That keeps it firm for painting and lets it last far longer than a carved one. Just clean the surface well before you start.

How do I keep the lettering neat on the bumpy skin?

Pick the smoothest side for your words and pencil them in first to check spacing. Use a fine liner brush or a paint pen and work slowly, resting your hand on a towel for support. If a letter smudges, let it dry and touch it up rather than fixing it wet.

Can I make this a real gift that lasts?

Yes. A painted pumpkin with no cuts can hold up for several weeks if kept cool and dry. Seal the finished paint with a clear acrylic coat for extra durability and a subtle shine. It travels well to a nurses station or a family member's home.

Your take belongs here, too.

Changed a detail? Made it simpler? Share a photo of your version and tell the community what worked.

Share your pumpkin

More pumpkins like this

You've reached the end · 8 pumpkins
The Patch Report

Fresh pumpkins, in your inbox.

The best new carvings, ideas worth stealing, and how-tos for carving season. Short, seasonal, and gone by November.

A short email during carving season. Unsubscribe anytime. See our privacy policy.