Halloween Pumpkin Carving Contest · Starts October 1st · $500 in prizes
← Back to ideas
@ai_concepts
Jul 17, 2026
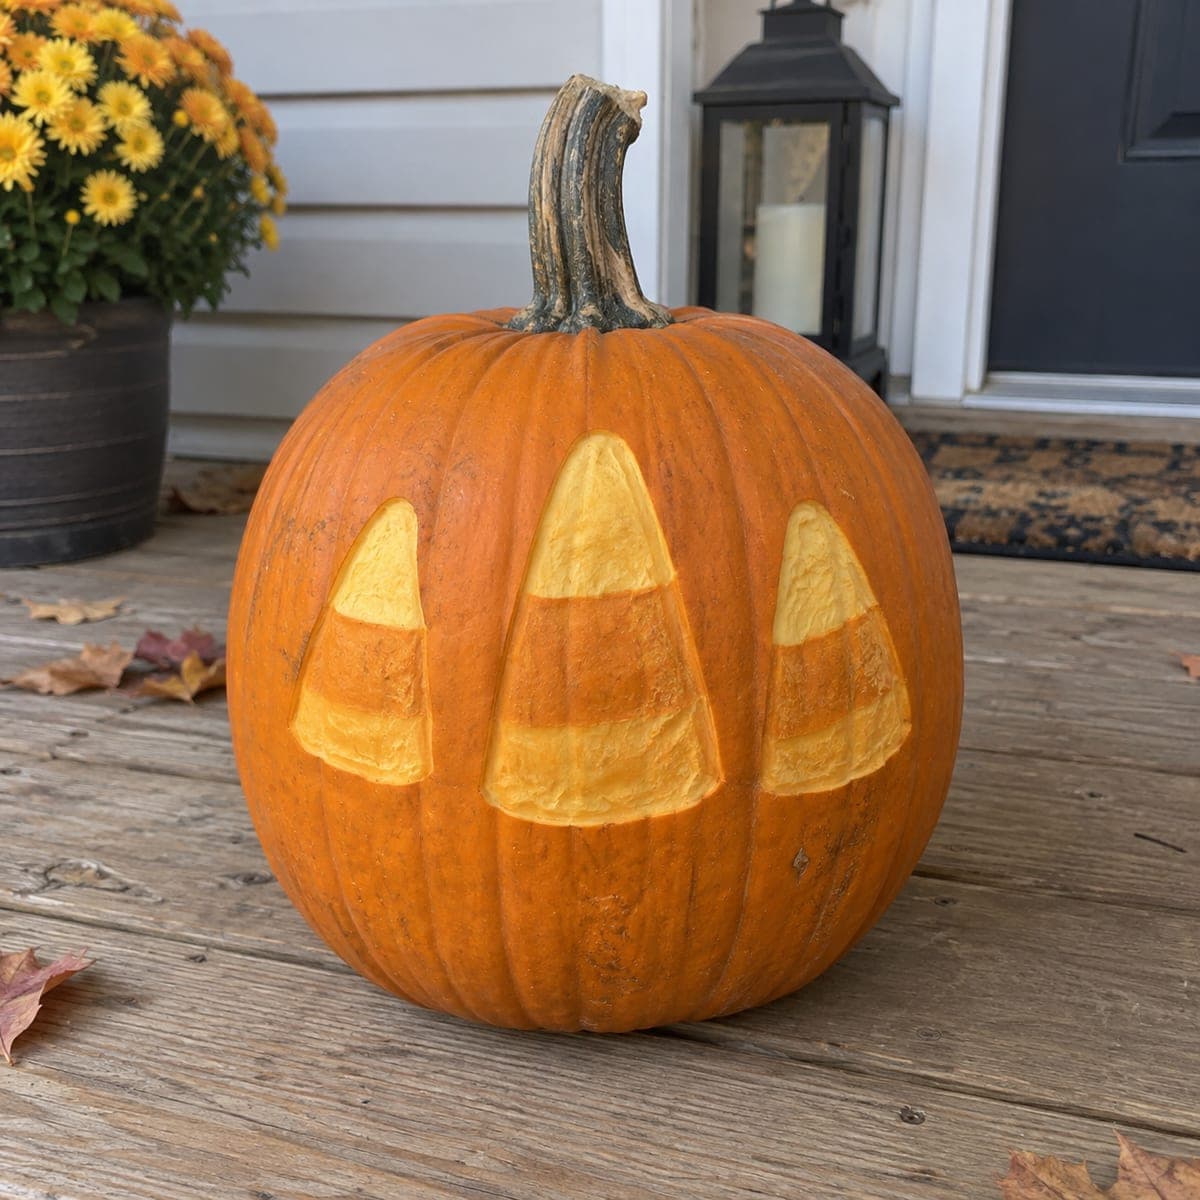
Three Candy Corn No-Carve Pumpkin IdeaAI
0

Three Candy Corn No-Carve Pumpkin Idea

Three candy corn shapes are painted across the front of this uncut pumpkin, their triangular bodies shaded from white at the tip to orange at the base, mimicking the classic fall candy. The no-carve approach uses acrylic paint applied with a flat brush, making it a great project for kids who are too young to handle carving tools. Because nothing is cut, this pumpkin will last several weeks longer than a carved one. Try placing it on a hay bale alongside a bowl of actual candy corn for a festive entry display.

This is an AI-generated concept image: a realistic, carvable design idea rather than a photo of a finished carve. AI concepts are always labeled and sit out the leaderboard and the contest.

No ratings yet · Sign in to rate
Comments (0)

  • No comments yet — be the first.

Save without an account. Sign in to like or comment.

Our tips for carving a similar design

This is an AI concept image, so no real pumpkin exists, but you can recreate the look with relief carving instead of paint. The core trick is skin-peeling at different depths so each candy corn shows three glowing bands, from a bright tip down to a warmer base. Repeat the same cone three times across the front for a tidy, balanced row.

Written by PumpkinCarvingIdeas.com, inspired by the image above. These are our suggestions, not instructions from the uploader. This approach to the AI concept has not been tested on a real pumpkin.

From pumpkin to porch

  1. Plan and transfer the three cones

    Pick the smoothest, flattest face of the pumpkin so all three shapes read clearly. Draw or trace three candy corn triangles evenly spaced, making the center one slightly larger. Divide each cone into three horizontal bands with light pencil or a transfer tool. Step back and check the spacing before you commit to any cutting.

  2. Score the outlines first

    With a small detail saw or a fine loop tool, lightly trace the outer edge of each triangle and the two band lines inside. You are only scoring here, not cutting deep. Clean scoring keeps your bands crisp once you start shading. Take your time so the three cones stay matched in size.

  3. Peel the base band for a soft glow

    Starting with the lowest band of each cone, use a ribbon or gouge tool to shave off just the orange skin, leaving the pale flesh exposed. This shallow peel gives a warm, dim glow when lit. Keep the depth even across all three so they match. Work slowly and let an adult handle the sharp tools.

  4. Deepen the tip for the brightest band

    Peel the top tip band thinner than the base so more light passes through, giving that near-white candy corn tip. Do not cut all the way through; leave a thin wall so the shape stays strong. Feather the edge between bands slightly for a smooth shaded transition. Repeat identically on all three cones.

  5. Leave the middle band as skin

    Keep the center band of each cone as untouched orange skin so it stays darker than the peeled parts. This gives you the classic three-tone candy corn look without any extra color. Tidy up any rough band lines with your detail tool. Wipe the surface clean with a damp cloth.

  6. Light it and photograph

    Drop a battery LED puck or string inside through a lid or bottom opening, never a candle. Set the pumpkin on a hay bale with a bowl of real candy corn nearby for a festive entry scene. Shoot at dusk so the peeled bands glow against the dark skin. Rub the cut edges with a little petroleum jelly to slow drying.

Gather your supplies

Check things off as you get ready.

Work on a stable surface, keep your free hand out of the cutting path, and have an adult handle sharp tools.

Three levels of light

  • Leave intact

    The background skin around the cones and the middle orange band of each candy corn stay untouched and dark.

  • Peel & shade

    The lower base band of each cone gets a shallow skin-peel for a warm, dim glow.

  • Cut through

    The top tip band is shaved thinnest for the brightest, near-white candy corn point.

Learn the carving basics

Before you start cutting

Do I really have to carve this, or can I just paint it like the concept shows?

You can absolutely paint it, which is the easiest no-carve route and lasts weeks longer. If you want a glowing version instead, the relief carving described here mimics the same three bands with light. Choose based on whether you want it lit or long-lasting.

How do I keep all three candy corns the same size?

Make a single paper template of one cone and trace it three times, flipping it face down between uses if needed. Mark the band lines on the template too so the divisions land in the same spot each time. Consistent scoring before shading is what keeps them looking like a matched set.

Why not cut all the way through for the tips?

Cutting fully through would make the pale tip look empty and could weaken the thin point. A thin peeled wall still lets plenty of light through for that bright candy corn tip while keeping the shape solid. Leave at least a quarter inch of flesh behind each peeled band.

Your take belongs here, too.

Changed a detail? Made it simpler? Share a photo of your version and tell the community what worked.

Share your pumpkin

More pumpkins like this

You've reached the end · 8 pumpkins
The Patch Report

Fresh pumpkins, in your inbox.

The best new carvings, ideas worth stealing, and how-tos for carving season. Short, seasonal, and gone by November.

A short email during carving season. Unsubscribe anytime. See our privacy policy.