Halloween Pumpkin Carving Contest Β· Starts October 1st Β· $500 in prizes
← Back to ideas
@ai_concepts
Sep 7, 2026
Red Squirrel Holding Acorn Painted Harvest PumpkinAI
0

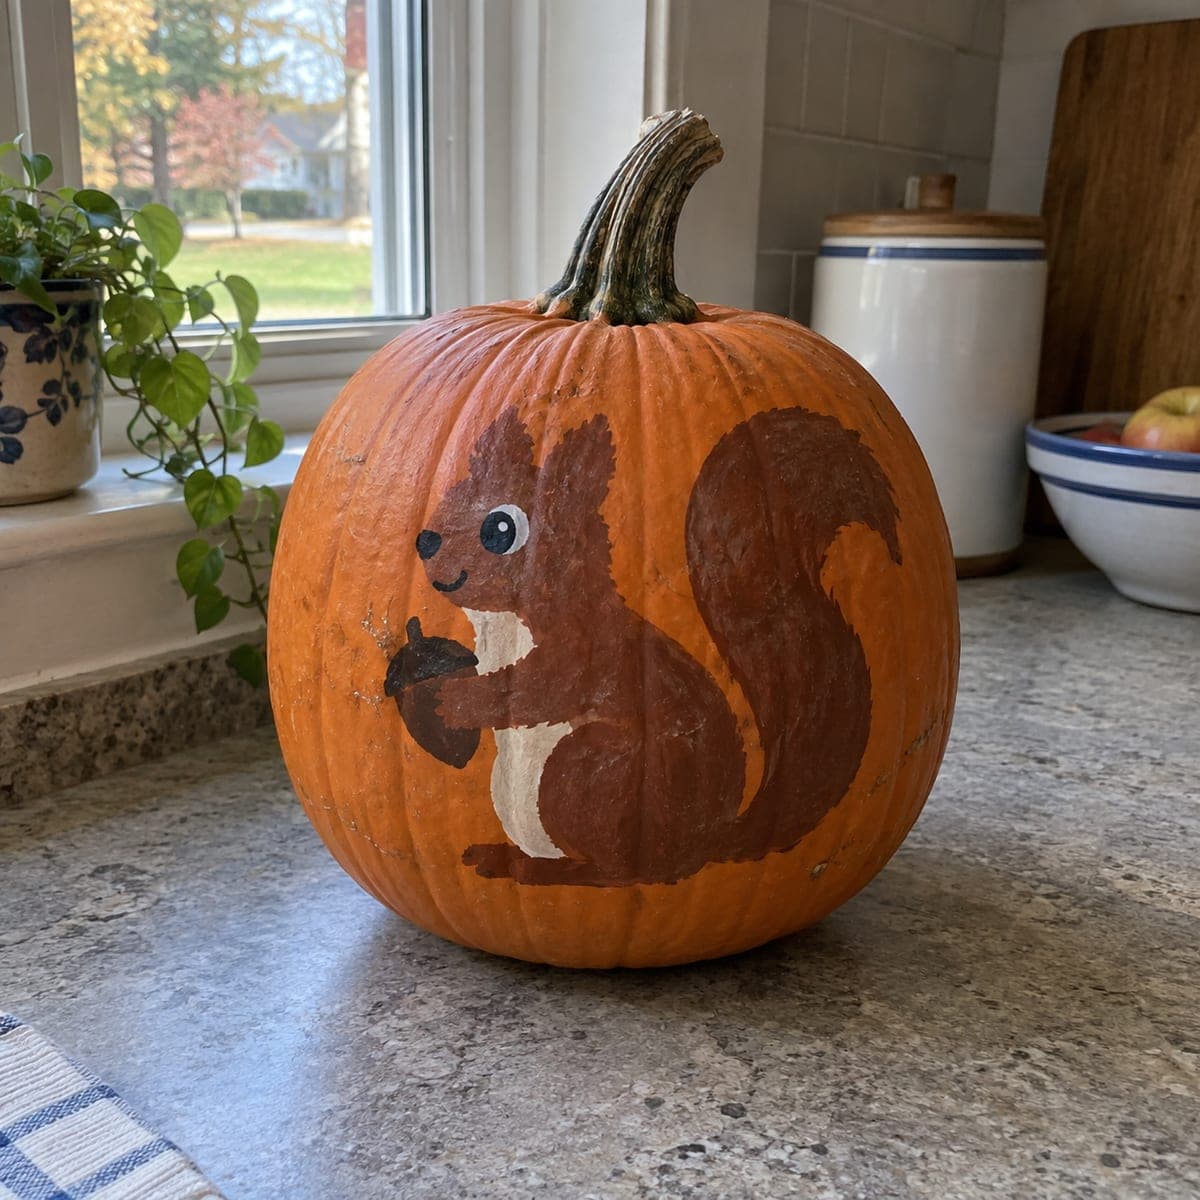
Red Squirrel Holding Acorn Painted Harvest Pumpkin

A round-bodied red squirrel clutching an acorn sits upright on the front of this uncarved pumpkin, the warm brown and rust tones of the painting blending naturally with the pumpkin's orange skin for a cohesive fall look. The bushy tail curls up behind the squirrel and fills much of the upper half of the design. Start by painting the tail shape first since it forms the natural frame for the body below. This harvest-themed no-carve pumpkin idea is versatile enough to display through Thanksgiving without looking out of season.

This is an AI-generated concept image: a realistic, carvable design idea rather than a photo of a finished carve. AI concepts are always labeled and sit out the leaderboard and the contest.

No ratings yet Β· Sign in to rate

Comments (0)

  • No comments yet β€” be the first.

Save without an account. Sign in to like or comment.

Our tips for carving a similar design

The trick here is painting the bushy tail before anything else so its curved shape frames the round little body sitting below it. Because this is an AI concept, no real pumpkin exists, but you can copy the look by layering warm rust and brown acrylics right onto an uncarved pumpkin so the paint blends with the orange skin. Work light shapes to dark details, saving the tiny acorn and face highlights for last.

Written by PumpkinCarvingIdeas.com, inspired by the image above. These are our suggestions, not instructions from the uploader. This approach to the AI concept has not been tested on a real pumpkin.

From pumpkin to porch

  1. Clean and dry the pumpkin

    Wipe the whole pumpkin with a damp cloth to lift dust and any waxy residue, then dry it fully. Paint grips clean, dry skin far better than a slick surface. Pick the flattest, smoothest face for your squirrel so the ribs do not distort the shape. Let it sit a few minutes before you start sketching.

  2. Sketch the tail and body

    With a soft pencil, lightly draw the big curling tail across the upper half first, then tuck the round seated body underneath it. Add a simple oval head and a small paw area up front where the acorn will go. Keep lines light so you can wipe and adjust them. Getting the tail placement right now keeps the rest of the design balanced.

  3. Block in the tail and body

    Load a medium brush with rust brown and fill the tail shape, following its curve with your strokes so it reads as fur. Paint the body the same color, then let this base coat dry before adding anything on top. Two thin coats look smoother than one thick one. Wait until each coat is dry to the touch so colors do not muddy together.

  4. Add belly, shading, and fur strokes

    Brush a cream or pale patch down the chest and belly while the base is dry. Use a slightly darker brown to add short flicking strokes along the tail edge and around the body for a soft fluffy texture. Keep the strokes light and layered rather than solid. This shading is what makes the flat shape look round and furry.

  5. Paint the face and acorn details

    Add the black eye, then a tiny white dot on it for that friendly spark, and a small curved smile. Paint the acorn in the front paws with a tan cap and dark brown body. These small high-contrast details are the focal point, so use a fine brush and a steady hand. Let everything dry completely.

  6. Seal and display

    Once dry, brush on a coat of clear matte acrylic sealer to protect the paint from smudges and light moisture. Set the pumpkin on a shelf or porch table out of direct rain. Because nothing is cut, it will last for weeks and carry you from Halloween through Thanksgiving. Snap a photo in soft daylight to show off the warm tones.

Gather your supplies

Check things off as you get ready.

Work on a stable surface, keep your free hand out of the cutting path, and have an adult handle sharp tools.

Three levels of light

  • Leave intact

    The orange background skin and the whole painted squirrel stay intact and unlit, which is the point of a no-carve design.

  • Peel & shade

    If you want a soft glow, you could lightly shave a thin ring of skin around the squirrel for a dim halo, keeping the painted area untouched.

  • Cut through

    Only if you want one bright accent, cut fully through a small shape like a tiny star or leaf in an upper corner and drop in an LED, never a candle.

Learn the carving basics

Before you start cutting

Do I need to carve anything for this design?

No, this is a fully painted no-carve pumpkin, so the squirrel and acorn are done entirely with acrylic paint. Skipping the cut also means it lasts much longer, easily through Thanksgiving. If you want a glowing version later, you can add a small LED-lit cutout in a corner without touching the painting.

What if my brown paint blends too much into the orange skin?

Some blending is actually the goal here, since the warm tones are meant to sit naturally against the pumpkin. If the squirrel starts to disappear, add a second coat and deepen the outline edges with a darker brown. A few pale cream strokes on the belly and tail will also make the shape pop.

How do I keep the painted pumpkin looking good for weeks?

Let every layer dry fully, then finish with a coat of clear matte acrylic sealer to guard against smudges and light moisture. Display it somewhere sheltered from rain and harsh sun. Stored this way, a no-carve painted pumpkin can hold up for several weeks.

Your take belongs here, too.

Changed a detail? Made it simpler? Share a photo of your version and tell the community what worked.

Share your pumpkin

More pumpkins like this

You've reached the end Β· 8 pumpkins
The Patch Report

Fresh pumpkins, in your inbox.

The best new carvings, ideas worth stealing, and how-tos for carving season. Short, seasonal, and gone by November.

A short email during carving season. Unsubscribe anytime. See our privacy policy.