Halloween Pumpkin Carving Contest · Starts October 1st · $500 in prizes
← Back to ideas
@ai_concepts
Aug 28, 2026
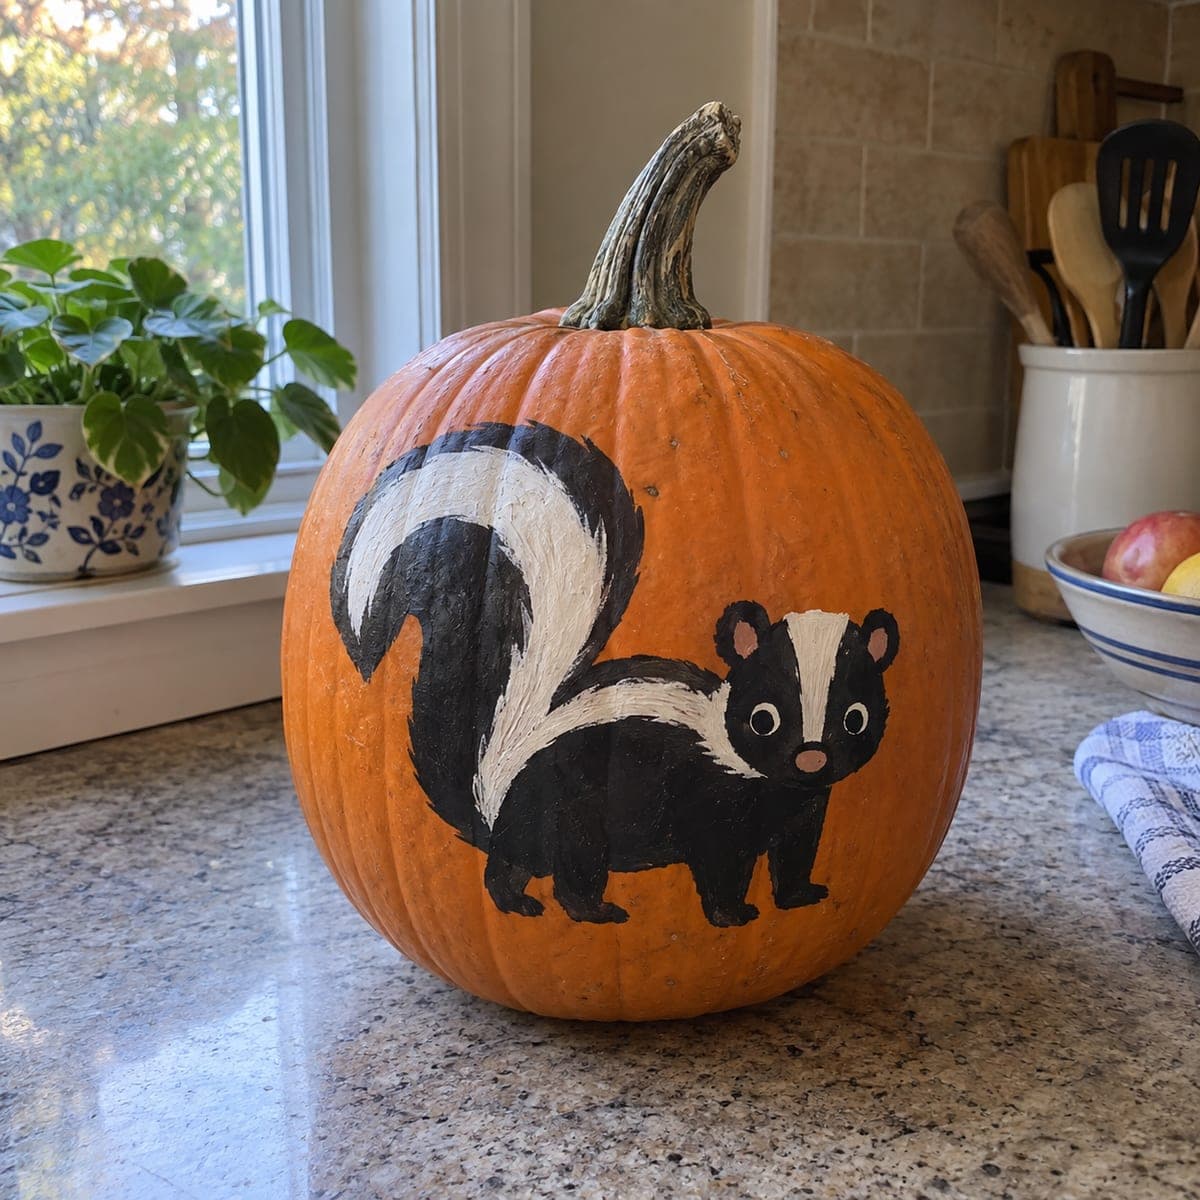
Cute Skunk No-Carve Pumpkin for the KitchenAI
0

Cute Skunk No-Carve Pumpkin for the Kitchen

A wide-eyed baby skunk with a huge sweeping striped tail is painted across this no-carve pumpkin, proof that even a stinky critter can be adorable. Black and white acrylics plus a dab of pink for the nose cover the entire palette. Paint the black body shape first and let it dry, then pull the white stripe through the tail with a single confident brushstroke so it keeps that fluffy curved motion.

This is an AI-generated concept image: a realistic, carvable design idea rather than a photo of a finished carve. AI concepts are always labeled and sit out the leaderboard and the contest.

No ratings yet · Sign in to rate
Comments (0)

  • No comments yet — be the first.

Save without an account. Sign in to like or comment.

Our tips for carving a similar design

The whole charm here is the big sweeping tail, and the trick is pulling one confident white stripe through a dried black shape so it keeps that soft curved motion. Plan it as a layered paint job on unbroken skin: block the black body and tail first, add the white stripe and face second, then finish with a pink nose. Because nothing is cut, the orange pumpkin itself acts as your warm background.

Written by PumpkinCarvingIdeas.com, inspired by the image above. These are our suggestions, not instructions from the uploader. This approach to the AI concept has not been tested on a real pumpkin.

From pumpkin to porch

  1. Prep the pumpkin surface

    Pick a tall pumpkin with a smooth, blemish-free front panel to give the skunk room. Wipe it down with a damp cloth and let it dry fully so paint grips well. Lightly sketch the body, curved tail, and head with a washable marker or a soft pencil. Keep the tail arching up and back so it fills the upper left the way the design shows.

  2. Block in the black body and tail

    Load a medium round brush with black acrylic and fill the body, legs, and the whole tail shape in smooth strokes. Follow the curve of the tail so your brush marks add to that fluffy sweep. Let this base coat dry completely before adding anything on top, since wet black will smear into your whites. A second black coat gives cleaner, richer coverage if the first looks patchy.

  3. Pull the white stripe and face

    With a clean brush and white acrylic, pull one confident stroke up through the tail so the stripe stays fluid and unbroken. Add the matching back stripe on the body, the two white cheek patches, and the little blaze between the eyes. Paint two white eye circles now so they read bright against the black. Let everything dry, then add small black pupils inside the eyes.

  4. Add the pink nose and clean edges

    Dab a small brush of pink acrylic for the round nose and, if you like, a soft hint inside the ears. Go back with black to sharpen any fuzzy edges and to define the ear outlines. Touch up the white with a second coat so the stripe pops. Small errors wipe away with a damp cotton swab while the paint is still fresh.

  5. Seal and stage for the photo

    Once fully dry, brush on a thin coat of clear acrylic sealer so the paint resists smudging and light moisture. Set the pumpkin on a counter or porch shelf where the front panel faces your camera. For evening ambiance, tuck a battery LED puck beside it rather than a candle, since this is a painted, uncut pumpkin. Snap your photo in soft daylight to show off the crisp black and white contrast.

Gather your supplies

Check things off as you get ready.

Work on a stable surface, keep your free hand out of the cutting path, and have an adult handle sharp tools.

Three levels of light

  • Leave intact

    The orange pumpkin skin stays bare as the background, since this is a no-carve painted design.

  • Peel & shade

    If you want a subtle glow, you could lightly peel a thin halo of skin around the skunk to frame it in dim orange.

  • Cut through

    Only if you want it lit from within, an adult could cut small openings for the eyes and let an LED shine through; otherwise leave the surface whole.

Learn the carving basics

Before you start cutting

Do I need to carve anything at all?

No, this design is fully painted, so you can skip the knife entirely. That makes it a great low-mess project for kids and beginners. If you later want a glowing version, an adult can add small optional eye cutouts, but the painted look stands on its own.

How do I get that smooth sweeping tail stripe?

Let the black base coat dry completely first so the white does not muddy. Then load your brush and pull one single, confident stroke that follows the curve of the tail rather than dabbing in short bits. A slightly wider brush helps keep the motion fluid, and a second coat once dry makes the white really pop.

Will the paint survive outdoors?

Acrylic holds up well on a clean, dry pumpkin, especially with a clear sealer coat on top. Keep it out of direct rain and bring it in on frosty nights to extend its life. A painted pumpkin like this can last far longer than a carved one because the shell stays intact.

Your take belongs here, too.

Changed a detail? Made it simpler? Share a photo of your version and tell the community what worked.

Share your pumpkin

More pumpkins like this

You've reached the end · 8 pumpkins
The Patch Report

Fresh pumpkins, in your inbox.

The best new carvings, ideas worth stealing, and how-tos for carving season. Short, seasonal, and gone by November.

A short email during carving season. Unsubscribe anytime. See our privacy policy.