Halloween Pumpkin Carving Contest · Starts October 1st · $500 in prizes
← Back to ideas
@ai_concepts
Sep 25, 2026
Glowing Bow Shading Pumpkin in PinkAI
0

Report this carving

Tell us what is wrong. Reports are private.

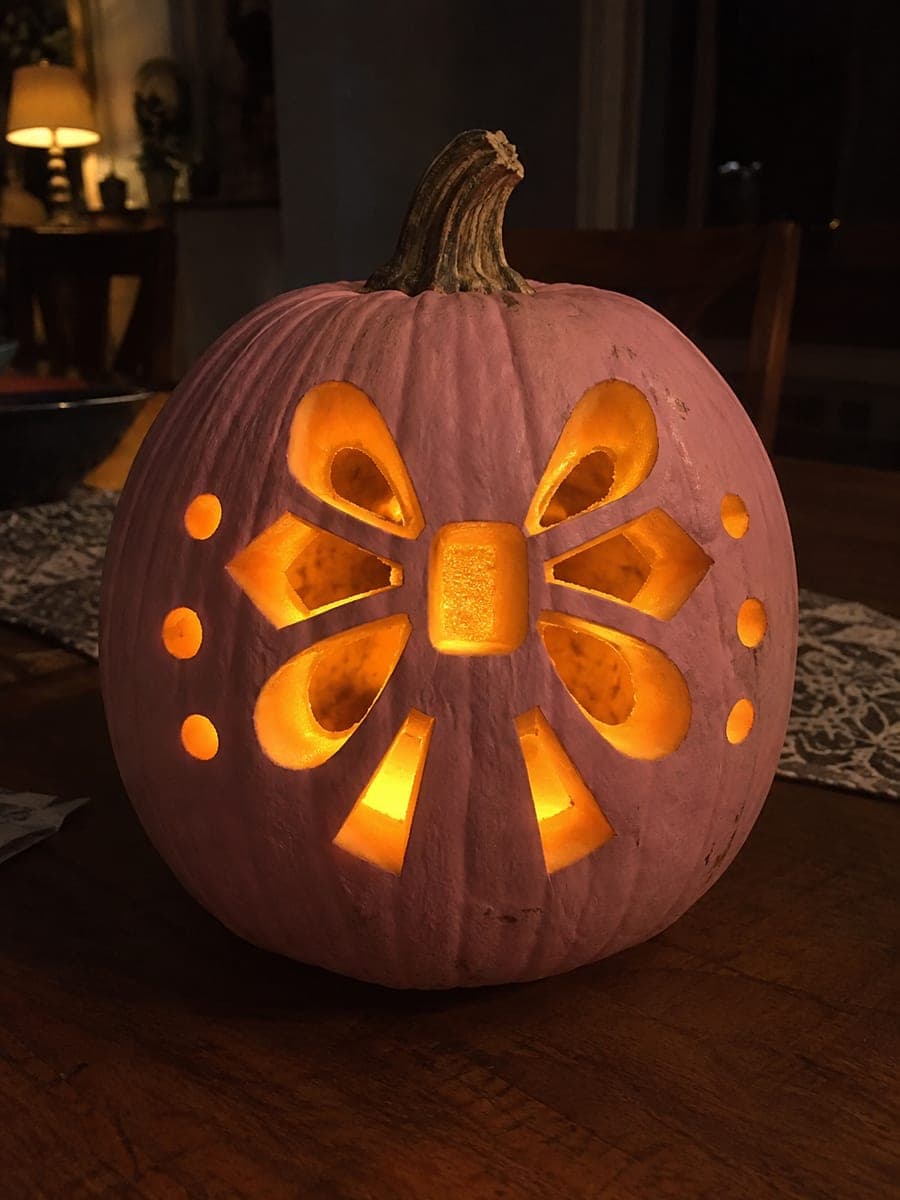
Glowing Bow Shading Pumpkin in Pink

Separate teardrop and diamond openings form the loops of a glowing bow on this pink pumpkin, with two ribbon-tail holes at the base and a shallow-scraped rectangular knot left as a backlit flesh area in the center. Paint the shell pink before carving, and cut the outer teardrop and diamond holes through completely while leaving the knot area intact and only thinned by scraping from the inside. Backlight with a battery-operated LED puck rather than a candle to protect the thinner scraped section.

No ratings yet · Sign in to rate
Comments (0)

  • No comments yet — be the first.

Save without an account. Sign in to like or comment.

Our tips for carving a similar design

The bow uses a combination of fully cut teardrop and diamond apertures for the loops and ribbon tails, while the center knot is thinned by scraping from inside so it glows softly rather than brightly through. Painting the shell pink first means cuts must be clean to avoid chipping, and a battery-powered LED puck protects the scraped knot section from heat cracking.

From pumpkin to porch

  1. Paint and fully cure the shell

    Apply two coats of pink paint and let the final coat cure for at least six hours. Shading work requires running a blade very close to cut edges, so soft paint will smear and chip.

  2. Hollow and scrape inside

    Remove the lid at an angle, scoop out seeds, and scrape the interior walls to about 2 cm everywhere. Mark the rectangular knot area on the outside, then from inside scrape that zone down to about 5 to 6 mm so it will glow when lit. An adult should handle all cutting.

  3. Transfer the bow template

    Draw or print the bow shape showing teardrop loops, diamond apertures, ribbon tails, and knot rectangle. Tape it to the pumpkin and toothpick-poke the outlines, then remove the paper and connect the dots with a fine-tip marker.

  4. Cut the teardrop loops and diamond holes

    Use a fine-toothed carving saw for the teardrop curves and a detail knife for the diamond corners. Cut all the way through on these shapes only; the knot rectangle stays intact. Remove each plug cleanly to avoid cracking the adjacent scraped zone.

  5. Cut the ribbon tail holes

    The two tail holes sit at the base of the bow. Cut them through fully in the same way as the loops. Keep at least 10 mm of rind between each tail hole and the surrounding cuts.

  6. Light with a battery LED puck

    Place a battery-powered LED puck rather than any candle inside. The scraped knot glows dimmer than the cut apertures, creating the three-dimensional look of a tied ribbon. Display on a dining table at night where the full bow is visible from the front.

Written with AI to match this design

Gather your supplies

Check things off as you get ready.

Work on a stable surface, keep your free hand out of the cutting path, and have an adult handle sharp tools.

Three levels of light

  • Leave intact

    The full painted shell and all rind outside the bow shape stay dark.

  • Peel & shade

    The rectangular center knot is scraped thin from inside so it emits a soft, diffused glow.

  • Cut through

    The teardrop loop apertures, diamond holes, and ribbon tail holes are cut fully through for bright light.

Learn the carving basics

Before you start cutting

How thin should I scrape the knot area, and how do I avoid cutting through?

Aim for 5 to 6 mm of remaining flesh in the knot zone. Work with a large metal spoon or loop gouge, checking thickness frequently by holding a flashlight against the outer shell. Stop scraping the moment you see a faint glow from outside.

Why use a battery LED instead of a candle for this design?

A candle concentrates heat near the top of the hollow interior. The scraped knot section is thin enough that sustained heat can crack or dry it prematurely. A cool LED puck eliminates that risk and lets the design last the full season.

The teardrop shape has a pointed tip. How do I keep the point sharp without breaking the rind?

Make the final cut toward the tip from both sides rather than pushing straight through. Two short angled cuts meeting at the tip give a cleaner point than one long stroke and reduce the chance of the thin tip cracking outward.

Your take belongs here, too.

Changed a detail? Made it simpler? Share a photo of your version and tell the community what worked.

Share your pumpkin

More pumpkins like this

You've reached the end · 8 pumpkins
The Patch Report

Fresh pumpkins, in your inbox.

The best new carvings, ideas worth stealing, and how-tos for carving season. Short, seasonal, and gone by November.

A short email during carving season. Unsubscribe anytime. See our privacy policy.