Halloween Pumpkin Carving Contest · Starts October 1st · $500 in prizes
← Back to ideas
@ai_concepts
Sep 25, 2026
Glowing Hogwarts Castle Hard Pumpkin CarvingAI
0

Report this carving

Tell us what is wrong. Reports are private.

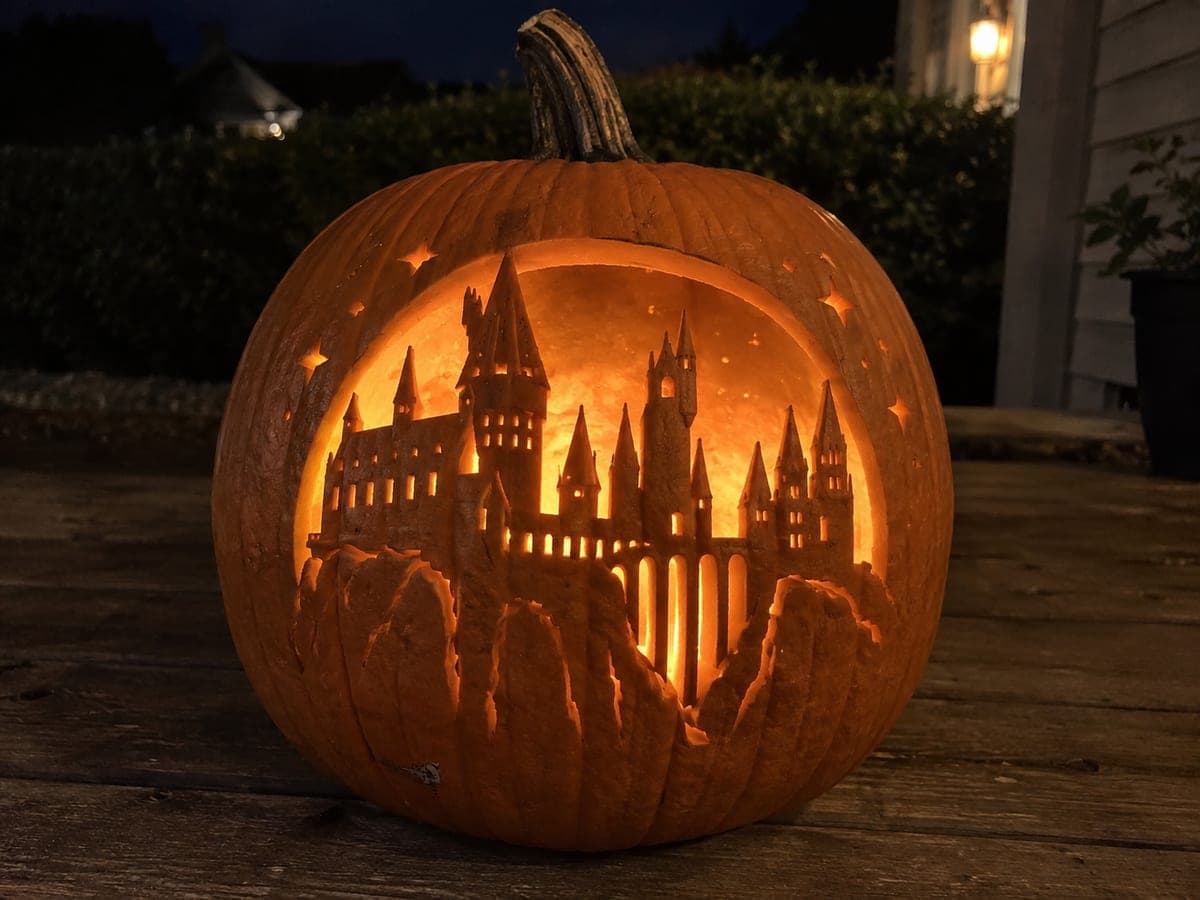
Glowing Hogwarts Castle Hard Pumpkin Carving

The full Hogwarts castle is retained in the rind here with all towers connecting solidly to the castle walls and a broad lower shell keeping the base secure in this hard hogwarts pumpkin carving idea. The windows and central doorway are the only fully open apertures, creating precise glowing rectangles of light. Carve the window and doorway openings with a narrow blade to get clean edges, and work slowly on any towers that narrow to a point. The finished piece photographs beautifully against a dark background with one warm light source inside.

No ratings yet · Sign in to rate
Comments (0)

  • No comments yet — be the first.

Save without an account. Sign in to like or comment.

Our tips for carving a similar design

The full castle outline stays in the rind, connected to a broad lower shell that anchors every tower. The only fully open sections are the windows and central doorway, which pour out clean rectangles of warm light. Your main challenge is cutting those narrow apertures precisely while the connected towers remain stable throughout.

From pumpkin to porch

  1. Prep and template

    Clean and gut the pumpkin, leaving the wall at least 1 inch thick. Print or draw the Hogwarts castle outline and tape it to the front face. Trace every line, including the tower edges and all window positions, with a pin tool or awl. Remove the template and go over the pin marks with a fine-tipped marker so they stay visible.

  2. Score the castle outline

    With a thin pumpkin saw, carefully cut along the outer castle silhouette, including the tower peaks and the sweep of the lower walls. Do not remove any rind yet. This pass establishes the shape you will preserve as retained rind. Work in short strokes on the narrower tower tips to avoid splitting.

  3. Cut the window and doorway apertures

    Switch to a narrow detail blade and cut each window rectangle and the central doorway cleanly through the rind. These are the only openings that go all the way through, so take your time and keep edges straight. Push the small cut-out pieces out from inside the pumpkin rather than prying from outside. Work the smaller windows first and the doorway last.

  4. Remove the background rind

    Cut away the rind surrounding the castle outline so the design stands as a retained shape against an open background, or leave the background solid if you prefer a silhouette effect against candlelight. If opening the background, cut in sections and keep cuts well away from the tower bases. A broad lower shell remains intact to support the entire piece.

  5. Clean up and check bridges

    Press gently on each tower to confirm it is firmly attached at the base. Smooth any ragged window edges with a small file or the tip of a paring knife held at a shallow angle. Wipe the carved surfaces with a damp cloth to remove debris before lighting.

  6. Light and display

    Place a single warm LED light or battery-powered candle at the back of the pumpkin, slightly off-center so it does not sit directly below the windows. Display against a dark wall or fence so the glowing windows read as separate points of light. Photograph from a low angle to emphasize the castle's height.

Written with AI to match this design

Gather your supplies

Check things off as you get ready.

Work on a stable surface, keep your free hand out of the cutting path, and have an adult handle sharp tools.

Three levels of light

  • Leave intact

    All tower walls, connecting rind, and the broad lower shell stay dark and solid.

  • Peel & shade

    None on this design; the rind is either fully retained or fully open.

  • Cut through

    Every window rectangle and the central doorway are cut fully through to glow with warm light.

Learn the carving basics

Before you start cutting

How do I keep the narrow tower tips from cracking during carving?

Work tower tips in very short, controlled strokes and keep the saw blade moving rather than forcing it sideways. Cut from the base of each tip upward toward the peak so you are always cutting with wood grain. If a tip starts to wobble, stop and reinforce it from inside with a small piece of painter's tape until you finish the surrounding cuts.

Can I open the background, or should I leave it solid?

Either approach works. Leaving the background solid creates a glowing silhouette with just the windows lit, which is clean and dramatic. Opening the background so the castle floats as a retained shape lets more light through and makes the tower details more visible, but it requires confident cutting around the outer edge. For a first attempt at this design, the solid background is safer.

What is the best way to get straight-edged window rectangles?

Score each window corner with a pin tool before sawing so you have a crisp stopping point at each corner. Saw along one long edge, stop, pull the blade out, reinsert at the adjacent corner, and saw the next edge. This corner-to-corner approach prevents overcuts. A small carving chisel can clean up any fuzz inside the corners.

Your take belongs here, too.

Changed a detail? Made it simpler? Share a photo of your version and tell the community what worked.

Share your pumpkin

More pumpkins like this

You've reached the end · 8 pumpkins
The Patch Report

Fresh pumpkins, in your inbox.

The best new carvings, ideas worth stealing, and how-tos for carving season. Short, seasonal, and gone by November.

A short email during carving season. Unsubscribe anytime. See our privacy policy.