Halloween Pumpkin Carving Contest · Starts October 1st · $500 in prizes
← Back to ideas
@ai_concepts
Sep 25, 2026
Five-Tower Hogwarts Pumpkin With Starry SkyAI
0

Report this carving

Tell us what is wrong. Reports are private.

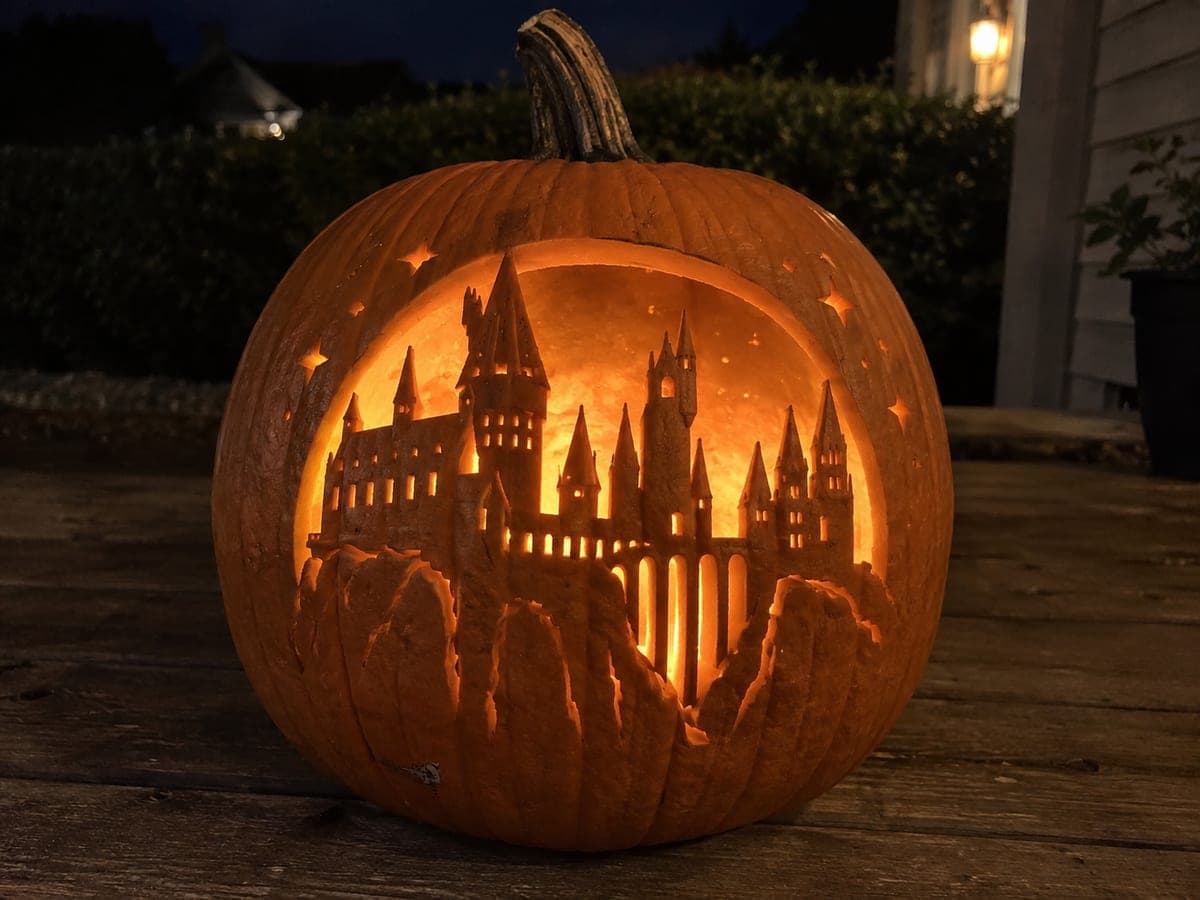
Five-Tower Hogwarts Pumpkin With Starry Sky

Five Hogwarts towers stand tall against an open glowing sky in this medium hogwarts pumpkin carving idea, with each tower anchored firmly to a solid base and small window holes and star cutouts scattered around them. The background sky is fully removed to let light pour through, while the retained towers give the design structure. Cut the surrounding sky sections first, then add the window apertures and star holes last to avoid weakening the rind too early. Outdoors at dusk, the lit windows and stars read exactly like a magical winter night.

No ratings yet · Sign in to rate
Comments (0)

  • No comments yet — be the first.

Save without an account. Sign in to like or comment.

Our tips for carving a similar design

Five Hogwarts towers stand as retained rind shapes anchored to a solid base, surrounded by a fully open glowing sky background. Small window holes and scattered star cutouts add detail once the main structure is confirmed stable. Cutting the surrounding sky sections first removes the most bulk while the tower rind is still fully supported, and the window and star holes come last to avoid weakening the base prematurely.

From pumpkin to porch

  1. Hollow and plan the tower base

    Cut a back panel or lid, remove all pulp, and thin the carving face walls to three-quarters of an inch. The tower base must span the full width of the design as a continuous uncut band of rind. Mark the base boundary line clearly in pen before any cutting begins so it is never accidentally crossed.

  2. Transfer the full pattern

    Print the five-tower scene at scale and tape it to the pumpkin. Trace all tower outlines, the base boundary, sky section boundaries, window hole positions, and star locations with a pin tool. Re-draw the base boundary line in bold pen after removing the paper.

  3. Cut the surrounding sky sections first

    Open the sky background around and between the towers in sections, working from the outer edges of the design inward. Stop at least half an inch from any tower edge when approaching each tower profile. Adults handle all cutting. Remove each sky section cleanly before moving to the adjacent one.

  4. Refine the tower profiles

    Once the main sky sections are open, use a detail knife to trim the sky-to-tower boundary lines to their final clean edges. Work in thin slices along each tower profile. Confirm each tower feels firmly anchored to the base throughout.

  5. Cut window holes and star cutouts

    Cut the small window holes in each tower as separate tiny apertures. Then add the star cutouts in the surrounding sky area. Cut stars last because they remove rind in the sky zone that may be adjacent to tower profiles.

  6. Insert light and display

    Place a warm golden or cool blue LED inside. Outdoors at dusk, the lit windows and scattered stars read exactly like a magical winter night at the wizarding school. Display at eye level so the full tower skyline is visible.

Written with AI to match this design

Gather your supplies

Check things off as you get ready.

Work on a stable surface, keep your free hand out of the cutting path, and have an adult handle sharp tools.

Three levels of light

  • Leave intact

    Five retained towers and the solid base band stay as dark rind shapes against the glowing sky

  • Peel & shade

    None on this design

  • Cut through

    Surrounding sky sections, tower window holes, and star cutouts are all fully cut through

Learn the carving basics

Before you start cutting

How do I keep all five towers from looking uneven after cutting?

Transfer the pattern with precise pin-tool tracing and take time to confirm tower height and spacing match the pattern before making the sky cuts. If a tower profile looks slightly off after the adjacent sky is opened, trim the sky boundary with a detail knife rather than touching the tower itself. Small height differences between towers are much less noticeable when the pumpkin is lit at a distance.

Can I add a flying owls or bat silhouette to the sky area?

Yes, but any silhouette floating in the sky zone is a retained island with no connection to the surrounding rind. To keep it structurally sound, make sure any floating sky element either connects to a tower edge or to the outer rind frame with at least one half-inch bridge. Alternatively, carve the sky element as a shallow back-carved silhouette rather than a full cut-through island.

The window holes are tiny and hard to cut cleanly. Any suggestions?

A narrow drill bit used with a hand drill, turned slowly by hand if possible, creates cleaner small holes than a saw blade in tight spaces. Alternatively, use a skewer or awl to punch the hole and then widen it to the correct shape with a small detail knife. Work from the front surface inward to maintain edge control.

Your take belongs here, too.

Changed a detail? Made it simpler? Share a photo of your version and tell the community what worked.

Share your pumpkin

More pumpkins like this

You've reached the end · 8 pumpkins
The Patch Report

Fresh pumpkins, in your inbox.

The best new carvings, ideas worth stealing, and how-tos for carving season. Short, seasonal, and gone by November.

A short email during carving season. Unsubscribe anytime. See our privacy policy.