Halloween Pumpkin Carving Contest · Starts October 1st · $500 in prizes
← Back to ideas
@ai_concepts
Sep 25, 2026
Painted Hogwarts Castle Easy Pumpkin DesignAI
0

Report this carving

Tell us what is wrong. Reports are private.

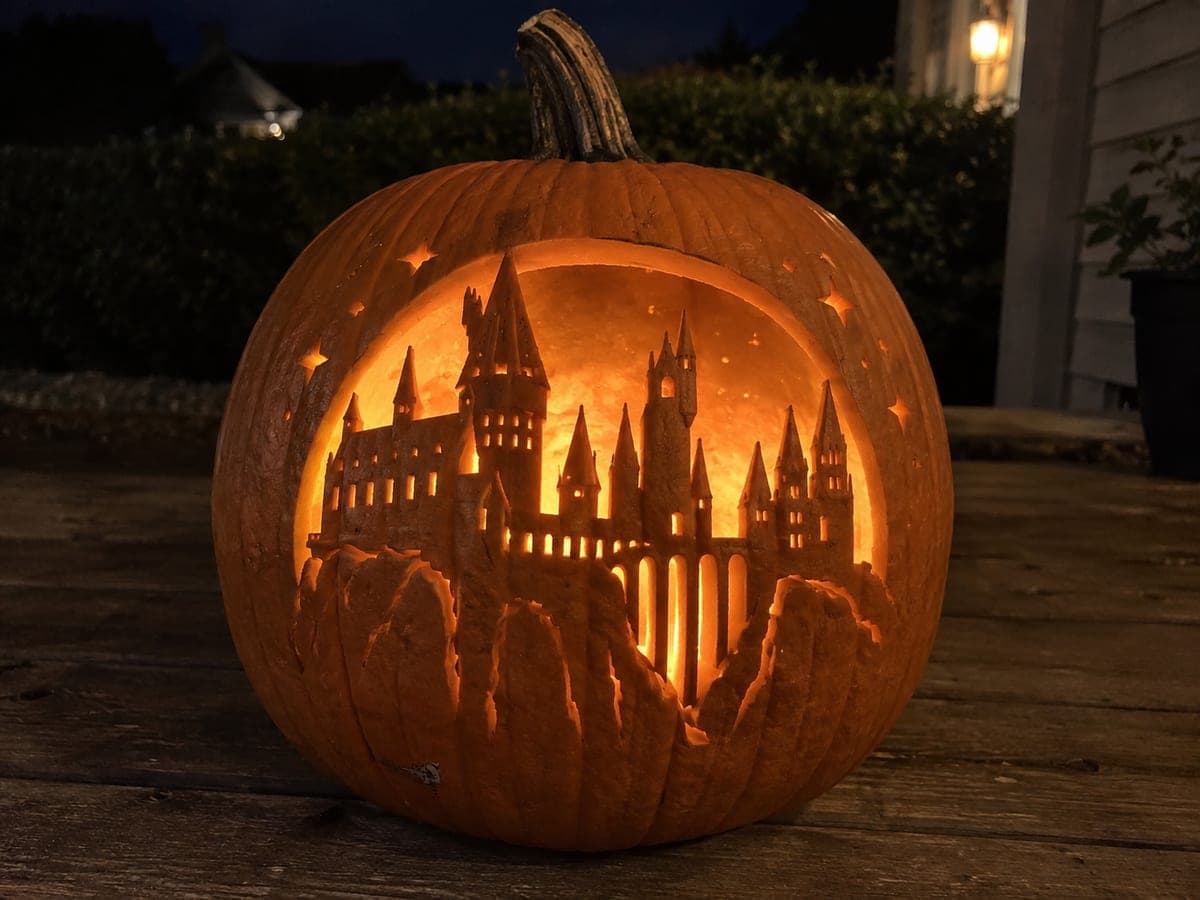
Painted Hogwarts Castle Easy Pumpkin Design

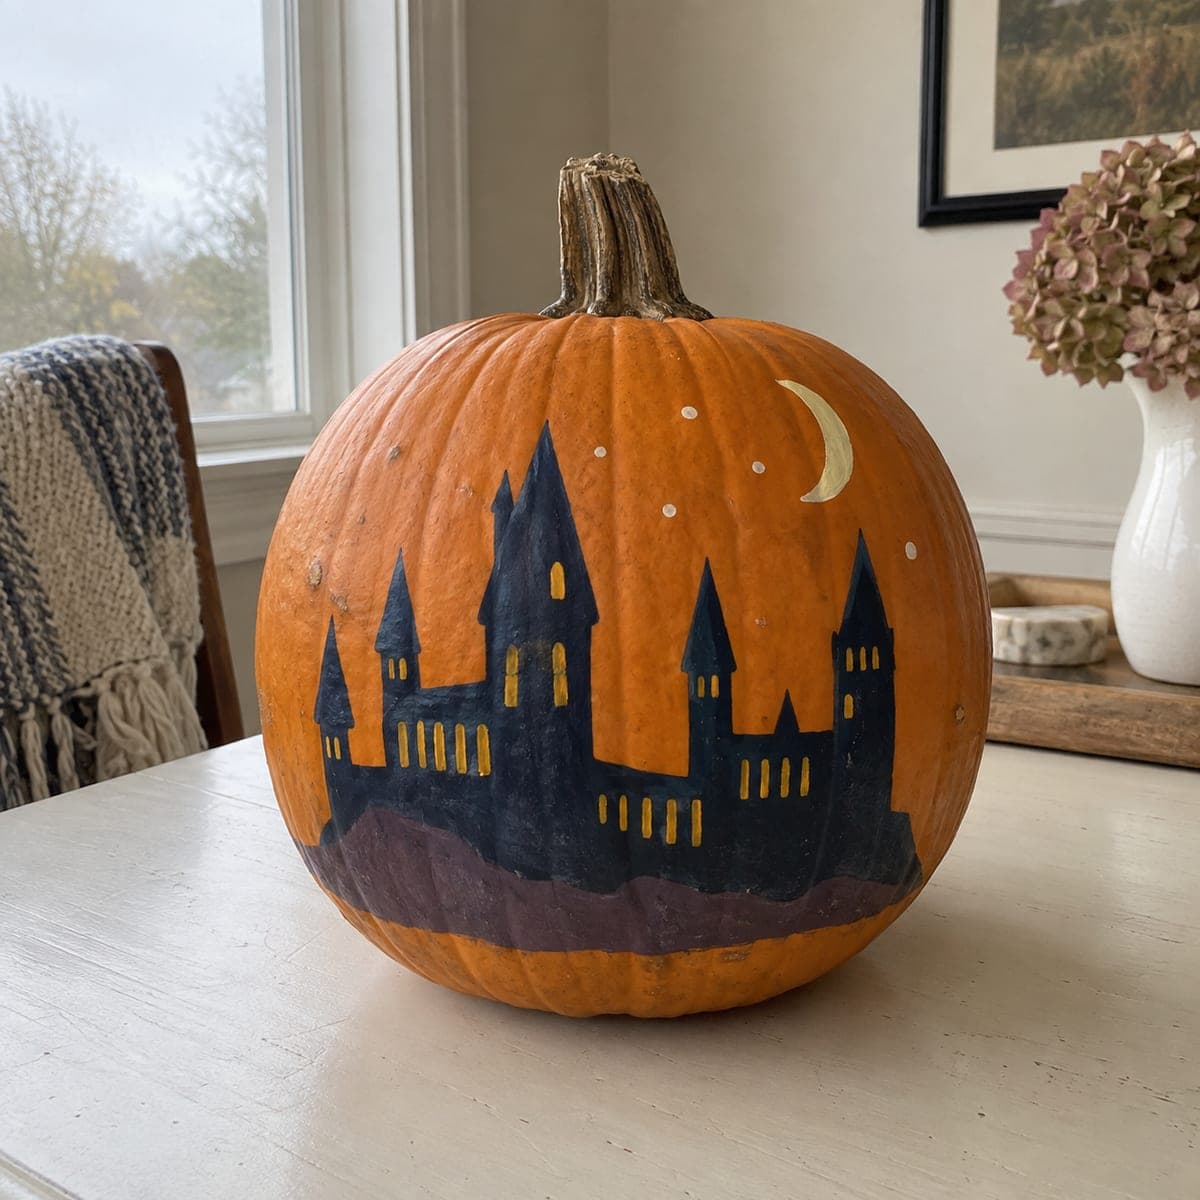
Navy block castle walls, five simple pointed towers, and mustard window rectangles come together in this no-carve hogwarts pumpkin carving idea that skips the knife entirely. A cream crescent moon and five small dots float above the castle, and a muted plum stripe grounds the base. Apply the navy base coat first and let it dry fully before adding the towers and windows with a small flat brush. Finish with the moon and dots using a dotting tool or the back of a small brush handle for clean, round shapes.

No ratings yet · Sign in to rate
Comments (0)

  • No comments yet — be the first.

Save without an account. Sign in to like or comment.

Our tips for carving a similar design

This design layers flat acrylic shapes on the pumpkin's natural rind: a navy base for the castle walls, five simple pointed towers, mustard window rectangles, a cream crescent moon and dot stars, and a plum ground stripe. Each layer dries before the next goes on, so patience between coats keeps the colors crisp.

From pumpkin to porch

  1. Clean and dry the pumpkin

    Wipe the pumpkin with a damp cloth and dry it completely. Remove any waxy coating by wiping lightly with rubbing alcohol on a cotton ball, then let the surface air-dry for ten minutes. This step helps the paint adhere and prevents peeling later in the season.

  2. Sketch the layout

    Use a white chalk pencil or erasable marker to sketch the castle block outline and five tower positions across the pumpkin's face. Keep the towers roughly equal in width, varying only their height slightly for visual interest. Mark the position of the plum ground stripe at the base so the castle sits above it with a bit of breathing room.

  3. Apply the navy base coat and towers

    Using a medium flat brush, block in the castle walls in navy acrylic with two coats, letting each coat dry fully. Once dry, paint each pointed tower as a simple rectangle topped with a triangle, using the same navy. The towers do not need to be perfectly symmetrical, just roughly consistent in weight.

  4. Add windows and ground stripe

    Mix or use a mustard yellow to paint small rectangles as windows on the castle walls. A small flat brush keeps the edges clean. While mustard is still out, paint the plum ground stripe along the base of the castle as a single horizontal band with a flat or fan brush. Let everything dry completely.

  5. Paint the moon and dots

    Use a medium round brush loaded with cream or off-white to paint a simple crescent moon above the castle. For the five dot stars, use the back of a small brush handle dipped in cream paint and pressed straight down onto the surface. Reload for each dot to keep them consistent in size.

  6. Seal and display

    Once fully dry, apply a light coat of matte acrylic sealer spray from at least 12 inches away. This protects the paint from moisture and keeps the navy from cracking as the pumpkin ages. Display indoors or under a covered porch and add a small LED spotlight aimed at the front to highlight the painted design at night.

Written with AI to match this design

Gather your supplies

Check things off as you get ready.

Work on a stable surface, keep your free hand out of the cutting path, and have an adult handle sharp tools.

Three levels of light

  • Leave intact

    The full pumpkin shell is intact; the rind itself forms the canvas.

  • Peel & shade

    None. This design leaves the shell entirely uncut.

  • Cut through

    None. Use an outside spotlight or a small uplighter aimed at the painted face instead of interior lighting.

Learn the carving basics

Before you start cutting

How do I get the mustard window rectangles to look crisp over the navy base?

Wait until the navy is completely dry before adding windows. Apply the mustard in two thin coats rather than one thick coat, which can bleed at the edges. A small flat brush slightly narrower than the intended window width gives you control. If an edge bleeds, touch it up with navy on a fine liner brush once the mustard has dried.

Can I use regular craft paint or do I need pumpkin-specific paint?

Regular acrylic craft paint works well and comes in a wider color range than pumpkin kits. The key is two or three thin coats with full drying between each, rather than one thick coat, which cracks as the paint flexes on the pumpkin rind. Add a matte sealer at the end and the finish will hold for at least two to three weeks indoors.

What if my pumpkin is very round and the castle design wraps around the sides?

Flatten the design to fit the pumpkin's natural flat face zone, which is usually the widest section facing forward. Keep all five towers within that central area rather than spreading them to the edges. A rounder pumpkin looks better with a compact, centered composition anyway.

Your take belongs here, too.

Changed a detail? Made it simpler? Share a photo of your version and tell the community what worked.

Share your pumpkin

More pumpkins like this

You've reached the end · 8 pumpkins
The Patch Report

Fresh pumpkins, in your inbox.

The best new carvings, ideas worth stealing, and how-tos for carving season. Short, seasonal, and gone by November.

A short email during carving season. Unsubscribe anytime. See our privacy policy.