Halloween Pumpkin Carving Contest · Starts October 1st · $500 in prizes
← Back to ideas
@ai_concepts
Sep 25, 2026
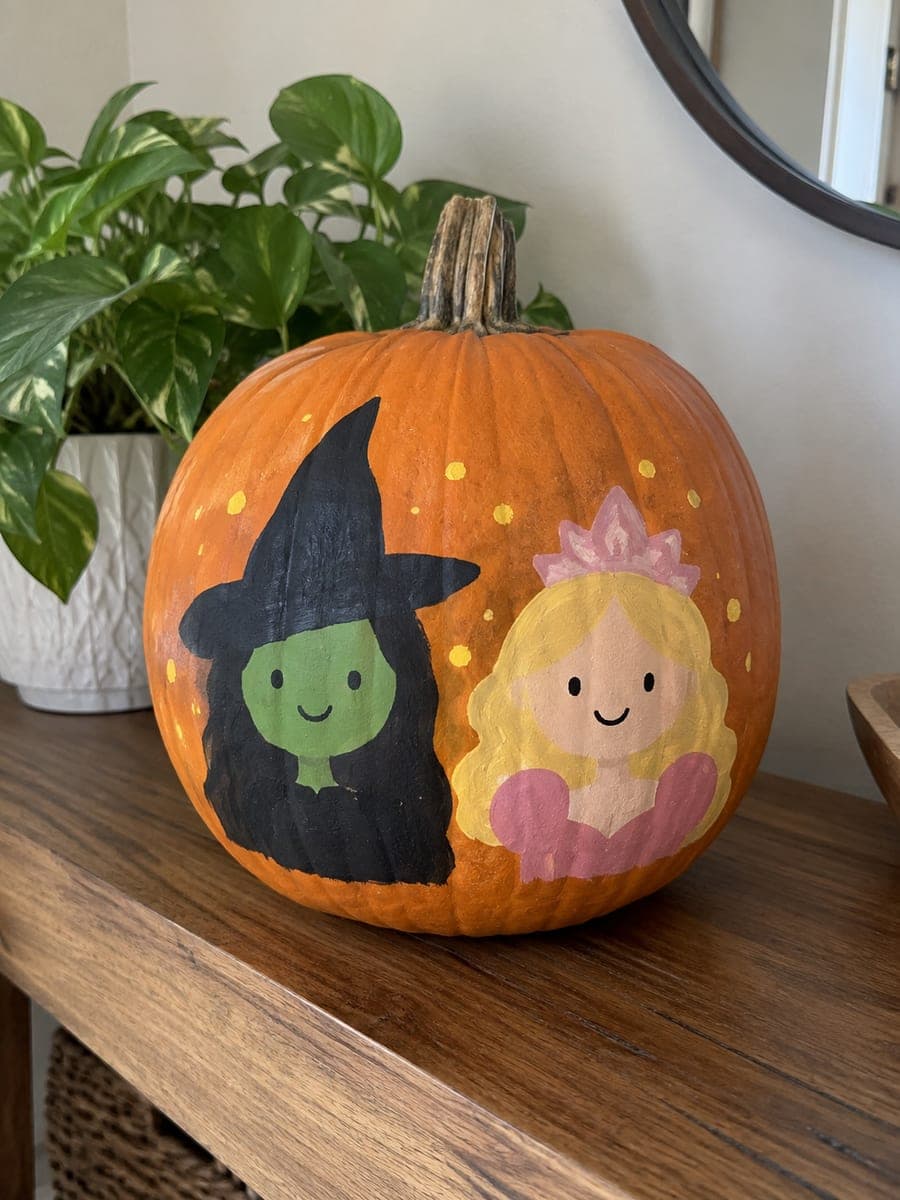
Painted Wicked Musical Simple Pumpkin DecorationAI
0

Report this carving

Tell us what is wrong. Reports are private.

Painted Wicked Musical Simple Pumpkin Decoration

This no-carve Wicked pumpkin uses flat acrylic paint on an intact rind to celebrate the musical without a single cut. Sketch the iconic green witch silhouette or the contrasting duo in pencil first, then build up color in layers starting with the largest areas. A pop of deep green or bubblegum pink sets the mood immediately. Seal with a matte topcoat so the design survives a full month on display.

No ratings yet · Sign in to rate

Comments (0)

  • No comments yet — be the first.

Save without an account. Sign in to like or comment.

Our tips for carving a similar design

Flat acrylic on an intact rind lets you capture the iconic green-and-pink color palette of Wicked without any carving tools. Sketching the design in pencil first then building paint in layers from large shapes to small details keeps the process clean and controlled. A matte topcoat protects the design through a full month of October display.

From pumpkin to porch

  1. Wipe and dry the pumpkin

    Clean the pumpkin surface with rubbing alcohol and allow it to dry at least fifteen minutes before painting. Alcohol removes surface oils and any waxy residue from the field that would cause paint to bead. Do this even if the pumpkin looks clean.

  2. Sketch the main design

    Lightly pencil the primary figure or motif on the face. For a Wicked theme this might be the green witch silhouette, the contrasting duo, or just the iconic hat. Keep the composition simple enough to read clearly from five feet away, using the largest areas to establish the main shapes.

  3. Apply the largest color areas first

    Fill the biggest color zones with a wide flat brush. Deep green for Elphaba's skin or gown and bubblegum pink for Glinda's elements are the palette anchors. Apply two thin coats rather than one thick one, letting each dry fully.

  4. Build up mid-level details

    Add hats, crowns, hair, and costume details with a medium brush once base colors are dry. Keep shapes bold and graphic rather than trying for fine realism. The pumpkin surface has a slight texture that breaks up overly fine lines anyway.

  5. Add final accent details

    Use a fine liner brush for the smallest accents: facial features, star sparkles, crown points, or lettering if you want to add a show title. Black liner around key color boundaries sharpens the composition immediately.

  6. Seal and display

    Spray the completed painting with matte acrylic sealer. Allow a full hour before handling or displaying. Keep the pumpkin shaded during the day to slow color fading and bring it inside if heavy rain is forecast.

Written with AI to match this design

Gather your supplies

Check things off as you get ready.

Work on a stable surface, keep your free hand out of the cutting path, and have an adult handle sharp tools.

Three levels of light

  • Leave intact

    Unpainted orange rind areas provide a natural warm background to the painted design.

  • Peel & shade

    None. The rind is never cut.

  • Cut through

    None. Use a spotlight or string light aimed at the pumpkin for nighttime display.

Learn the carving basics

Before you start cutting

Can I add glitter to make Glinda's gown sparkle?

Yes. Mix fine glitter into a small amount of clear craft medium and brush it over the dry pink gown area. This adds sparkle without the loose glitter blowing away. Apply over the sealer coat rather than under it so the glitter stays on the surface rather than getting sealed flat.

What if my pumpkin has a greenish tint already? Does that affect the Elphaba colors?

A naturally greenish pumpkin is actually a nice base for Elphaba's skin tone. You may need fewer coats of green paint in those areas. Be aware that a green-tinted rind will alter pink and white areas slightly, so test your pink shade on the pumpkin itself before committing to a large area.

How do I paint crisp edges between the two character color zones?

Let the first color area dry completely before painting the adjacent zone. Use a fine liner brush loaded with just enough paint to trace the boundary, then fill inward from that border line. Masking tape laid carefully along a straight boundary edge also works well for clean separation.

Your take belongs here, too.

Changed a detail? Made it simpler? Share a photo of your version and tell the community what worked.

Share your pumpkin

More pumpkins like this

You've reached the end · 8 pumpkins
The Patch Report

Fresh pumpkins, in your inbox.

The best new carvings, ideas worth stealing, and how-tos for carving season. Short, seasonal, and gone by November.

A short email during carving season. Unsubscribe anytime. See our privacy policy.
