Halloween Pumpkin Carving Contest · Starts October 1st · $500 in prizes
← Back to ideas
@ai_concepts
Sep 25, 2026
Hard Football Motif Jack-O-Lantern CarvingAI
0

Report this carving

Tell us what is wrong. Reports are private.

Hard Football Motif Jack-O-Lantern Carving

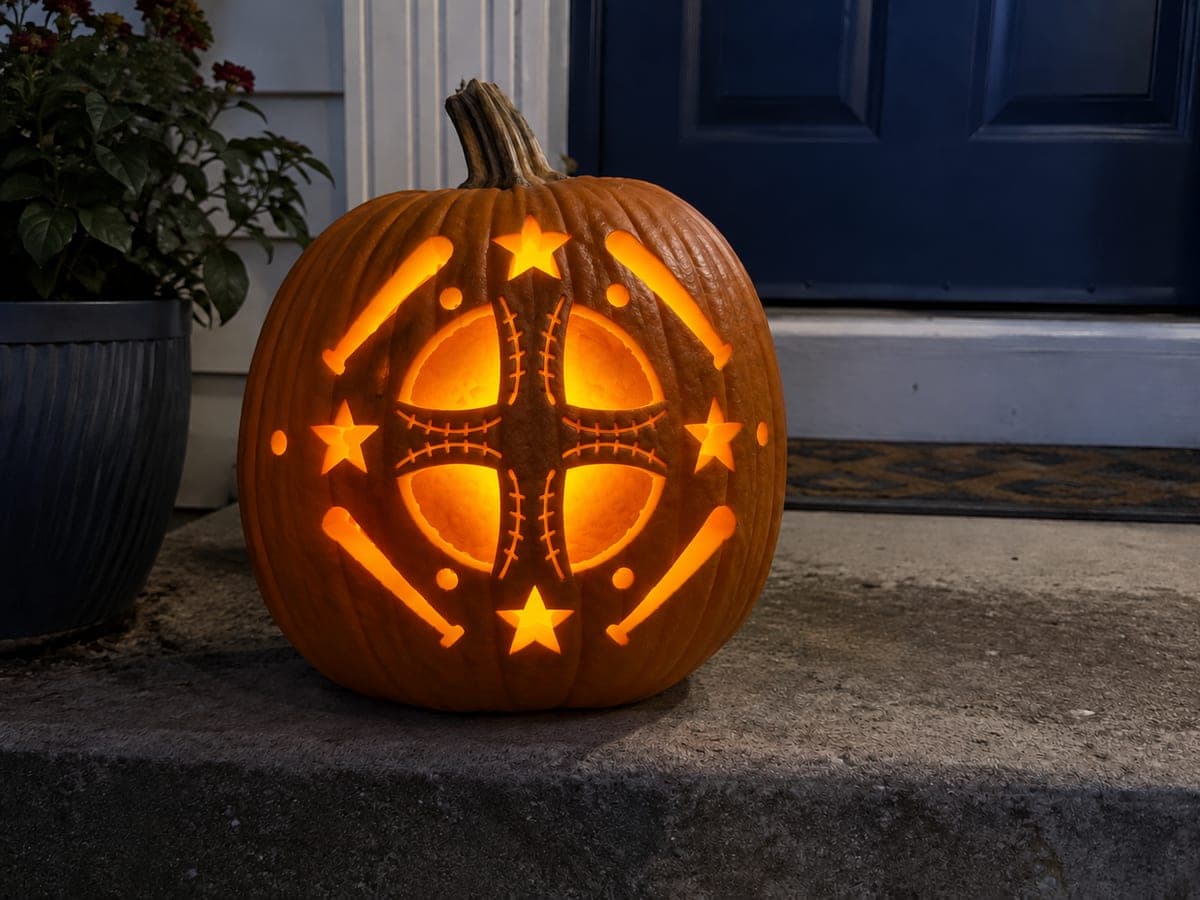
This hard football pumpkin carving idea brings a complex gridiron design to life with precisely cut apertures supported by connected rind bridges. The tight lace and seam details require a fine detail blade and steady hand. Carve the large open panels first to remove bulk, then switch to the smaller detail blade for lacing and markings. A focused directional LED inside casts dramatic shadows through the intricate shapes.

No ratings yet · Sign in to rate

Comments (0)

  • No comments yet — be the first.

Save without an account. Sign in to like or comment.

Our tips for carving a similar design

The hard version adds precise seam curves and multiple tight lace bars to the basic football oval, requiring two separate blade types and methodical sequencing. Large open panels are removed first to lighten the load on the shell, then the fine lacing and markings follow with a detail blade. A focused directional LED casts dramatic shadows through the finished design.

From pumpkin to porch

  1. Prep for a long session

    Refrigerate the pumpkin briefly to firm the flesh, then cut a bottom entry and scoop thoroughly. Scrape interior walls to an even three-quarter-inch depth. Lay out all your blades and a pin tool before starting; switching tools mid-carve is easier when everything is within reach.

  2. Transfer the full stencil

    Tape the football template firmly over the pumpkin face and pin-transfer all lines: the outer oval, the seam arcs, and every individual lace bar. Use three different pin spacings to distinguish through-cuts, score lines, and lace slots at a glance after the stencil is removed.

  3. Remove large open panels first

    Cut the two main elongated open panels of the football shape with a medium saw, staying well inside any bridge lines. This bulk removal reduces resistance and leaves the shell with predictable balance for the finer work ahead.

  4. Cut lace bars with a detail blade

    Switch to a narrow blade for the lace slots. Cut each bar from the top of the design downward so your hand does not cross already-cut areas. Ease each cut piece out with a toothpick rather than wiggling the blade, which can chip adjacent rind.

  5. Score seam arcs

    Use a linoleum gouge or paring knife tip to score the curved seam lines, removing only the outer skin layer. Seam arcs that are cut all the way through can weaken the oval shape's structural integrity.

  6. Light with a directional LED

    A small adjustable spotlight LED aimed at the back interior wall creates dramatic shadows through the lace slots rather than a uniform glow. Display the pumpkin where viewers approach from the front for maximum effect.

Written with AI to match this design

Gather your supplies

Check things off as you get ready.

Work on a stable surface, keep your free hand out of the cutting path, and have an adult handle sharp tools.

Three levels of light

  • Leave intact

    Outer shell border, bridge bands, and all background rind stay completely dark.

  • Peel & shade

    Surface-scored seam arcs glow faintly where the outer skin is removed but flesh remains.

  • Cut through

    Large open panels and all individual lace bar slots are cut through for full, sharp glow.

Learn the carving basics

Before you start cutting

The lace bars keep cracking into adjacent rind. How do I prevent this?

Support the rind on both sides of each lace bar with your non-cutting hand as you saw, especially near the endpoints. Cut inward from both ends of the bar toward the center rather than running the blade in one long pass from end to end.

How do I keep the curved seam lines looking smooth when I score them?

Use a single continuous stroke for each arc rather than short choppy passes. Chill the pumpkin beforehand so the skin resists tearing, and keep the scoring tool at a low angle so it shaves rather than digs. Practice the stroke on a removed rind scrap before committing to the display piece.

Is a directional spotlight really better than a standard LED puck for this design?

For a design with fine lace slots, a directional light aimed at the back wall creates focused beams through each slot, which look more dramatic than a puck's uniform diffused glow. If you only have a puck, place it on its side and angle it toward the carved face for a similar effect.

Your take belongs here, too.

Changed a detail? Made it simpler? Share a photo of your version and tell the community what worked.

Share your pumpkin

More pumpkins like this

You've reached the end · 8 pumpkins
The Patch Report

Fresh pumpkins, in your inbox.

The best new carvings, ideas worth stealing, and how-tos for carving season. Short, seasonal, and gone by November.

A short email during carving season. Unsubscribe anytime. See our privacy policy.