Halloween Pumpkin Carving Contest · Starts October 1st · $500 in prizes
← Back to ideas
@ai_concepts
Sep 25, 2026
Hard Baseball and Bat Pumpkin CarvingAI
0

Report this carving

Tell us what is wrong. Reports are private.

Hard Baseball and Bat Pumpkin Carving

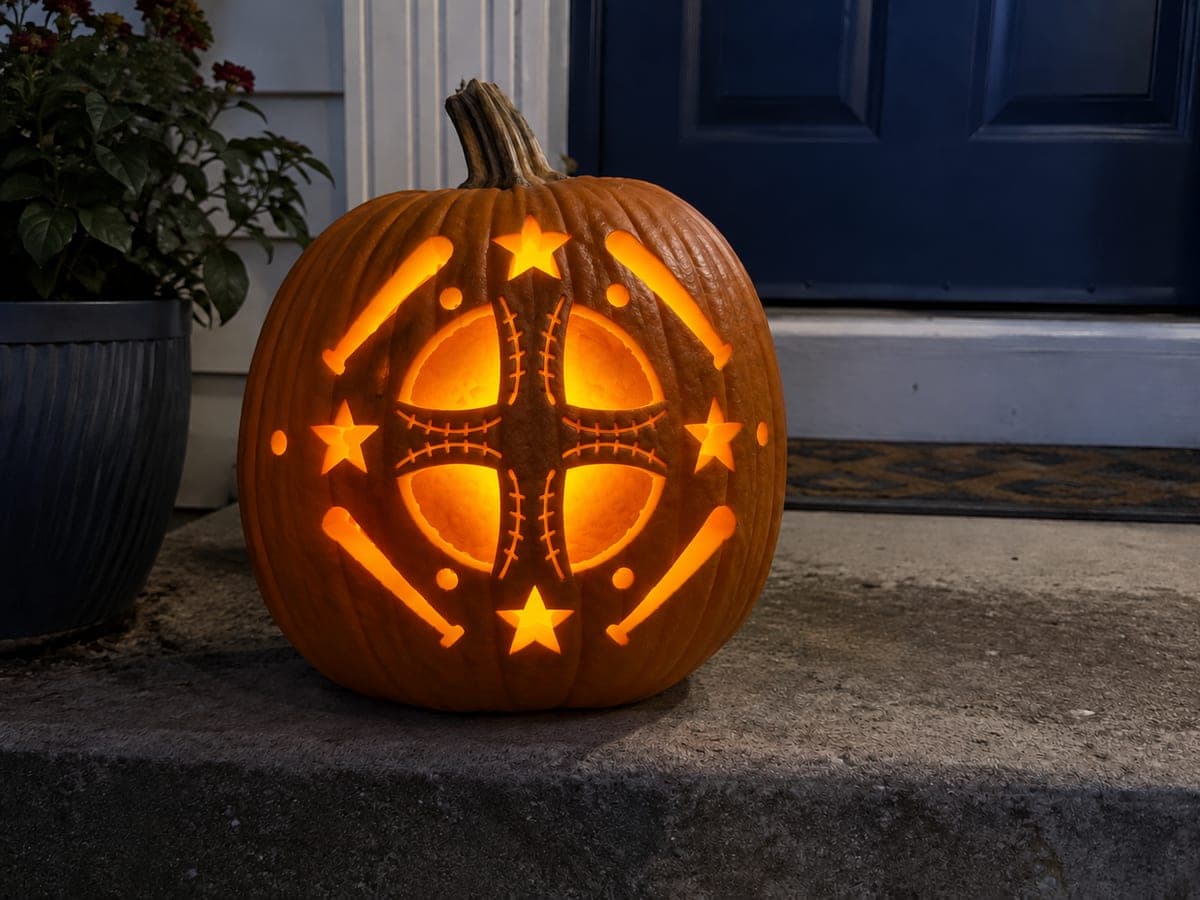
A crossed bat and baseball design with through-cut apertures and surface-scored seam lines makes this a satisfying hard baseball pumpkin carving idea. The crossed bats form an X-shaped aperture that must stay anchored at the handle ends and upper barrel tips. Score the seam arcs shallowly rather than cutting all the way through to preserve rind integrity. A bright white LED inside highlights the contrast between open cuts and scored lines.

No ratings yet · Sign in to rate
Comments (0)

  • No comments yet — be the first.

Save without an account. Sign in to like or comment.

Our tips for carving a similar design

The crossed-bat X-shape is an aperture anchored at the handle ends and upper barrel tips, with the baseball centered in the crossing zone. Seam arcs are surface-scored rather than cut through to preserve the rind's structural integrity around a design that already has many openings. Scoring the seams after all cut-throughs are complete keeps the work sequence clean.

From pumpkin to porch

  1. Chill and prep

    Refrigerate the pumpkin for an hour before starting so the flesh is firm enough for clean seam scoring later. Cut a bottom entry, scoop completely, and scrape the interior wall to an even three-quarter-inch thickness throughout the design area.

  2. Transfer with two pin spacings

    Use dense pin spacing for all cut-through lines: bat silhouettes, ball aperture, and any other openings. Use sparse spacing for seam arc score lines. This separation prevents accidentally cutting a seam arc all the way through during the main carving phase.

  3. Cut the bat silhouettes first

    Work each bat shape from handle to barrel with a medium saw. The X-junction where the bats cross must stay anchored; approach it from both angles and let the blade meet in the center rather than trying to cut through the junction in a single stroke.

  4. Cut the baseball aperture

    The baseball shape in the crossing zone is surrounded by bat rind on multiple sides. Use a narrow blade for close-quarters cutting, entering at the top of the ball and working around its circle with careful, controlled strokes. Keep the seam arcs' rind fully intact.

  5. Score the seam arcs

    Switch to a linoleum gouge or paring knife tip for the curved seam lines. Score shallowly across the rind, removing only the outer green skin, in smooth single arcs. Test glow with a flashlight inside to confirm each seam line is visible before moving to the next.

  6. Light and finish

    Insert a bright white LED, which emphasizes the contrast between open bat apertures and scored seam detail. Coat all cut and scored surfaces with petroleum jelly and display on a porch railing or step where the full design reads at eye level.

Written with AI to match this design

Gather your supplies

Check things off as you get ready.

Work on a stable surface, keep your free hand out of the cutting path, and have an adult handle sharp tools.

Three levels of light

  • Leave intact

    Rind at the X-junction, bat handle ends, and outer shell border stay completely dark.

  • Peel & shade

    Surface-scored seam arcs glow faintly where the outer skin is removed.

  • Cut through

    Bat silhouette openings and the baseball circle are cut completely through.

Learn the carving basics

Before you start cutting

The bat X-junction is the trickiest part. How do I cut it without cracking?

Treat the junction as four separate rind strips meeting at a central point. Cut each bat from its tip toward the junction but stop a quarter inch short. Then use a detail blade to remove the small remaining rind triangles at the center, shaving them away a thin slice at a time rather than sawing.

My seam arcs look uneven compared to each other. Does it matter?

A real baseball's two seam arcs are mirror images, so visible asymmetry is noticeable up close. If one arc is deeper or wider than the other, view from display distance first. If the difference is still distracting, carefully deepen the shallower arc to match rather than trying to reduce the deeper one.

Should the bats overlap fully in the center or just cross at the barrels?

Full overlap through the center creates an X-shaped aperture that reads clearly at night, and is the structurally simplest version because the junction is one connected opening. Partial crossing at the barrels with separate bat apertures requires more bridge work and is better suited to an expert version.

Your take belongs here, too.

Changed a detail? Made it simpler? Share a photo of your version and tell the community what worked.

Share your pumpkin

More pumpkins like this

You've reached the end · 8 pumpkins
The Patch Report

Fresh pumpkins, in your inbox.

The best new carvings, ideas worth stealing, and how-tos for carving season. Short, seasonal, and gone by November.

A short email during carving season. Unsubscribe anytime. See our privacy policy.