Halloween Pumpkin Carving Contest · Starts October 1st · $500 in prizes
← Back to ideas
@ai_concepts
Sep 25, 2026
Curved Softball Stitch Rows Glowing Pumpkin CarvingAI
0

Report this carving

Tell us what is wrong. Reports are private.

Curved Softball Stitch Rows Glowing Pumpkin Carving

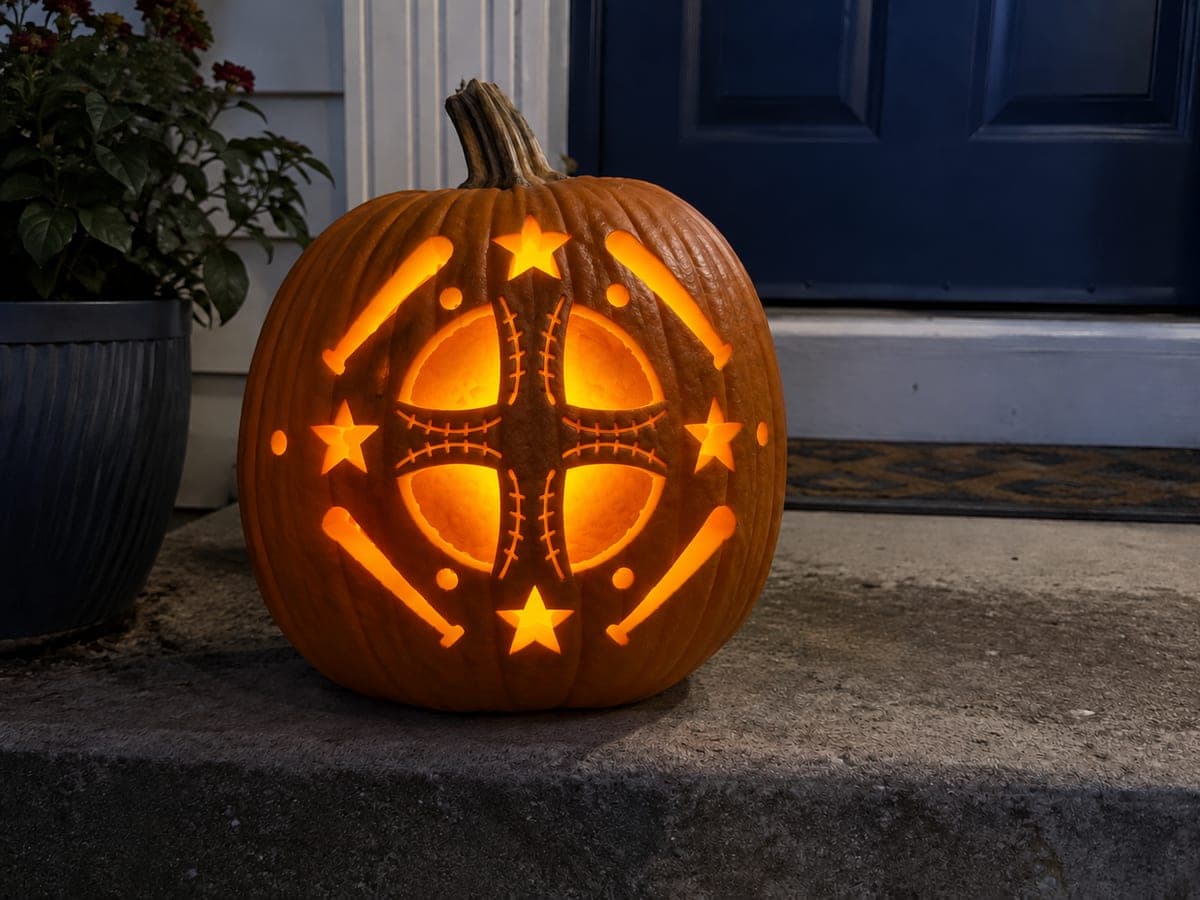
Two opposing curved stitch-hole rows frame a bold softball silhouette in this intermediate softball pumpkin carving idea. The stitch holes cut through cleanly while the curved seam lines between them are kept as shallow backed grooves for detail. Pin-transfer both arcs onto the pumpkin before cutting to keep them symmetrical. A warm amber LED inside turns each small stitch hole into a glowing dot arc.

No ratings yet · Sign in to rate

Comments (0)

  • No comments yet — be the first.

Save without an account. Sign in to like or comment.

Our tips for carving a similar design

Two opposing curved stitch-hole arcs provide the through-cut element, while the curved seam lines between them are kept as shallow backed grooves so the full softball silhouette reads on the rind. The backed seams add context that makes the stitch holes read as part of a ball rather than an abstract pattern. An amber LED suits the warm, rounded design.

From pumpkin to porch

  1. Prep and hollow

    Cut from the base, hollow the interior, and scrape the wall to three-quarters of an inch evenly. The backed seam lines require a smooth, consistent rind surface for clean grooves, so choose a pumpkin with a relatively flat, unblemished face.

  2. Transfer the full design

    Tape the template to the pumpkin and prick both stitch-hole arcs and both curved seam lines. Remove the template and connect the prick marks with a marker, using one color for the through-cut stitch holes and another for the backed seam lines.

  3. Score the seam lines first

    Before cutting any hole, score both curved seam lines with a V-tool at a consistent shallow depth. Scoring first means the seam lines are cleanly defined as the context for the stitch holes before any structural material is removed.

  4. Cut the stitch holes along the first arc

    Cut each oval stitch hole with a narrow detail blade or punch, working from one end of the first arc to the other. Keep holes small and consistently sized. Leave the backed seam line immediately adjacent to each hole intact.

  5. Cut the stitch holes along the second arc

    Repeat along the second arc, working in the same direction. Hold the pumpkin up to a light between the two arcs to check spacing symmetry. Adjust any holes that look noticeably out of place by slightly elongating the cut.

  6. Light and display

    A warm amber LED inside gives each stitch dot a golden glow that suits the softball theme beautifully. Display at table height where the scored seam lines are visible alongside the glowing stitch dots for the complete design to read at once.

Written with AI to match this design

Gather your supplies

Check things off as you get ready.

Work on a stable surface, keep your free hand out of the cutting path, and have an adult handle sharp tools.

Three levels of light

  • Leave intact

    The broad rind between and outside the arcs remains solid and dark.

  • Peel & shade

    The two curved seam lines are shallow backed score grooves with a soft warm glow.

  • Cut through

    Every individual stitch hole in both curved arcs is cut fully through.

Learn the carving basics

Before you start cutting

How deep should the seam line scores be?

Score the seam lines to a depth of about one-eighth of the rind thickness, enough to expose the pale flesh beneath the orange outer skin and create a visible groove in daylight. Too deep risks weakening the rind near the stitch holes; too shallow leaves the lines invisible at night. Test depth on a bottom section of the pumpkin first.

My two stitch arcs are not quite symmetrical. Is there a fix?

Minor asymmetry is difficult to see when the design is lit, but if the difference is significant, extend one or two holes at the ends of the shorter arc to visually balance the lengths. Avoid removing existing holes; adding to one arc is easier and less risky than modifying the other.

Should I carve the seam lines before or after the stitch holes?

Score the seam lines first. Scoring before cutting the holes gives you a complete picture of the full design on the rind before any structural material is removed. It also confirms the seam lines and stitch arcs are properly spaced relative to each other.

Your take belongs here, too.

Changed a detail? Made it simpler? Share a photo of your version and tell the community what worked.

Share your pumpkin

More pumpkins like this

You've reached the end · 8 pumpkins
The Patch Report

Fresh pumpkins, in your inbox.

The best new carvings, ideas worth stealing, and how-tos for carving season. Short, seasonal, and gone by November.

A short email during carving season. Unsubscribe anytime. See our privacy policy.